Step by Step instruction
-
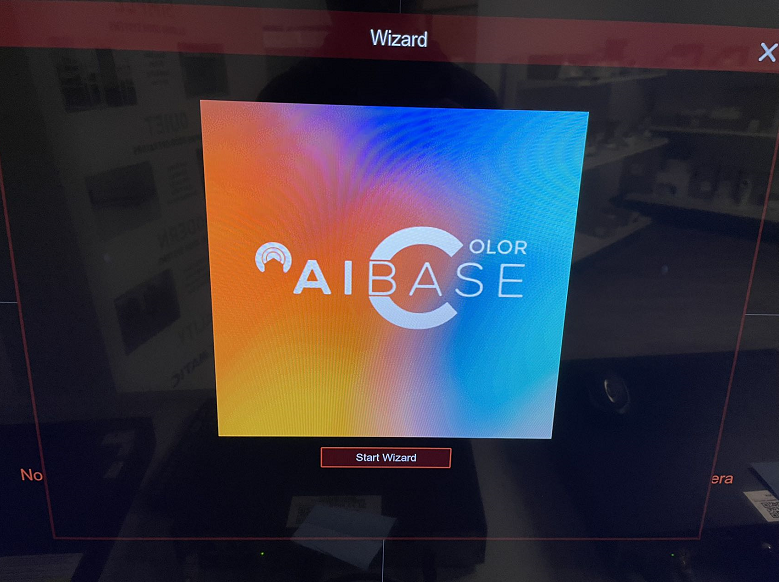
Press start wizard
-
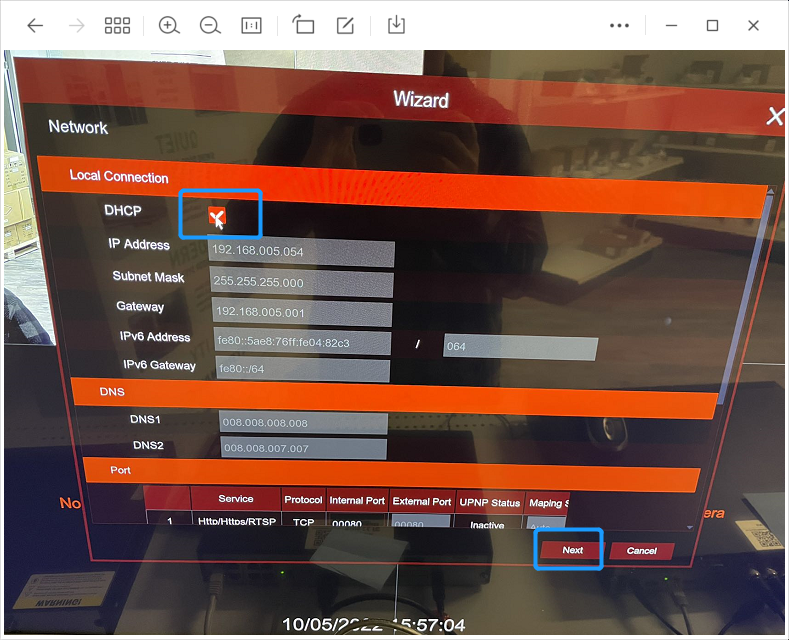
please put DHCP on to let your recorder have internet access. you could also modify your IP to the ip you want in this step.
-
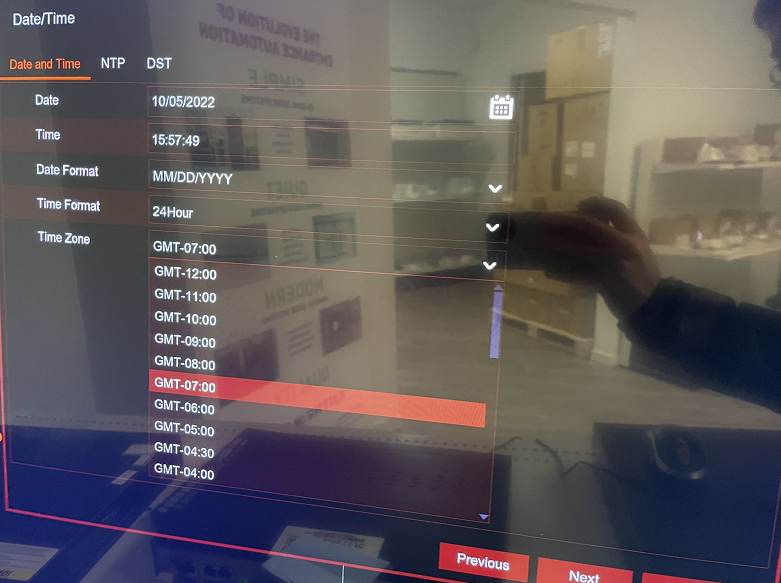
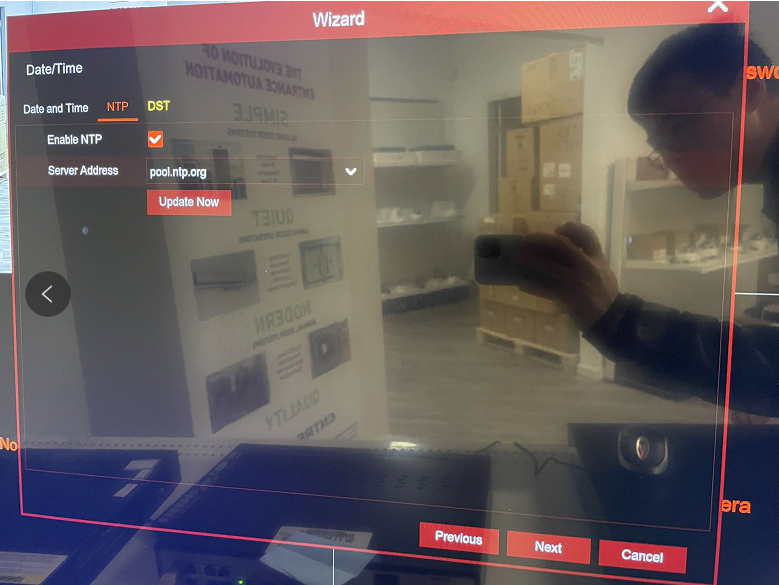
please select your time zone and the current time, you can also enable NTP time server to ensure the time is correct
-
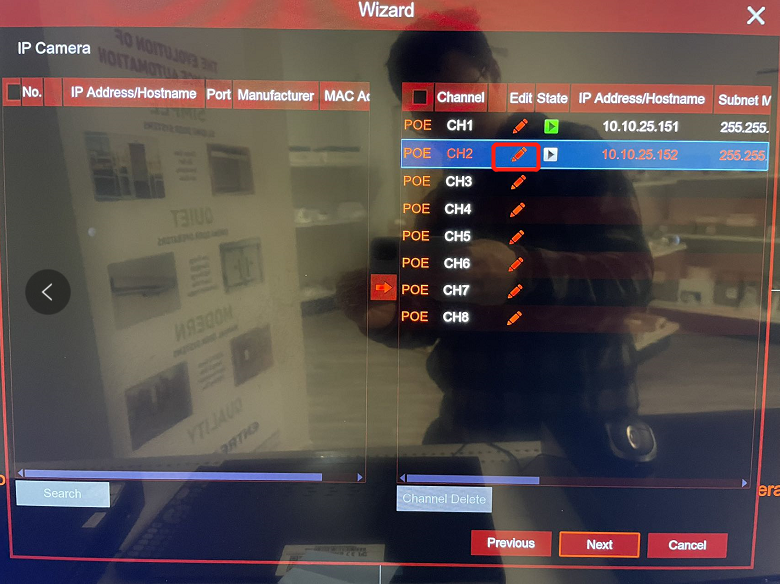
Existing camera or the cameras on the build-in POE port of the NVR will show on the left list, you can also add camera from left search list and edit the camera's password to add your cameras on the external POE switch.
-
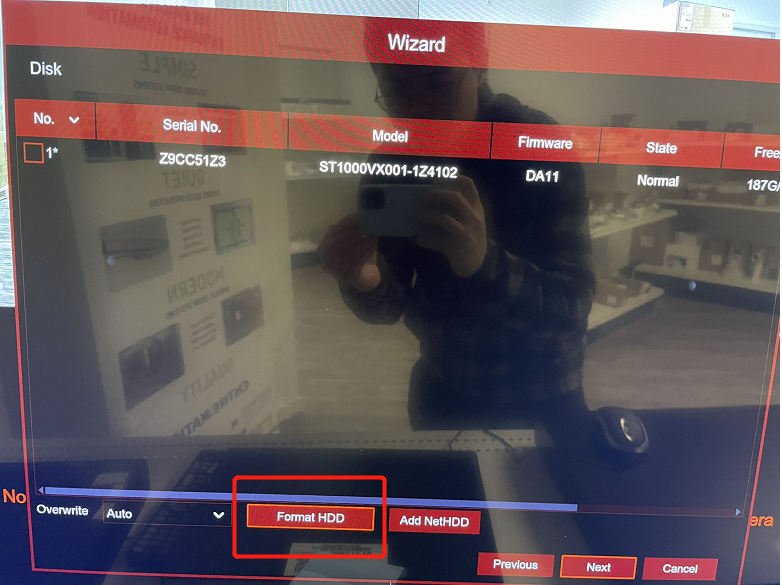
If you are first time use, please format HDD first before use.
-
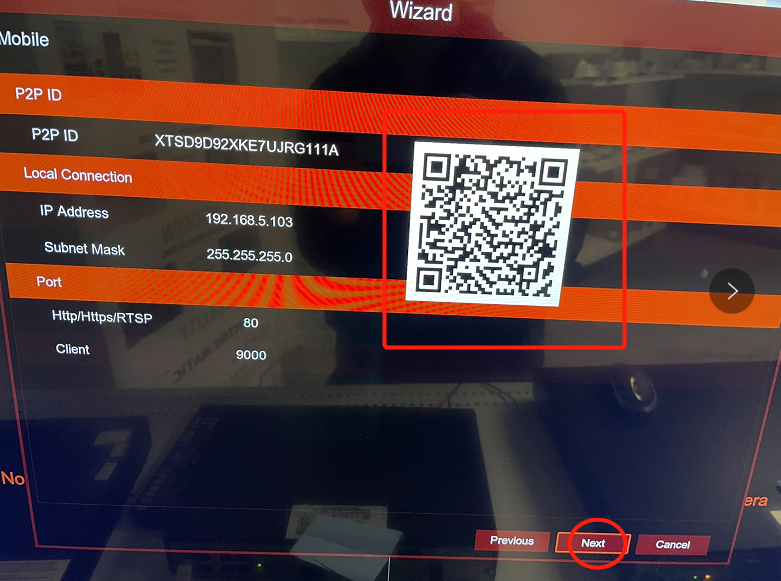
You can use your AI Color app to scan this** QR code** to add this device to your phone
-
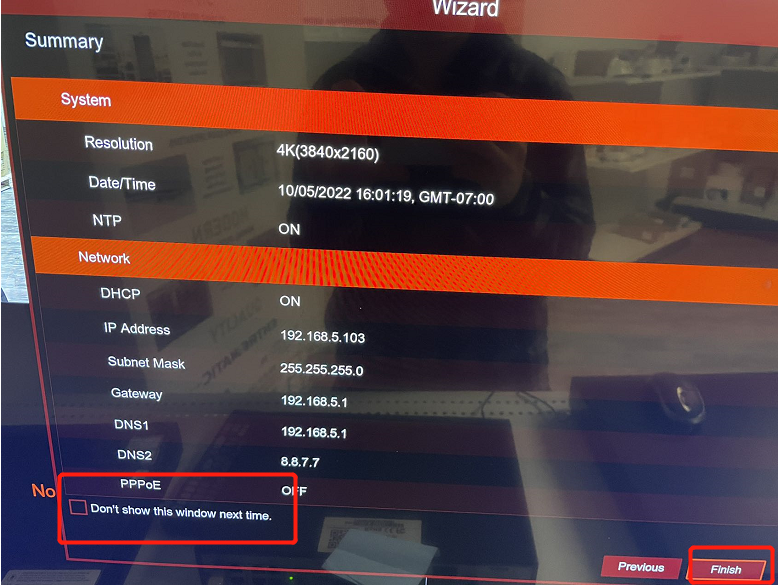
If all configs are good, please press finish and chick Don't show this window next time
How to modify recorder and camera’s IP address?
- Updated on 07 Oct 2022
- 1 Minute to read
In NVR local interface
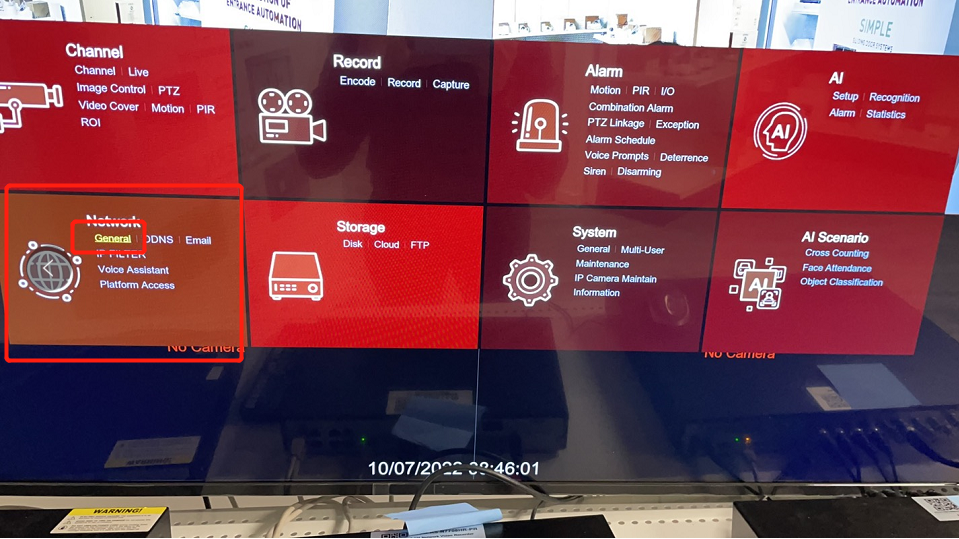
Go to NVR mean manu----Network----General
option1: checkmark the DHCP box
option2: change the IP, Gateway and DNS address to match your current network.

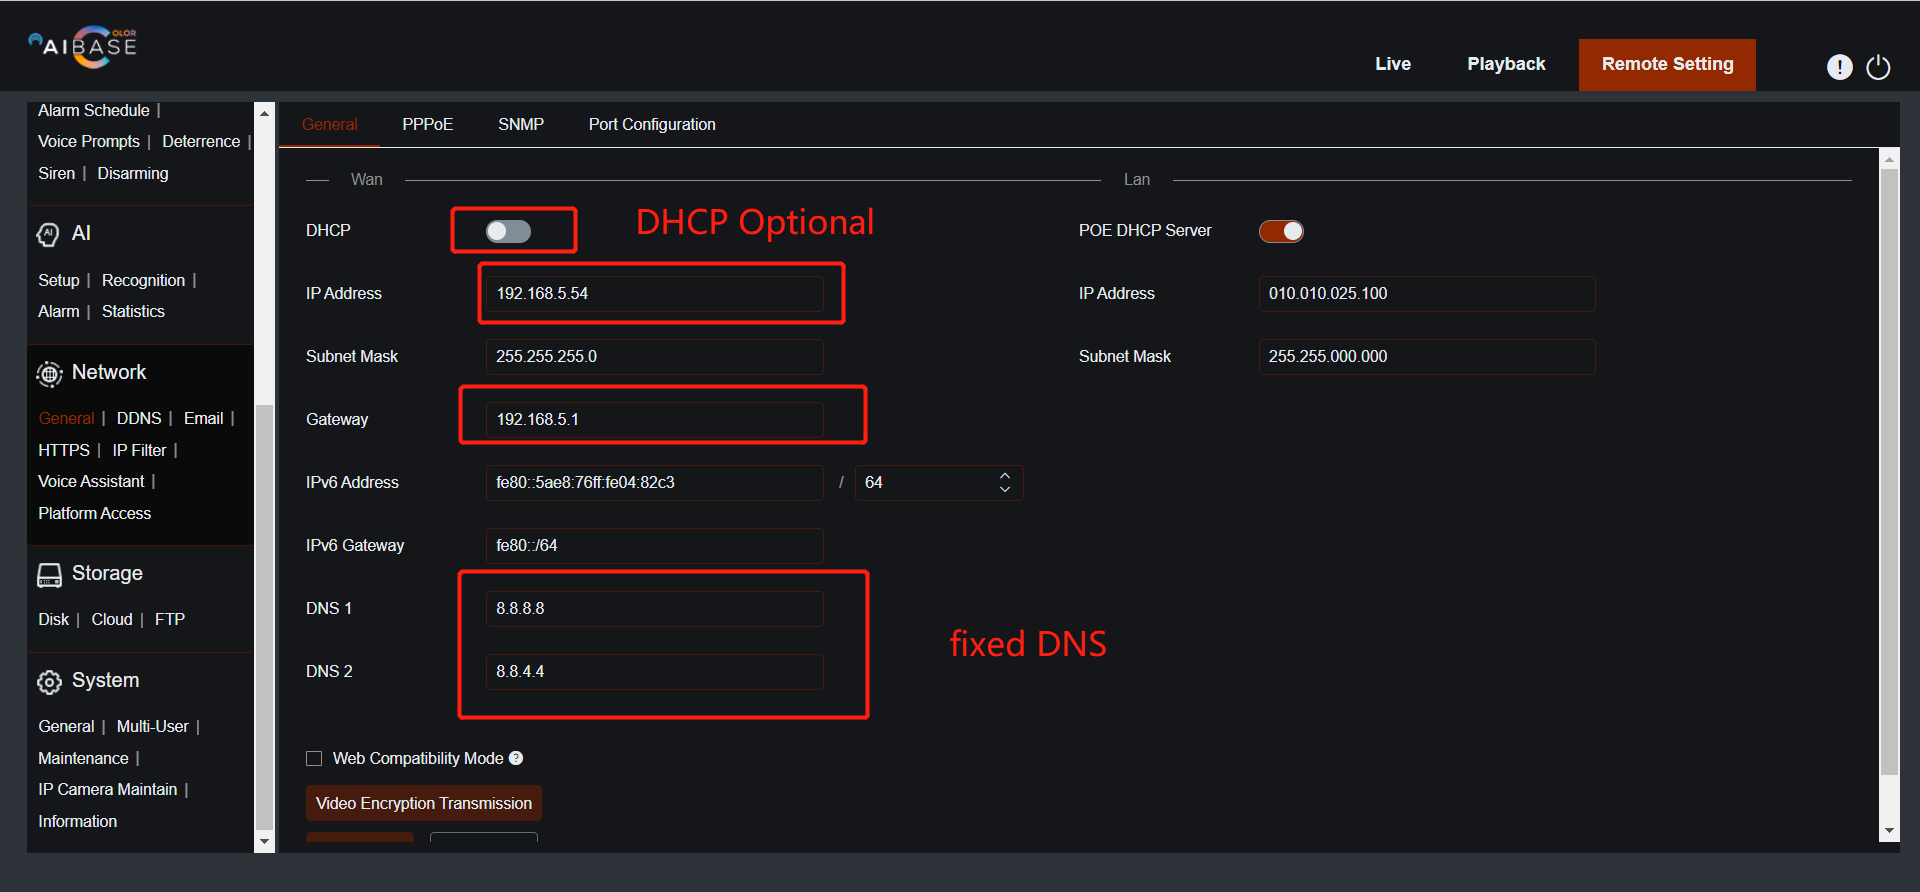
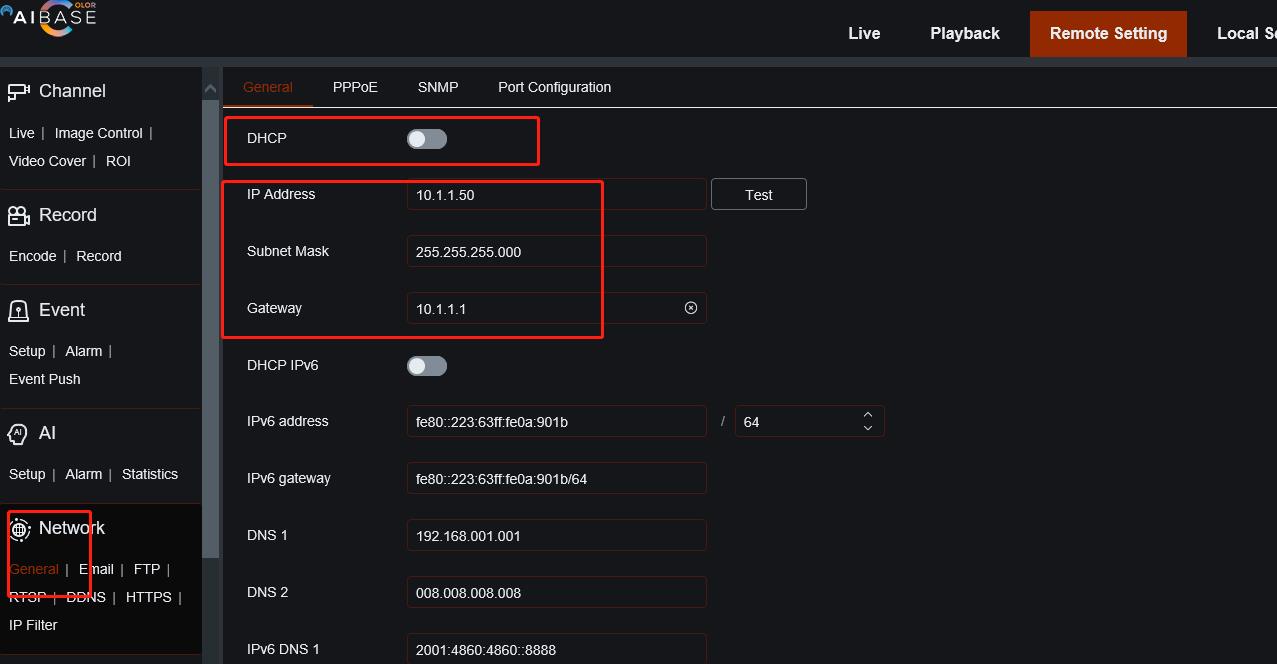
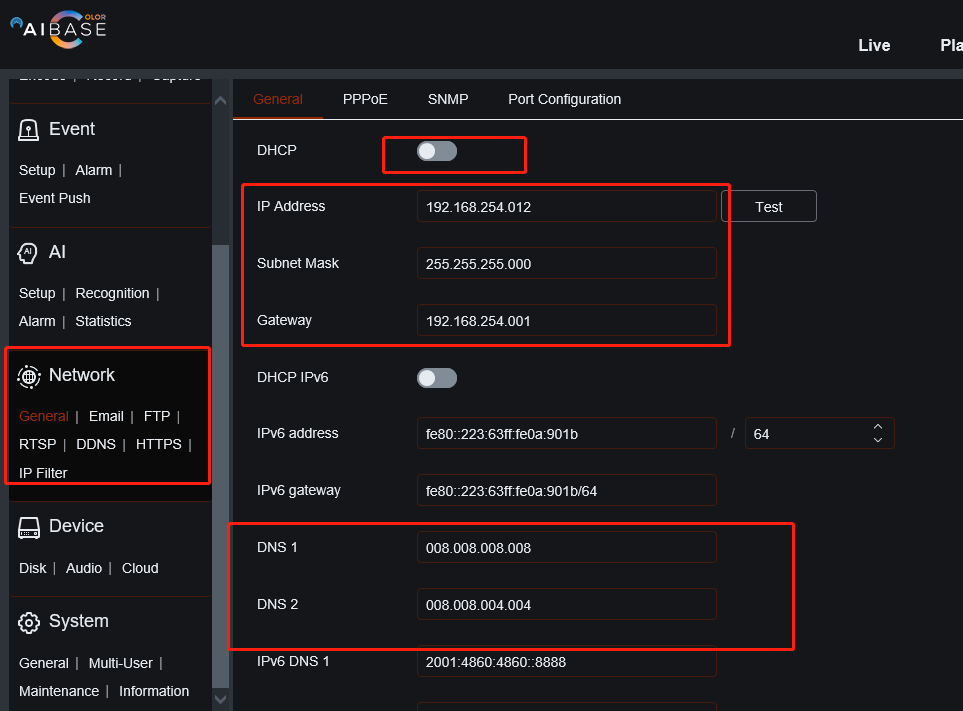
In web interface
In device web interface, go to Remote Setting----Network----General, follow the picture to change the IP, Gateway, DNS1, DNS2
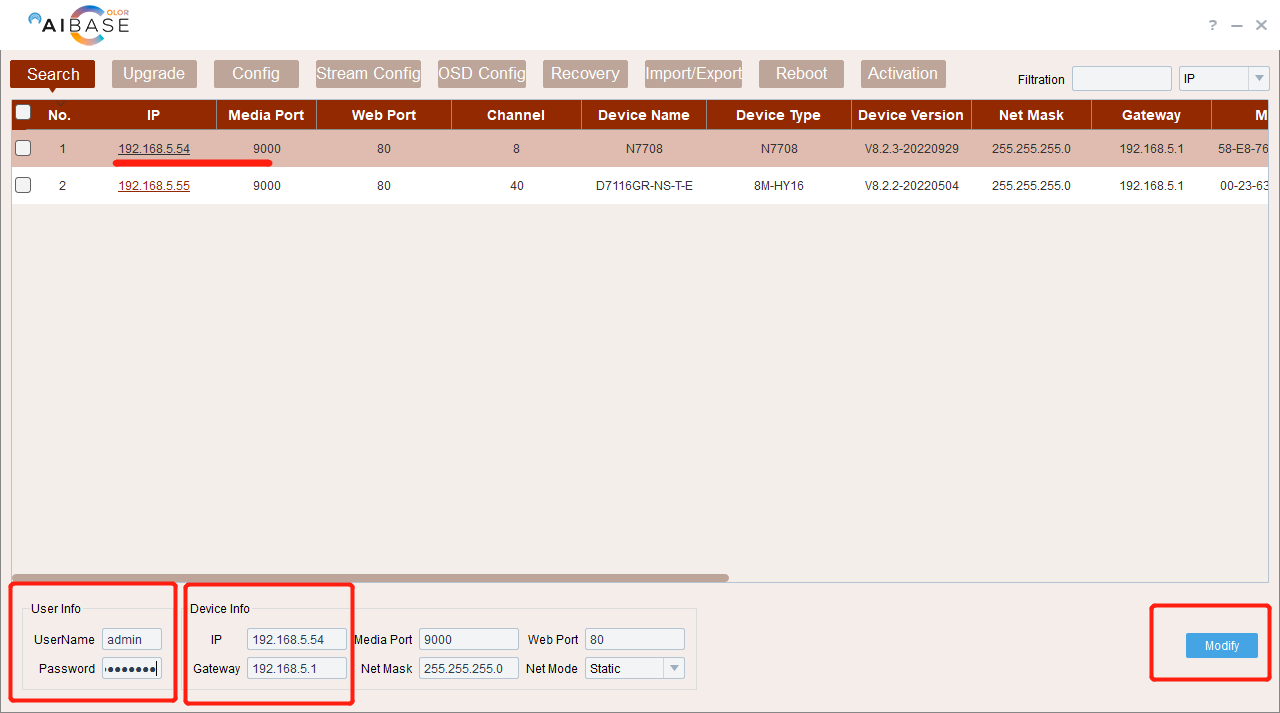
In AI Color search tool
(For both Camera and NVR)
Search for device----put in username and password of device----change the IP and Gateway to what ever you want----press modify to save
link here or insert file here
Time setting instruction
- Updated on 07 Oct 2022
- 1 Minute to read
Step by Step instruction
- go to device local or web interface
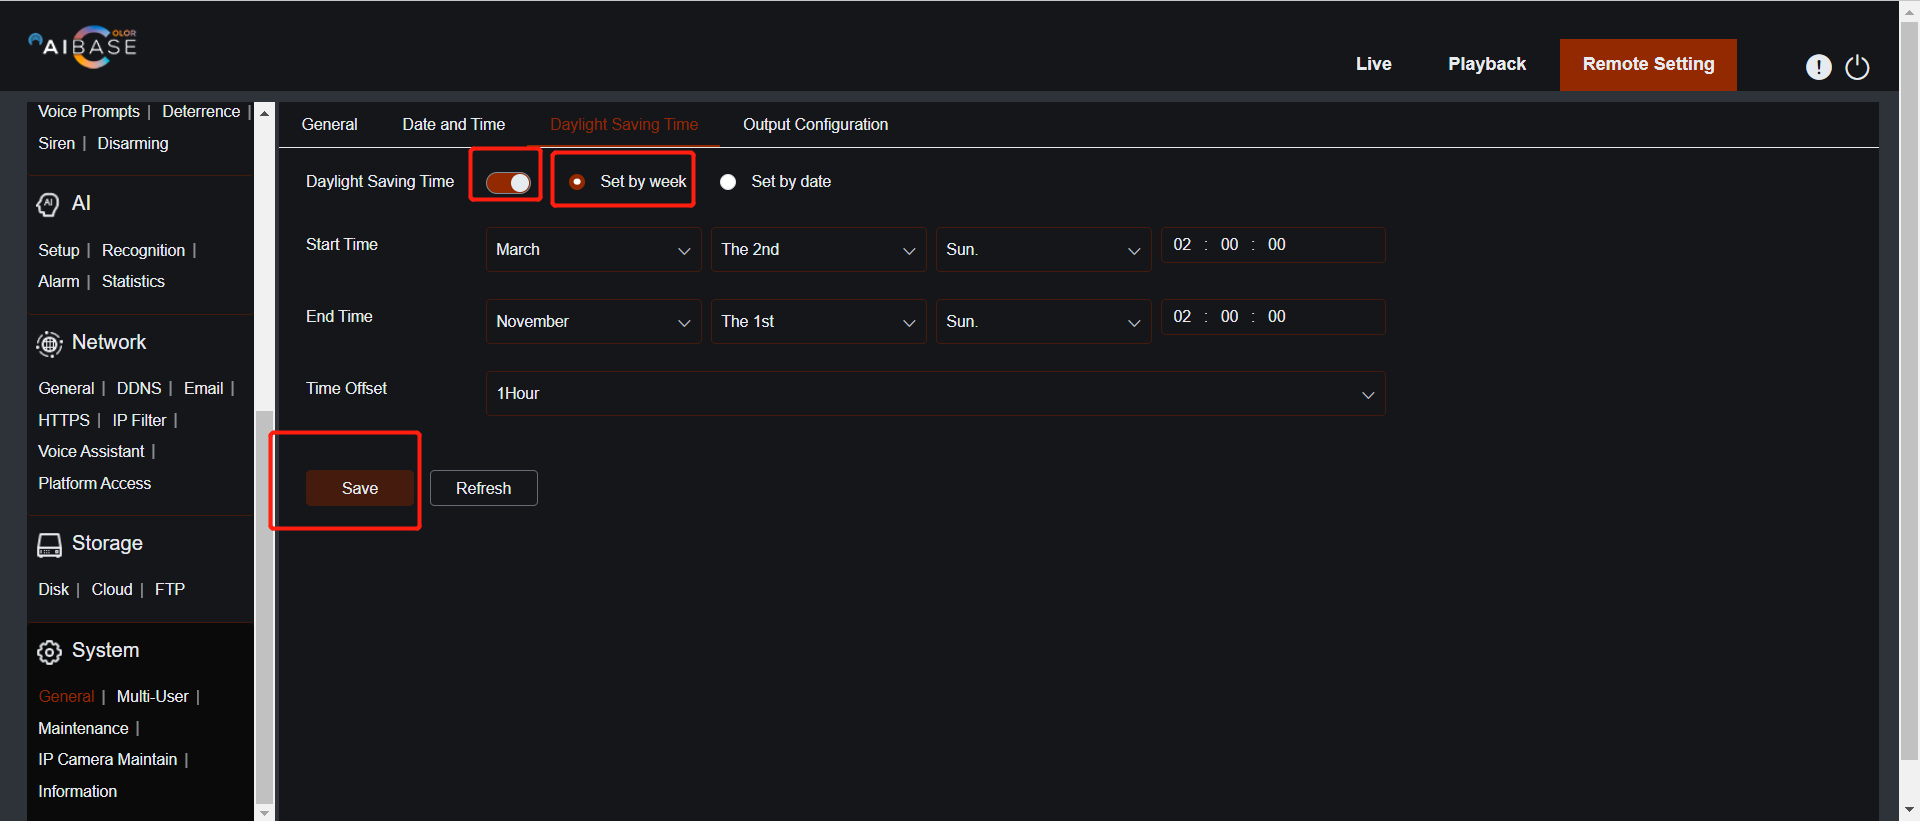
- go to setting----system----Date and Time----choose NTP server synchronization----select your time zone----edit your system time to match your current time----press save

- (optional) Go to Daylight saving time----enable DST----choose set by time---- press save
Motion detection setup guide
- Updated on 07 Oct 2022
- 1 Minute to read
Step by Step instruction
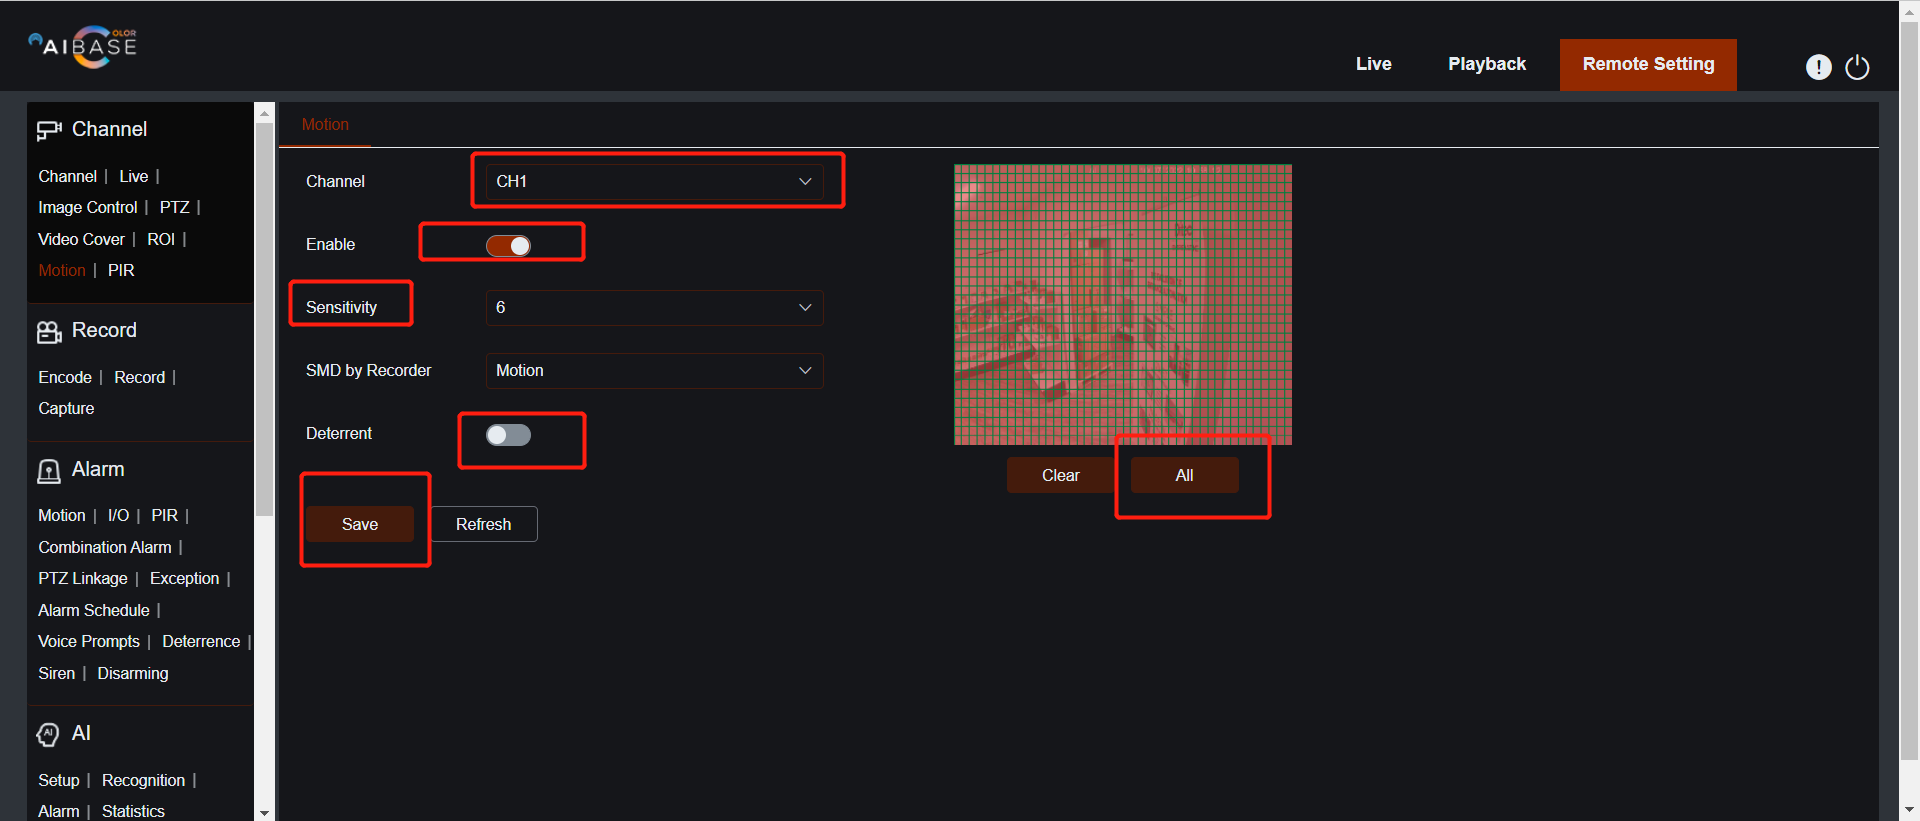
- go to web or local interface of device
- Select which channel of camera that you want to config motion----enable----choose All or draw a detect area you want in the picture on the right side----choose the sensitivity you want----(optional for deterrence cameras only)enable the deterrence function to trigger warning light and siren
Active deterrence function (Warning light and Siren) setup guide
- Updated on 13 Oct 2022
- 1 Minute to read
Step by Step instruction
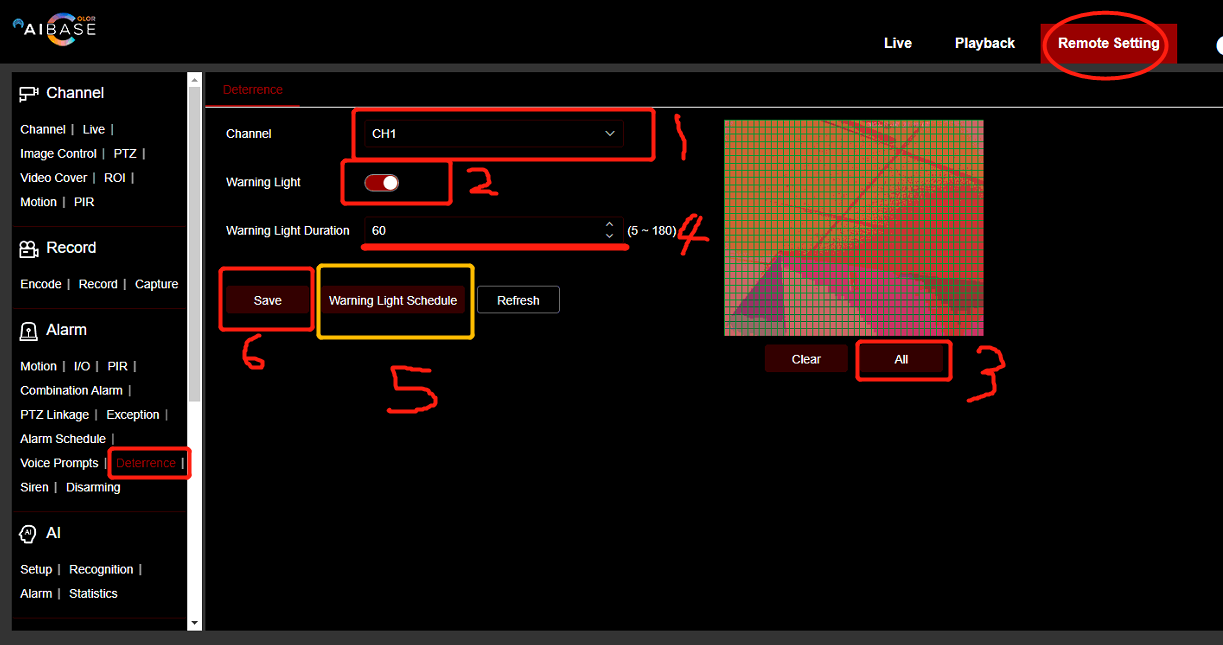
- Warning light
- Go to NVR web page----remote setting----deterrrence
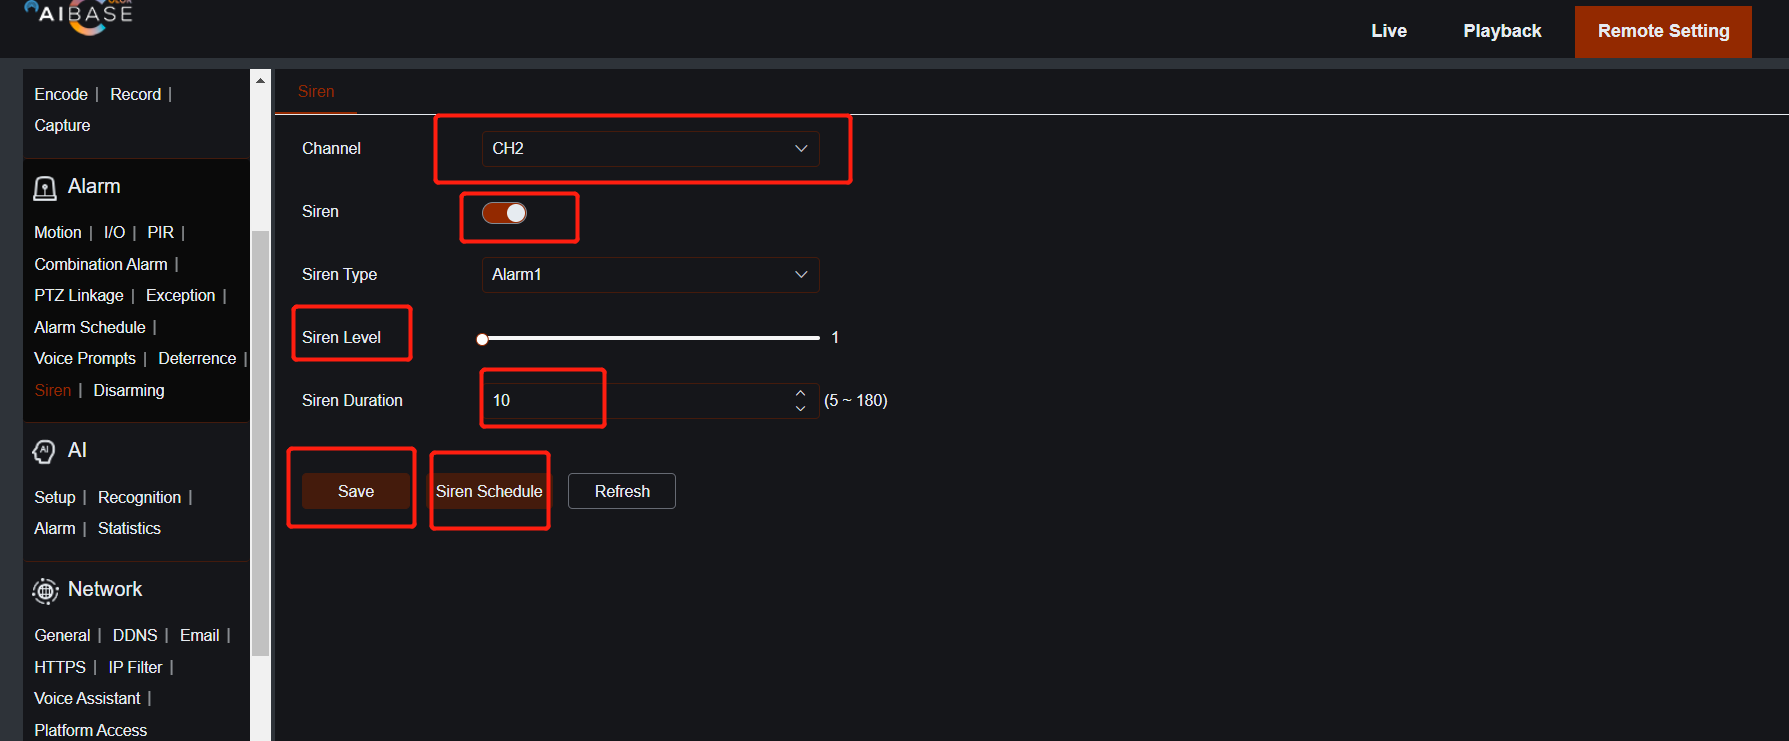
- Select your camera channel
- enable warning light
- select all for the area or live it as default
- select duration from 5s to 180s
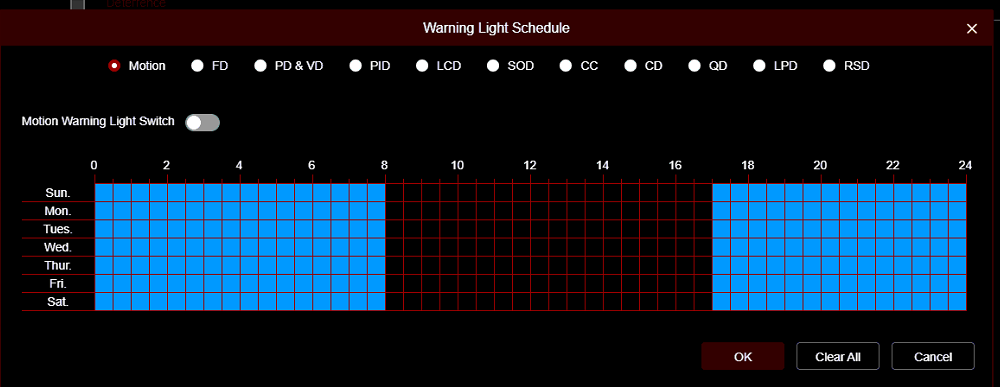
- select warning light schedule you want
- You can set up different schedule for different triggering function (include AI function), each function could have their own schedule and will not affect each other
- If the switch is ON, schedule will be applied. if the switch is OFF, this will always be triggered any time by motion detection only.
- Siren
Same config steps with warning light
Record schedule setup guide
- Updated on 14 Oct 2022
- 1 Minute to read
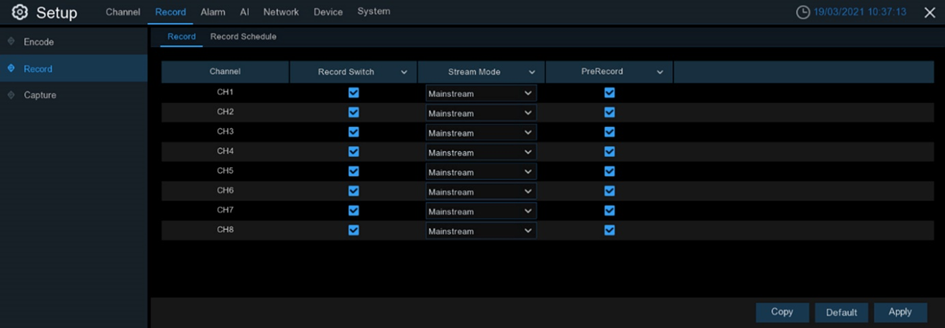
1. Record mode
Record Switch: Check to enable the recording in this channel.
Stream Mode: Choose the recording quality. If you choose Dualstream, the system will record in both Mainstream & Substream.
PreRecord: If this option is enabled, the NVR starts recording a few seconds before an alarm event occurs. Use this option if your primary recording type is motion or I/O alarm based.
2. Record Schedule
This menu allows you to specify when the NVR records video and defines the recording mode for each channel. The recording schedule lets you set up a schedule like, daily and hourly by normal (continuous) recording, motion recording, I/O alarm recording & PIR recording (if your NVR supports). To set the recording mode, click first on the mode radio button (Normal, Motion, IO, PIR), then drag the cursor to mark the slots. The recording schedule is valid only for one channel. If you want to use the same recording schedule for other channels, use Copy function.
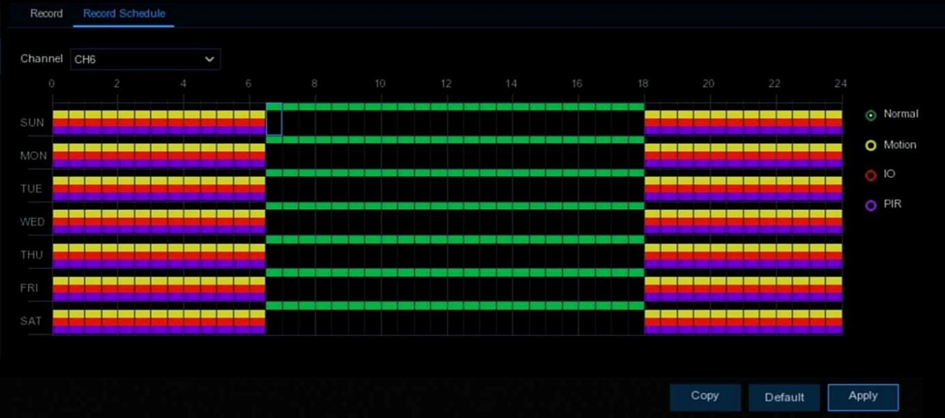
Channel: Select the channel to set its recording parameters.
Normal: When the time slot is marked green, this indicates the channel performs normal recording for that time slot.
Motion: When the time slot is marked yellow, this indicates the channel records when a motion is detected during that time slot.
IO: When the time slot is marked red, this indicates the channel records when the sensor is triggered during that time slot.
PIR: When the time slot is marked purple, this indicates the channel records when the PIR is triggered during that time slot.
No Record: A time slot marked black means that there is no recording scheduled for the time slot.
Click Apply to save your settings.
Playback, smart search instruction
- Updated on 14 Oct 2022
- 1 Minute to read
Step by Step instruction
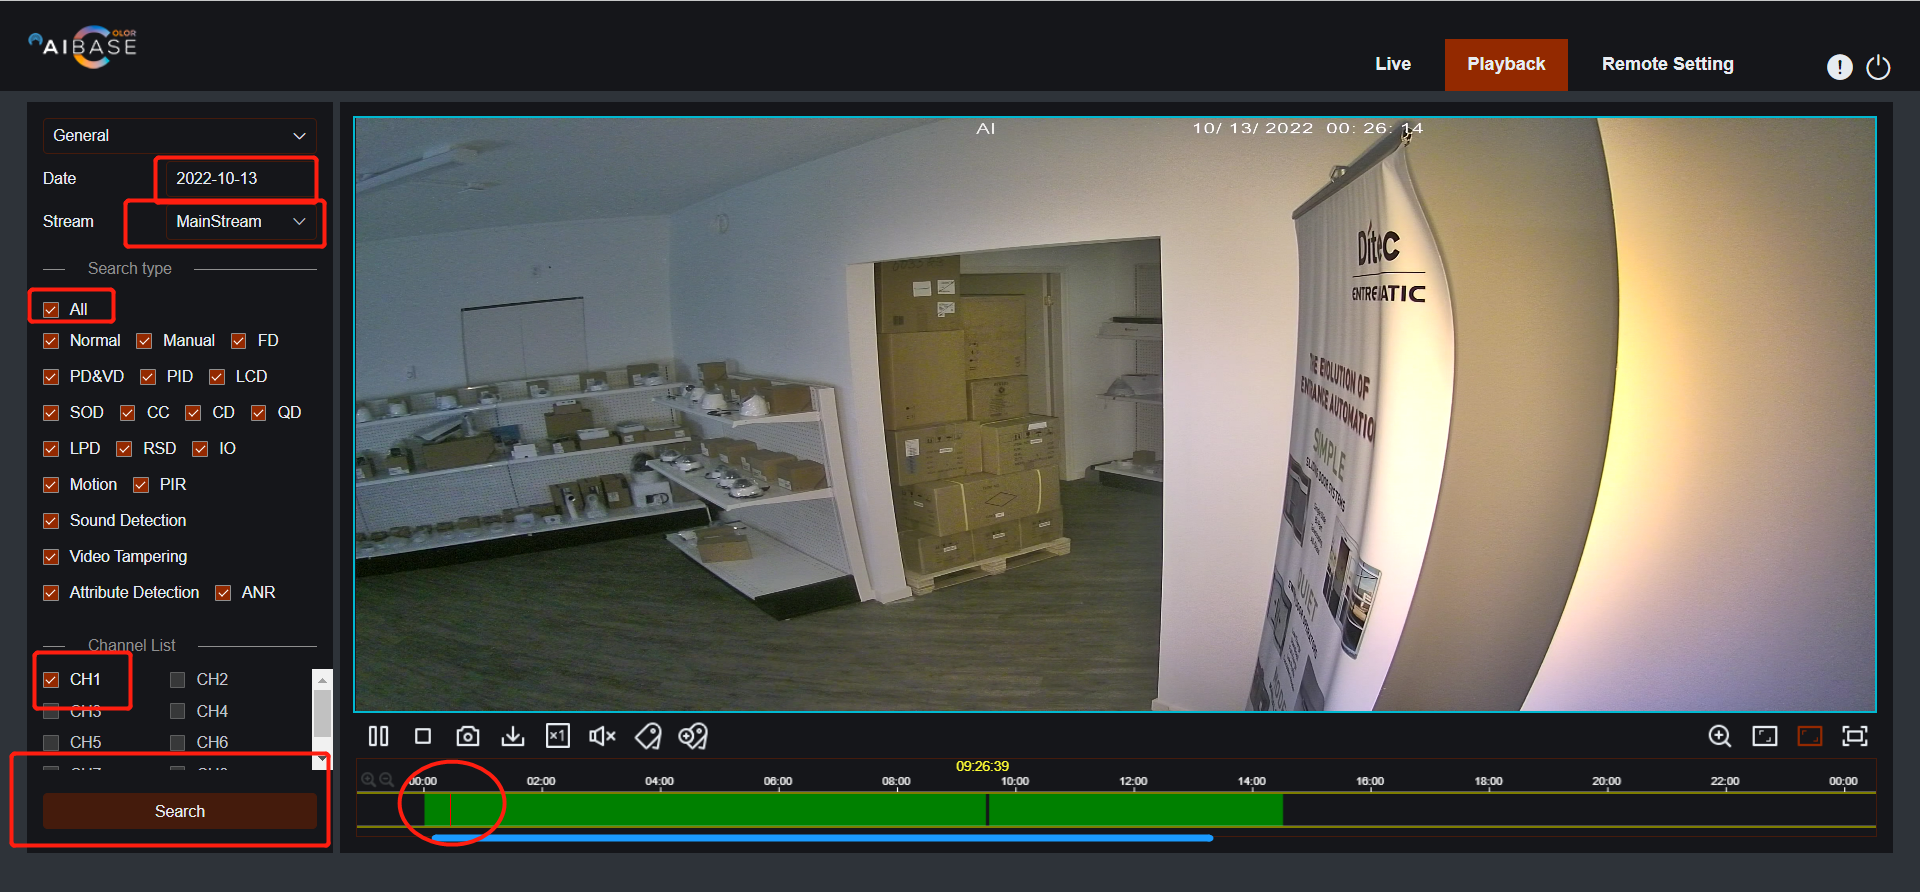
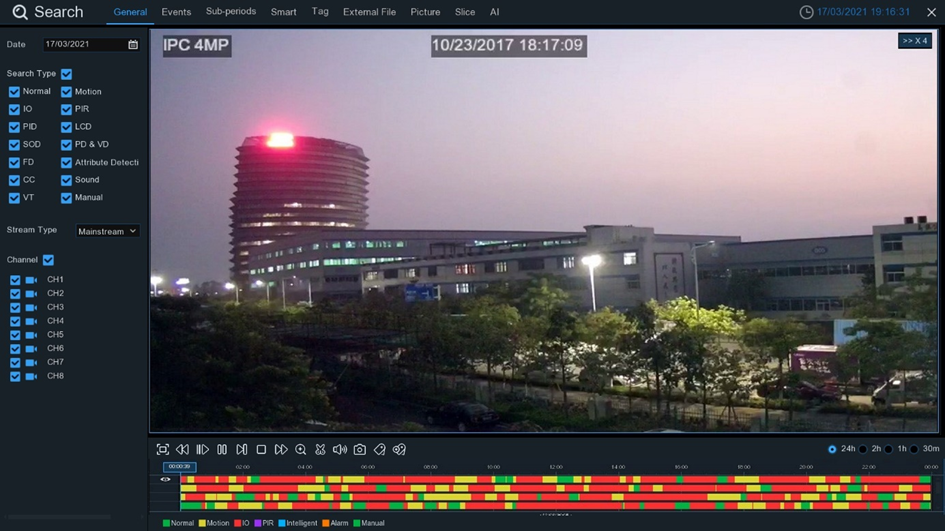
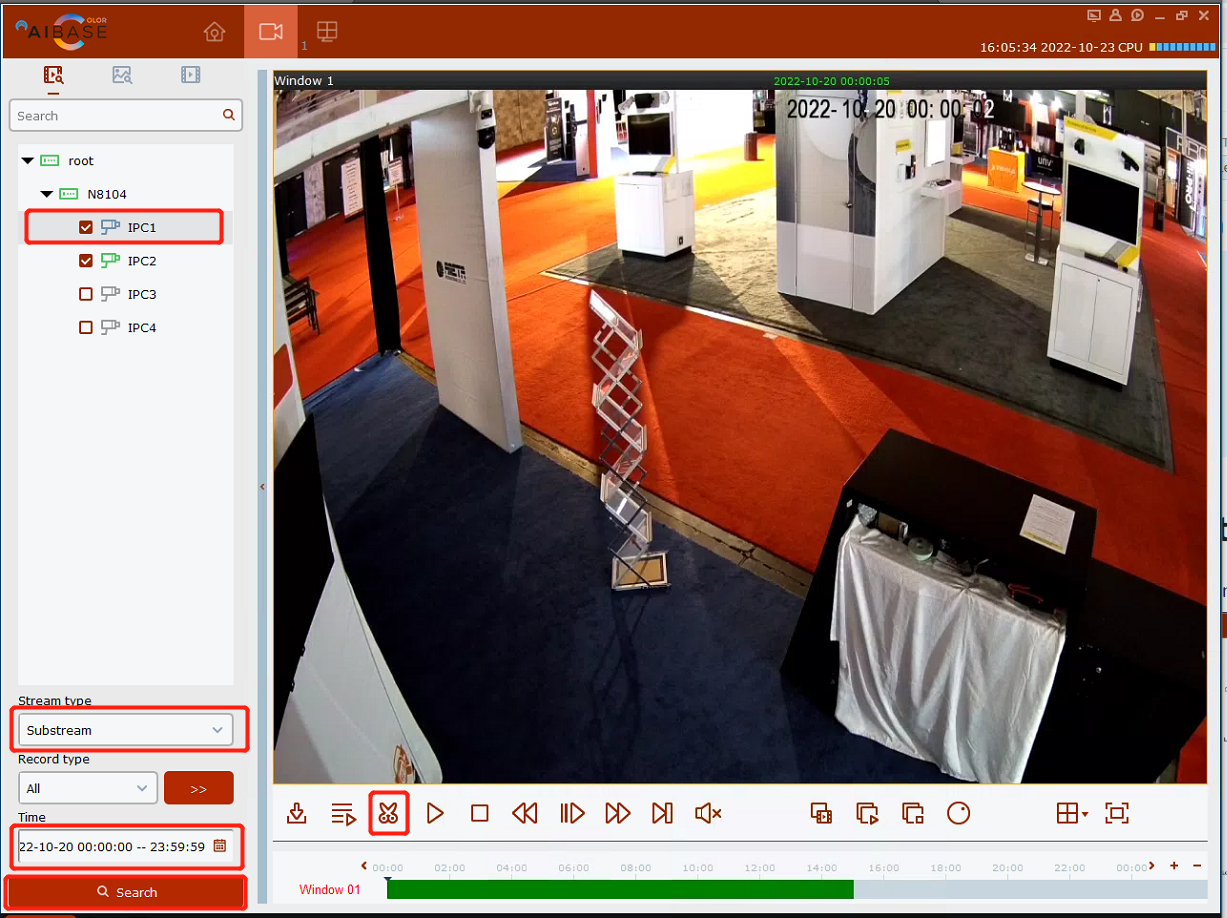
1. Normal playback
- select date, stream and what record type you want to view specificly
- select channel that you want view
- press search
- you could see a colored timeline, press on one timing of the timeline, you will see the video at that time.
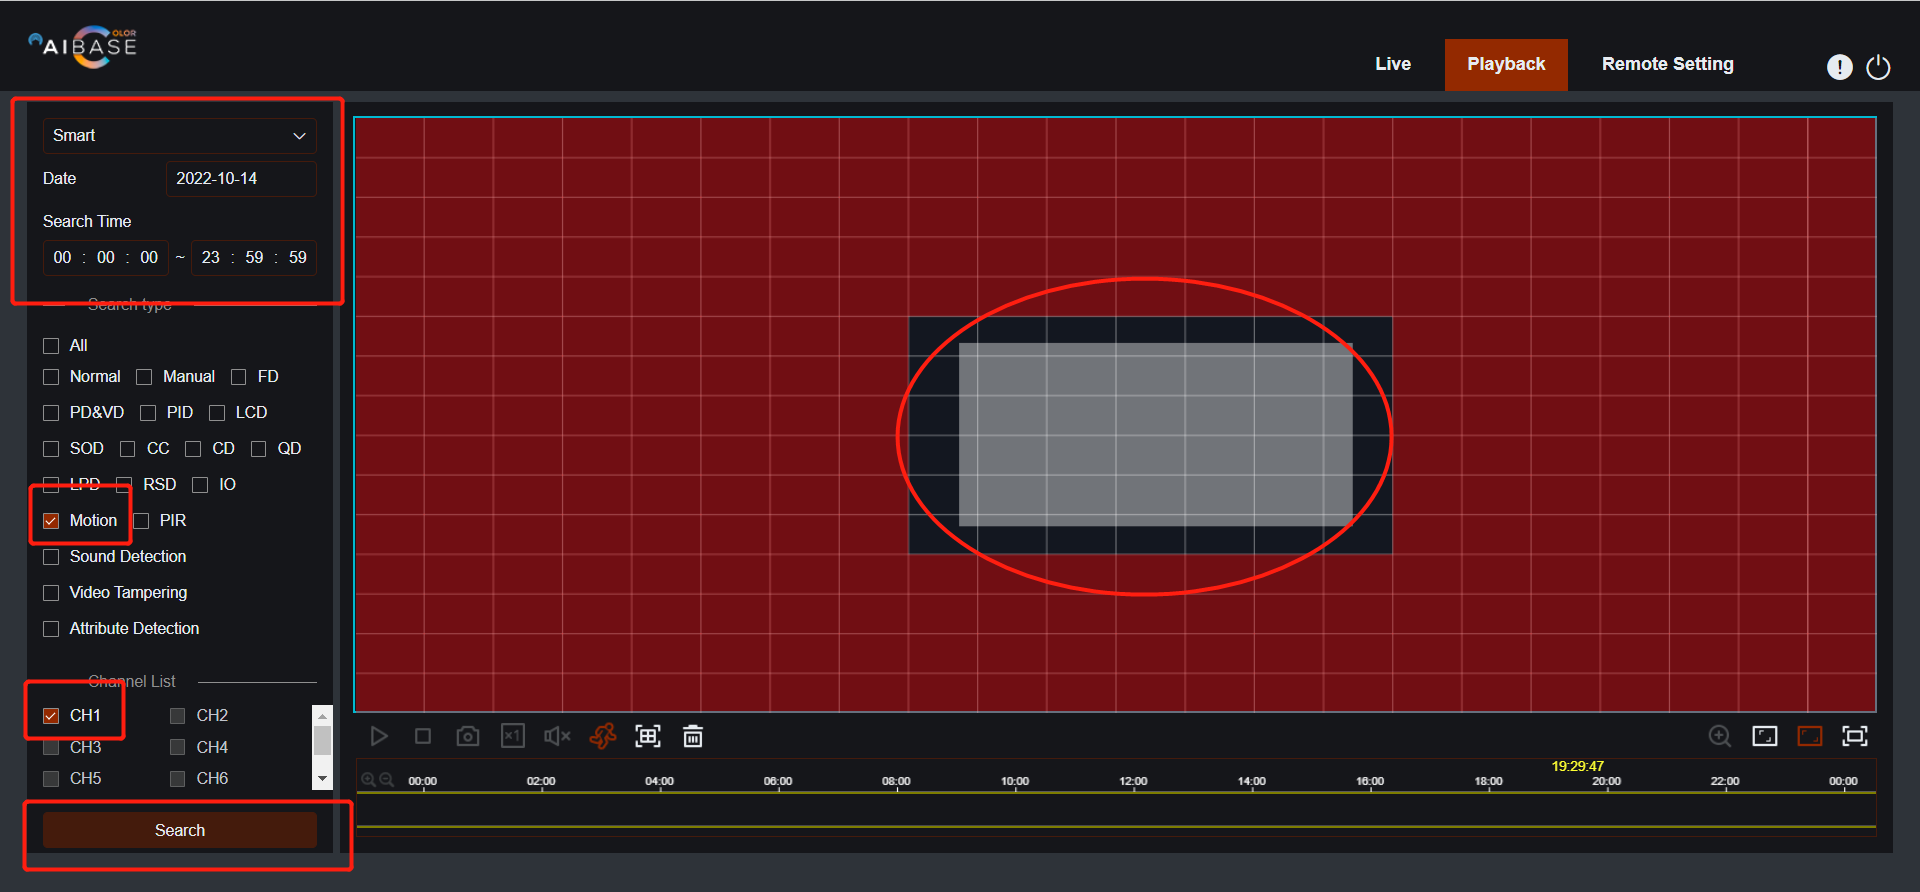
2. Smart search
- This function allows you to select a area that you want to search for the event record.
- After setup time, channel, type of event, choose an area you want to select.
- Press search to finish
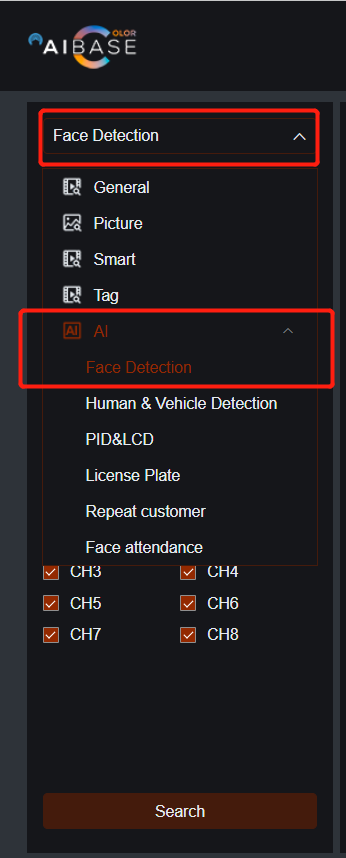
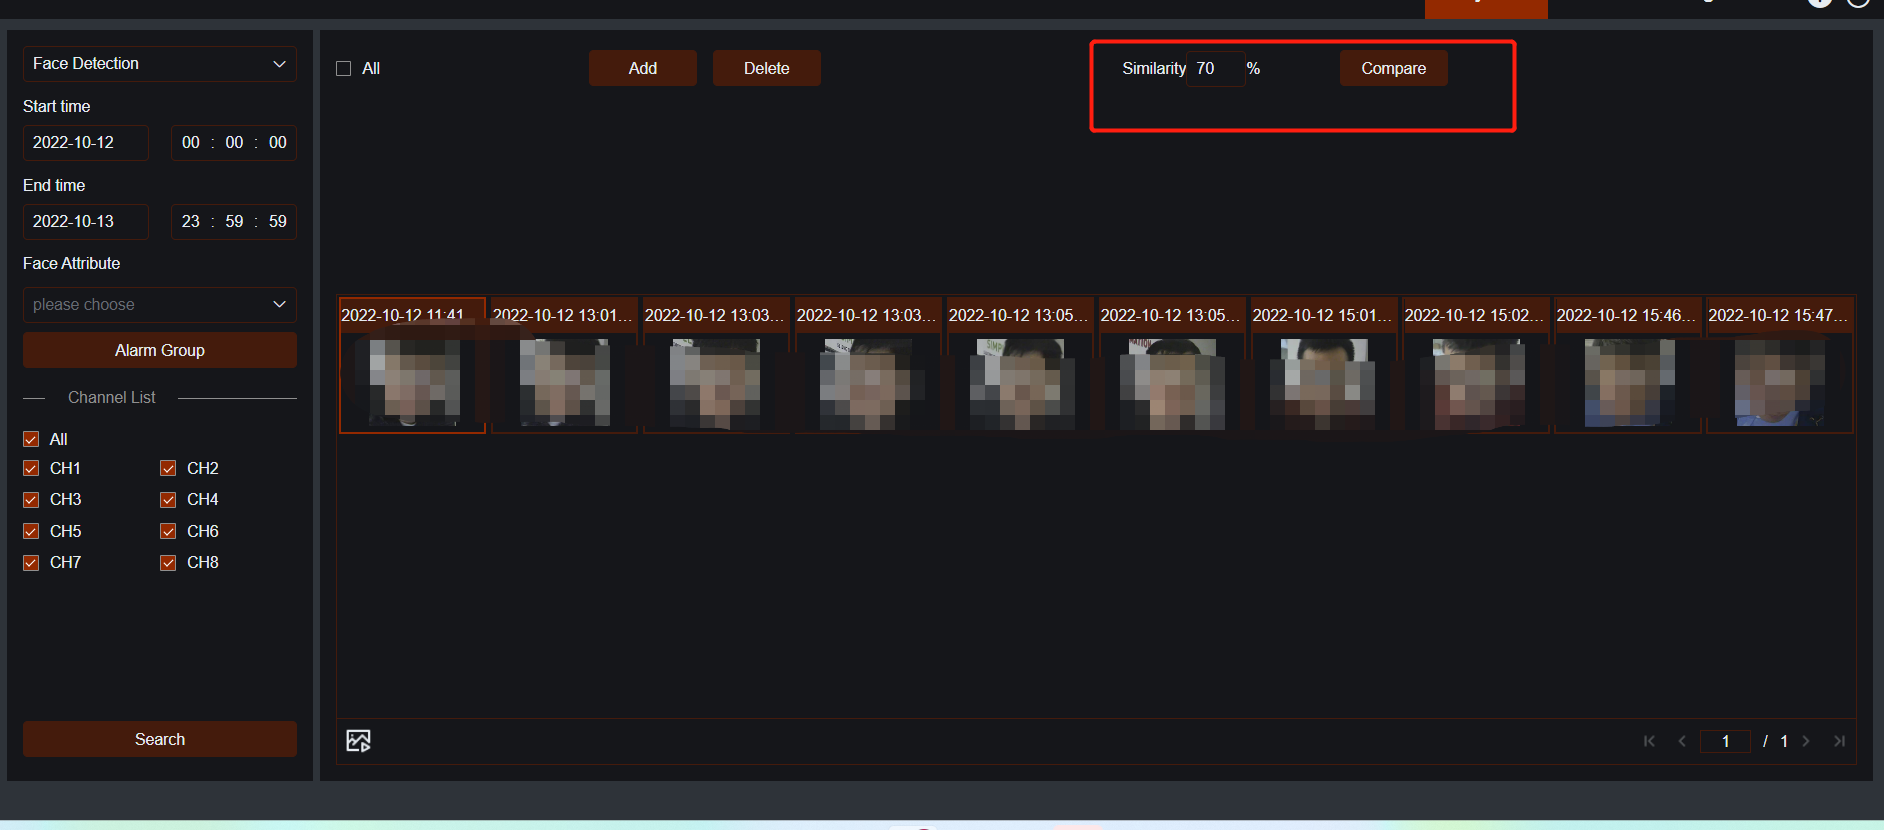
3. AI search
- select AI-Face detection in the first pull down list
- select channels you want to pull the face
- press search
- you could also apply the sensitivity filter to the result.
Video backup instruction
- Updated on 14 Oct 2022
- 1 Minute to read
Step by Step instruction
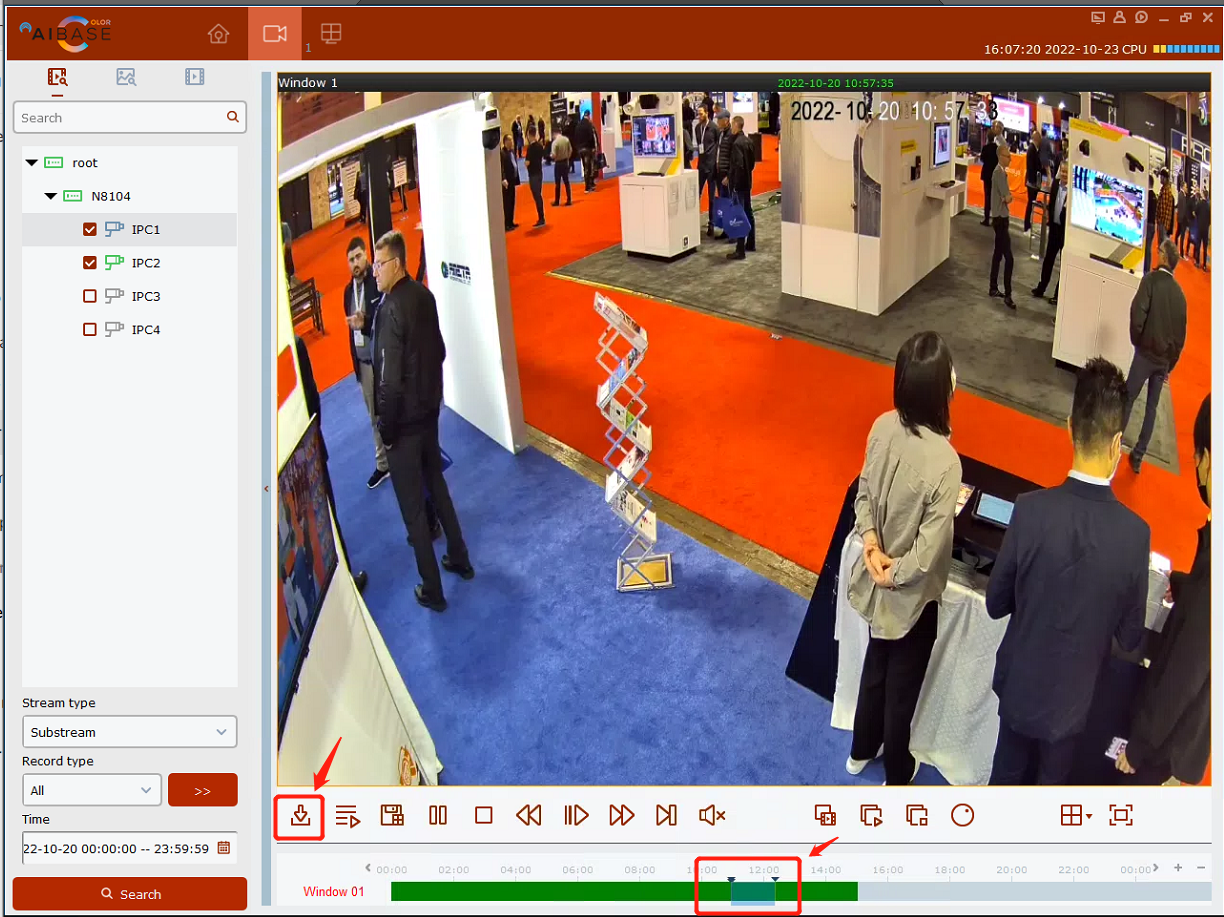
- Insert your USB flash drive to the NVR.
- Start a video recording playback.
- Click scissors icon.
- Check the channel(s) you want to make a video clip backup.
- Move the mouse cursor to the timeline where you want to start the video clip.
- Press and hold the left button of your mouse, and drag the drag the cursor to the timeline where you want to end the video clip.
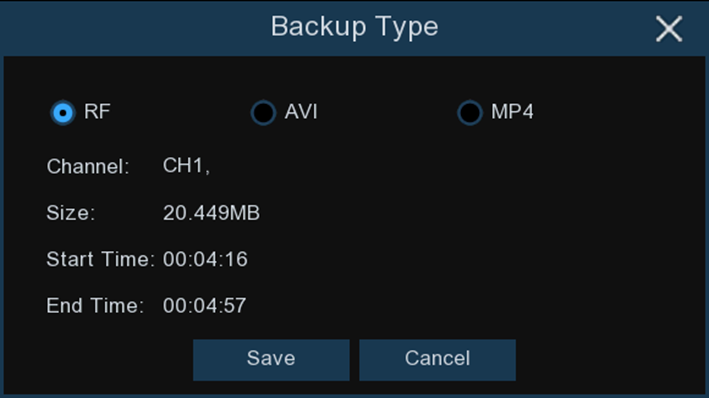
- The scissors icon has been changed to save icon, click save icon to save the video clip.
- Select a file type for your backup files, click Save button to save the video clips. Please make sure your USB driver has enough space to save the video clips.

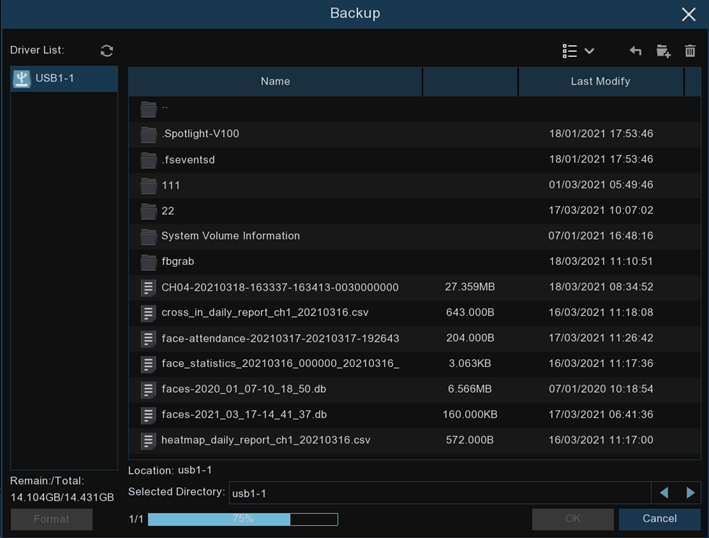
- The backup drive menu appears. Navigate to the folder you want the backup files to save in.
- Click OK to begin. The progress bar at the bottom of the window shows you the progress of the backup
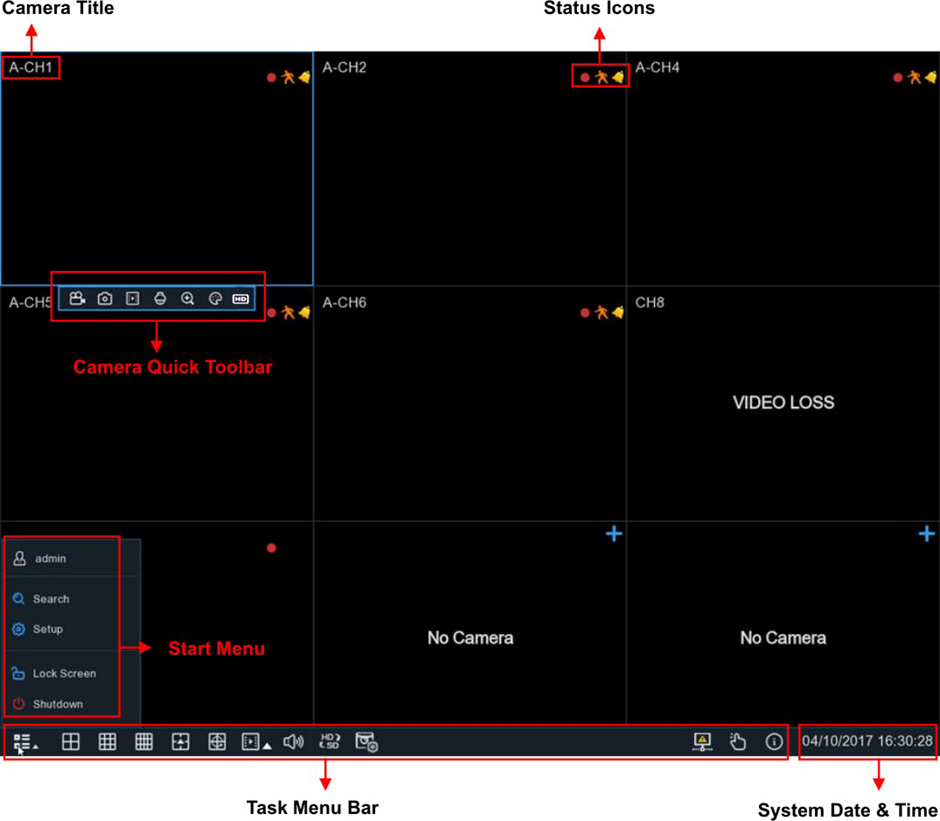
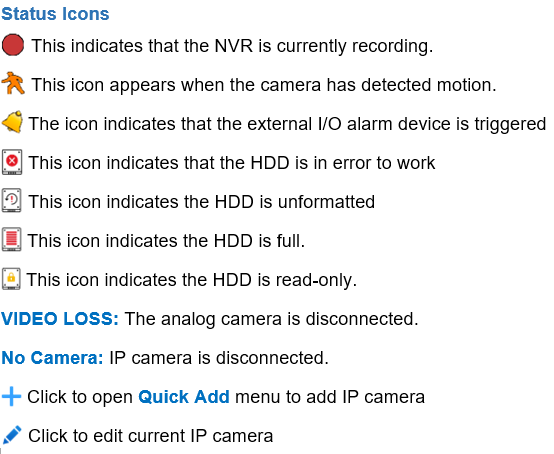
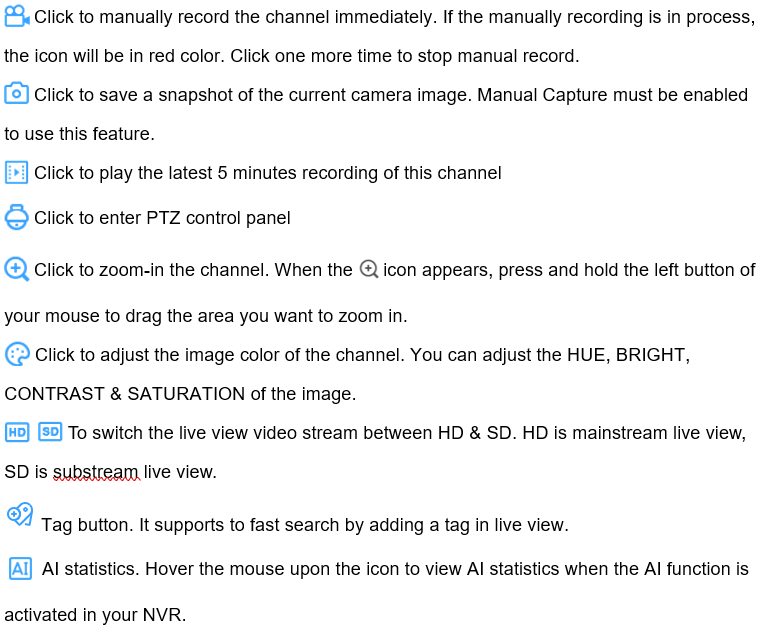
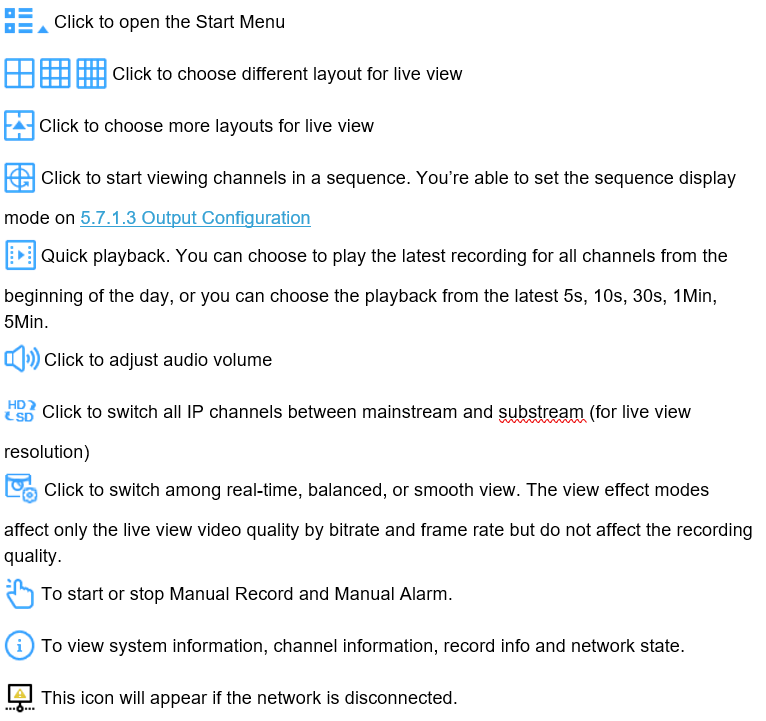
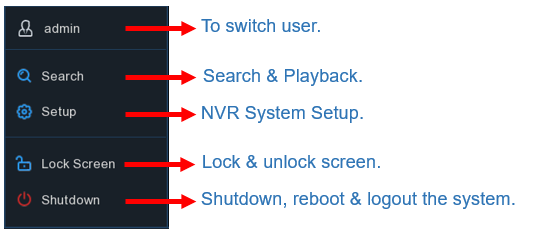
Liveview instruction
- Updated on 14 Oct 2022
- 1 Minute to read


How to setup Smart illumination
- Updated on 21 Oct 2022
- 1 Minute to read
Description
The Smart illumination function normally is opened by default. If not, please change by following steps
Step by Step instruction
-
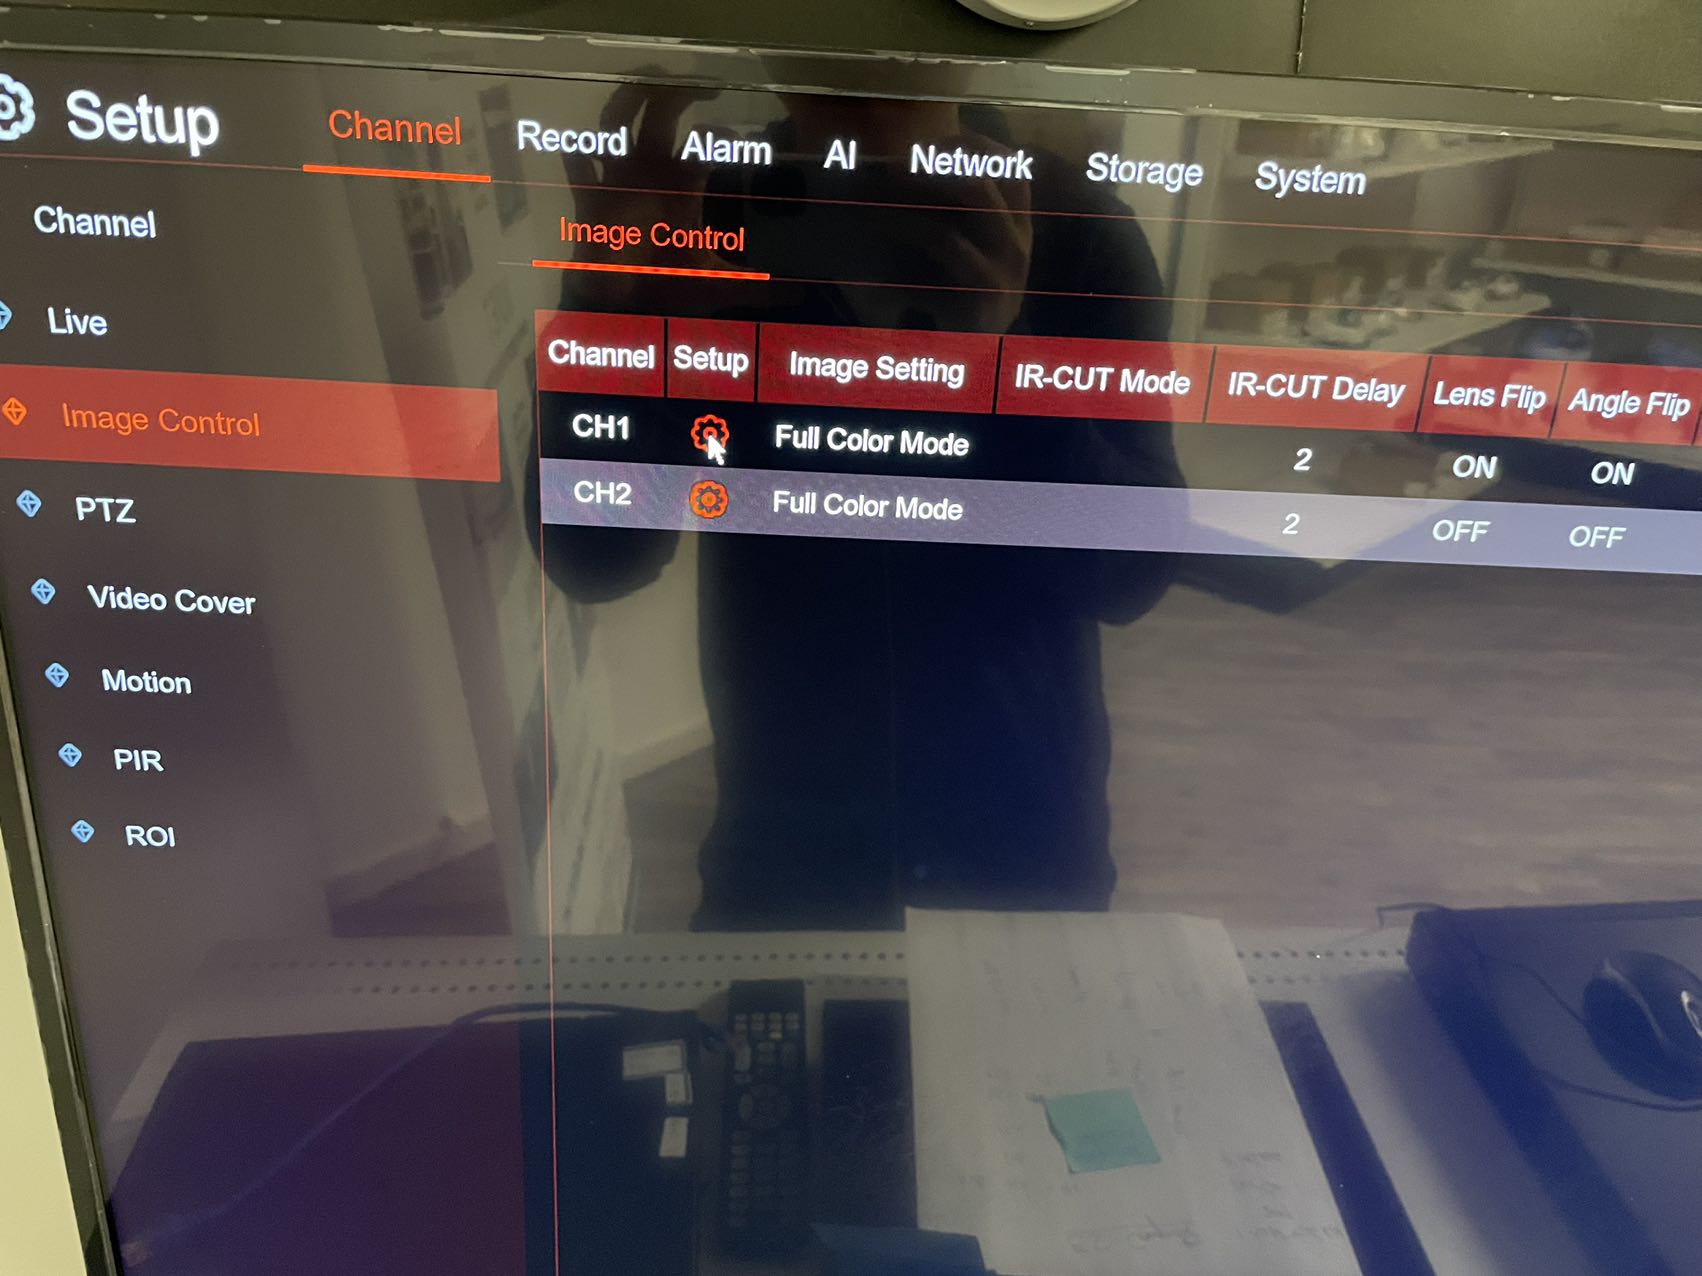
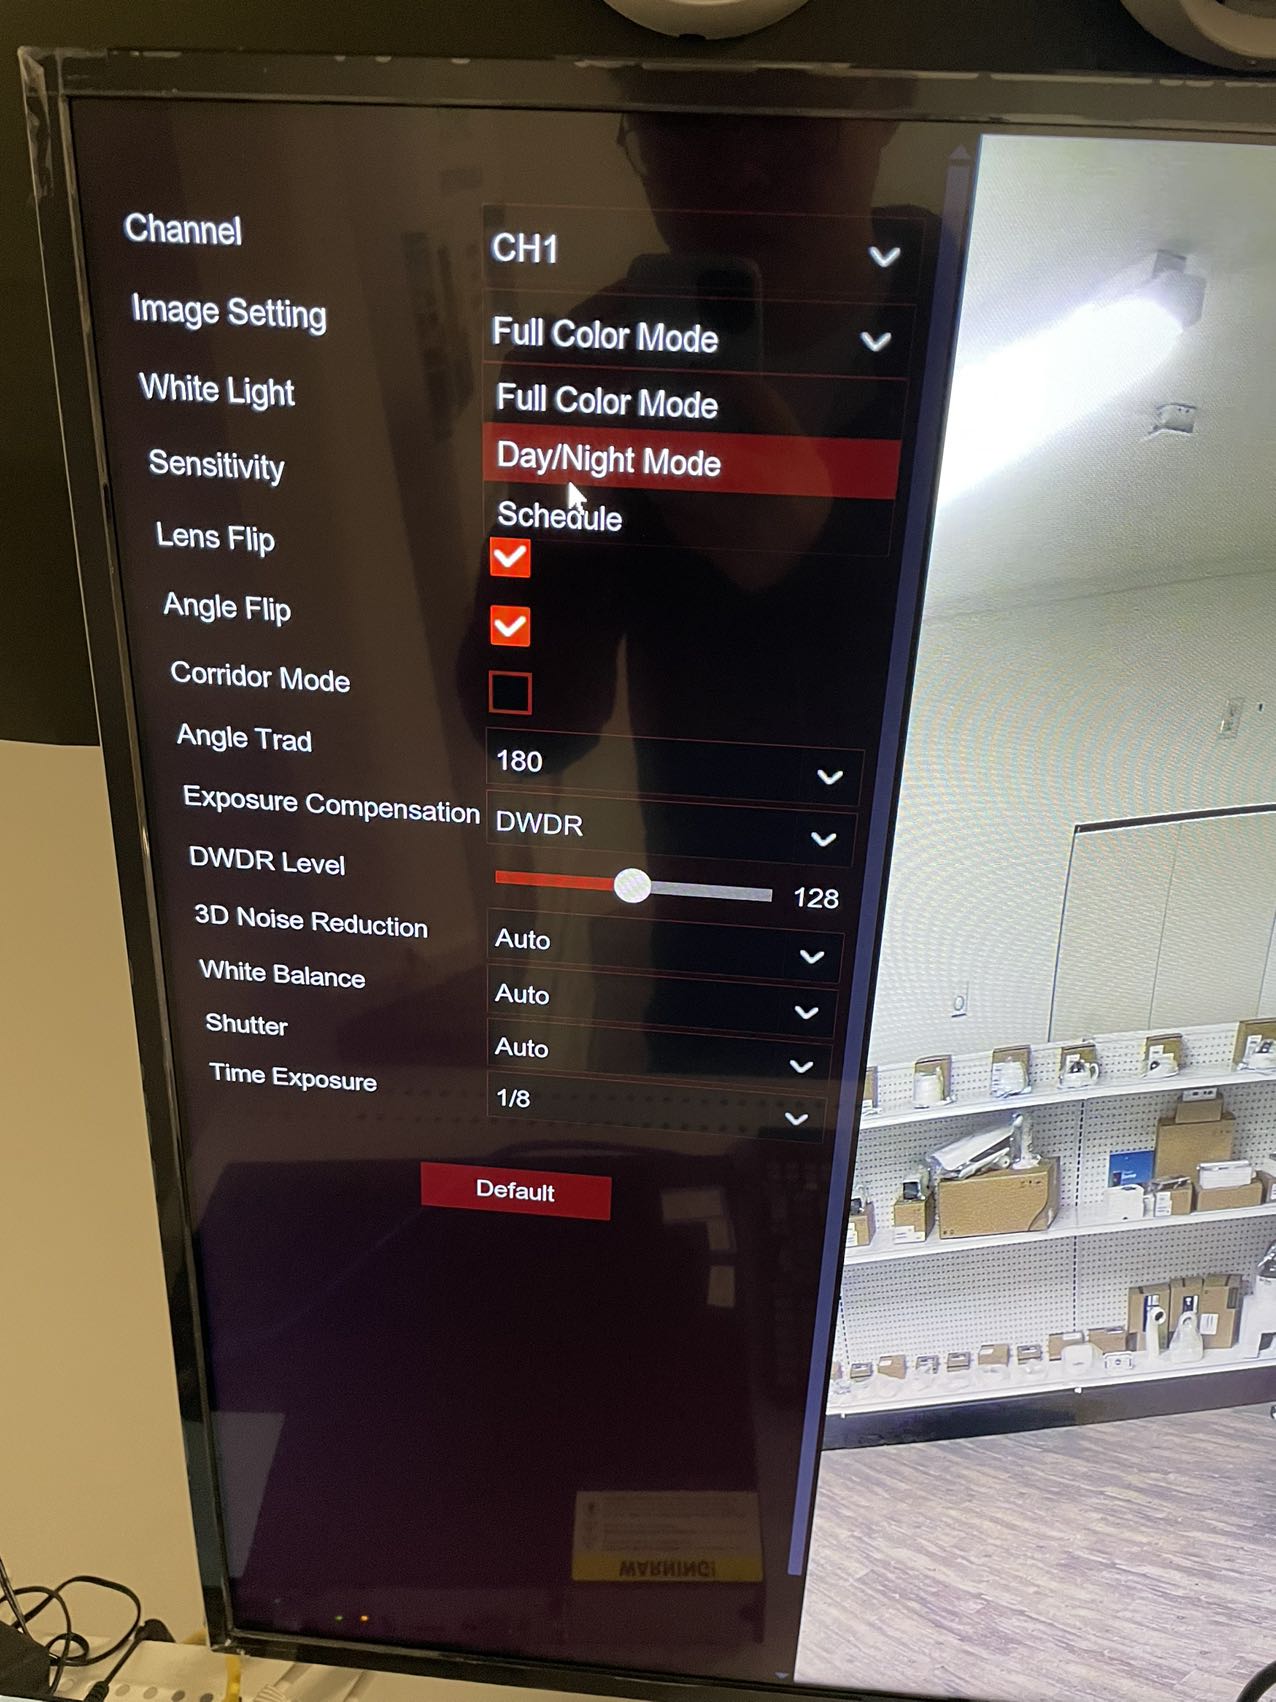
go to Setup----Channel----Image control----select channel setup icon
-
Image setting: select Day/Night mode
-
IR-LED: select Auto

How to set full color mode for camera via NVR
- Updated on 21 Oct 2022
- 1 Minute to read
Step by Step instruction
-
go to Setup----Channel----Image control----select channel setup icon
-
Image setting: select Full Color mode
Arming and disarming function guide
- Updated on 21 Oct 2022
- 1 Minute to read
Description
The disarming function could turn off all the alarm linkage except app push notifications for select channels by one key or by schedule, you can also do this configration on the phone app
Step by Step instruction
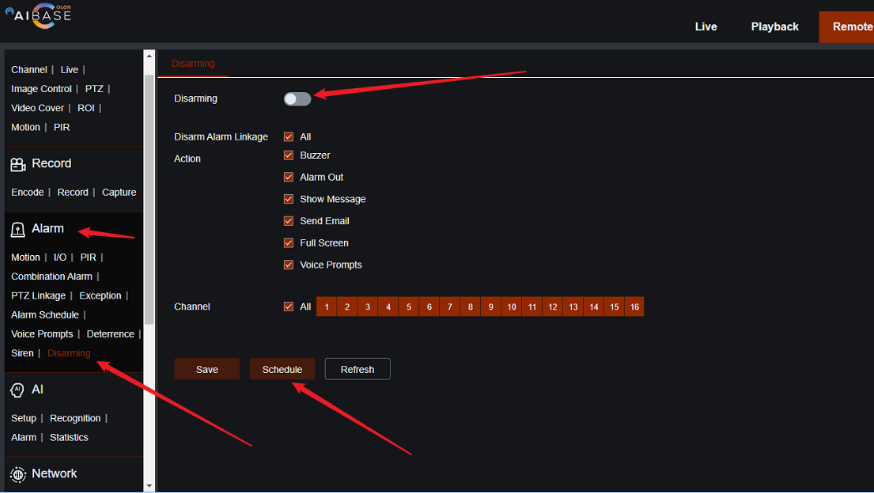
- Go to Setting----Alarm----Disarming
- Enable the Disarming switch
- Click Schedule button to setup a schedule for DISARMING(no alarm at select time)
- Press Save to save your change
P2P setting instruction
- Updated on 21 Oct 2022
- 1 Minute to read
Description
P2P fucntion is ON by default for all our Aibase color models. This instruction is about how to turn on and turn off it.
Step by Step instruction
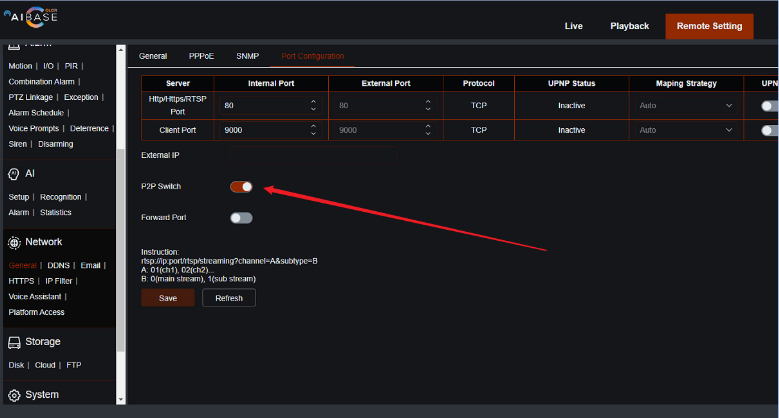
- Go to setting----network----General
- Enable the P2P switch
How to add Aibase color camera to dahua recorder?
- Updated on 16 Dec 2022
- 1 Minute to read
Camera model: Aibase color camera
Step by Step instruction
-
You need to modify the camera IP address first. You have to change IP address to 10.1.1.**. For example: 10.1.1.120.
-
Plug in the cameras to NVR directly
-
Search cameras on Aibase recorder.
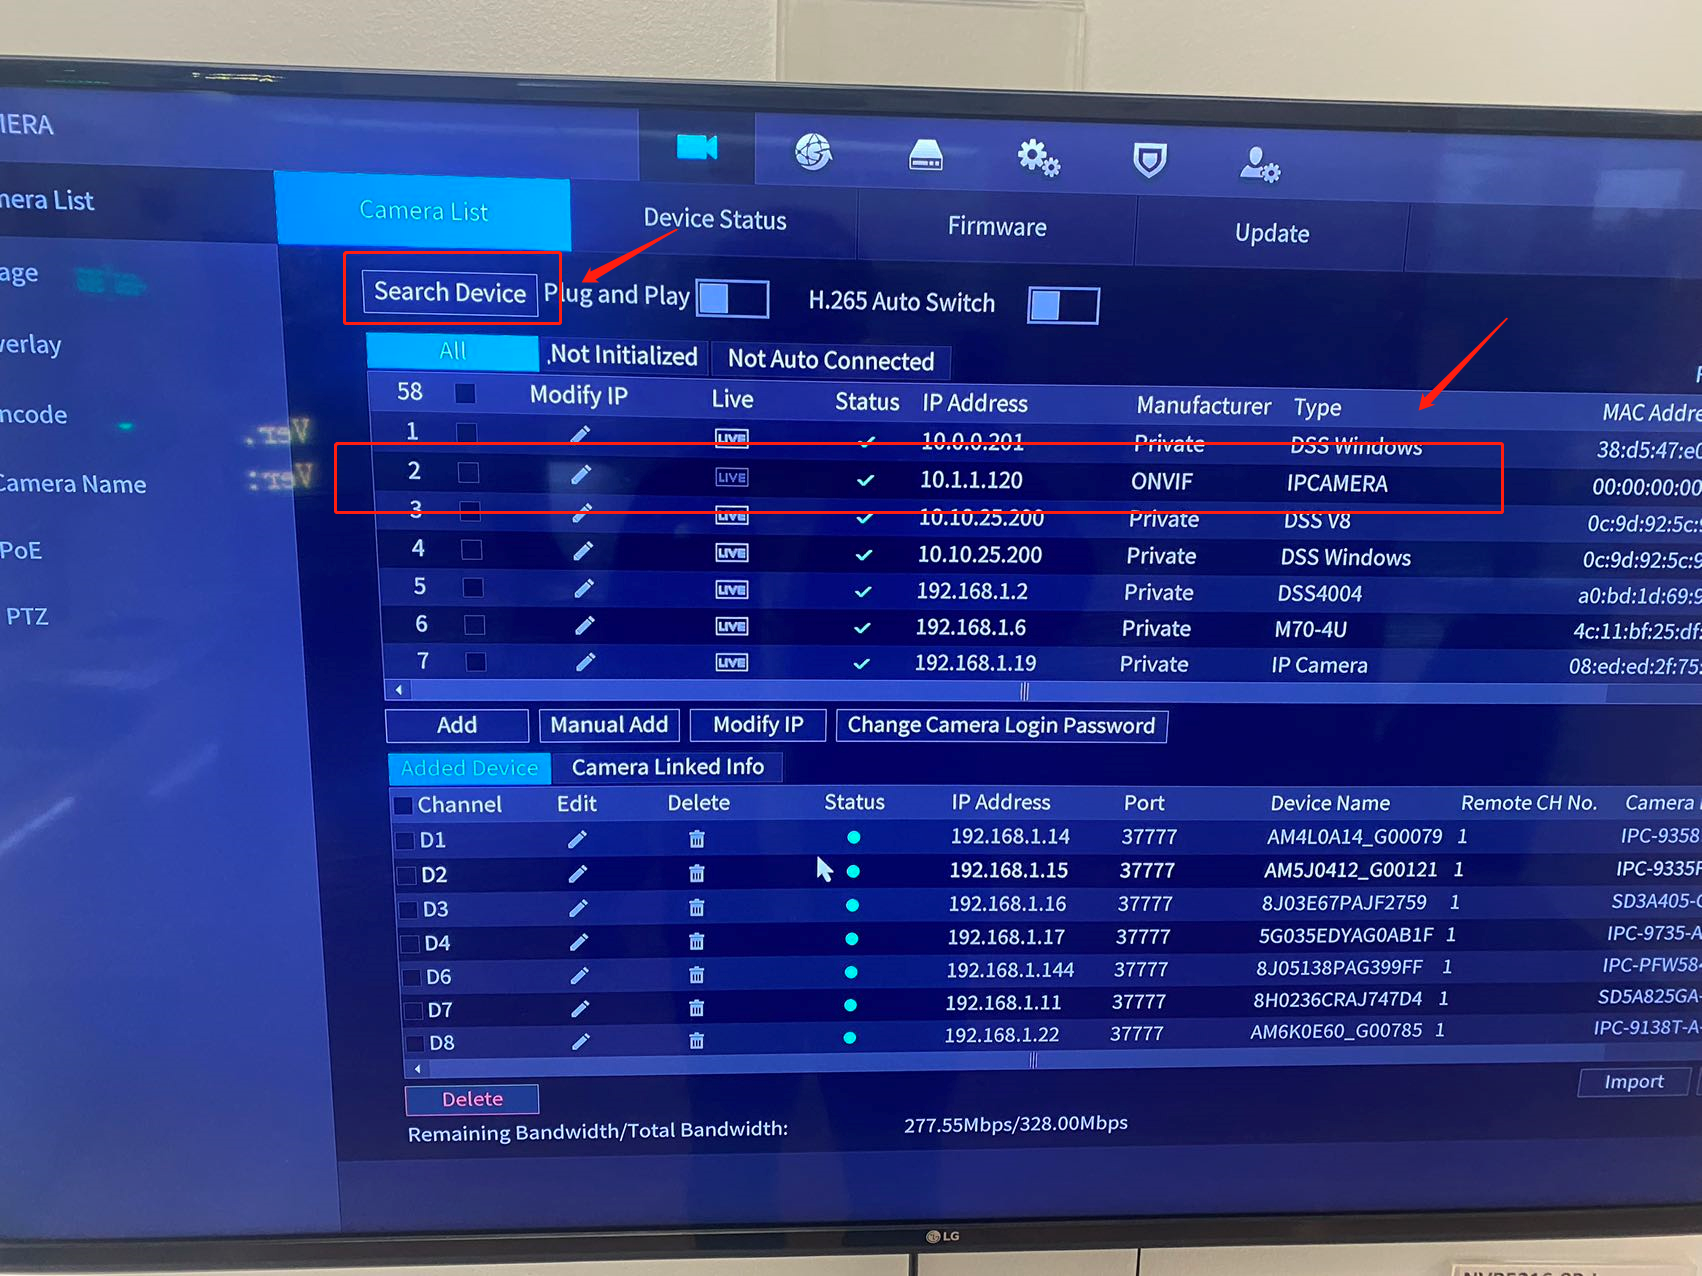
-
Select it and add it.

-
Edit and input the camera password
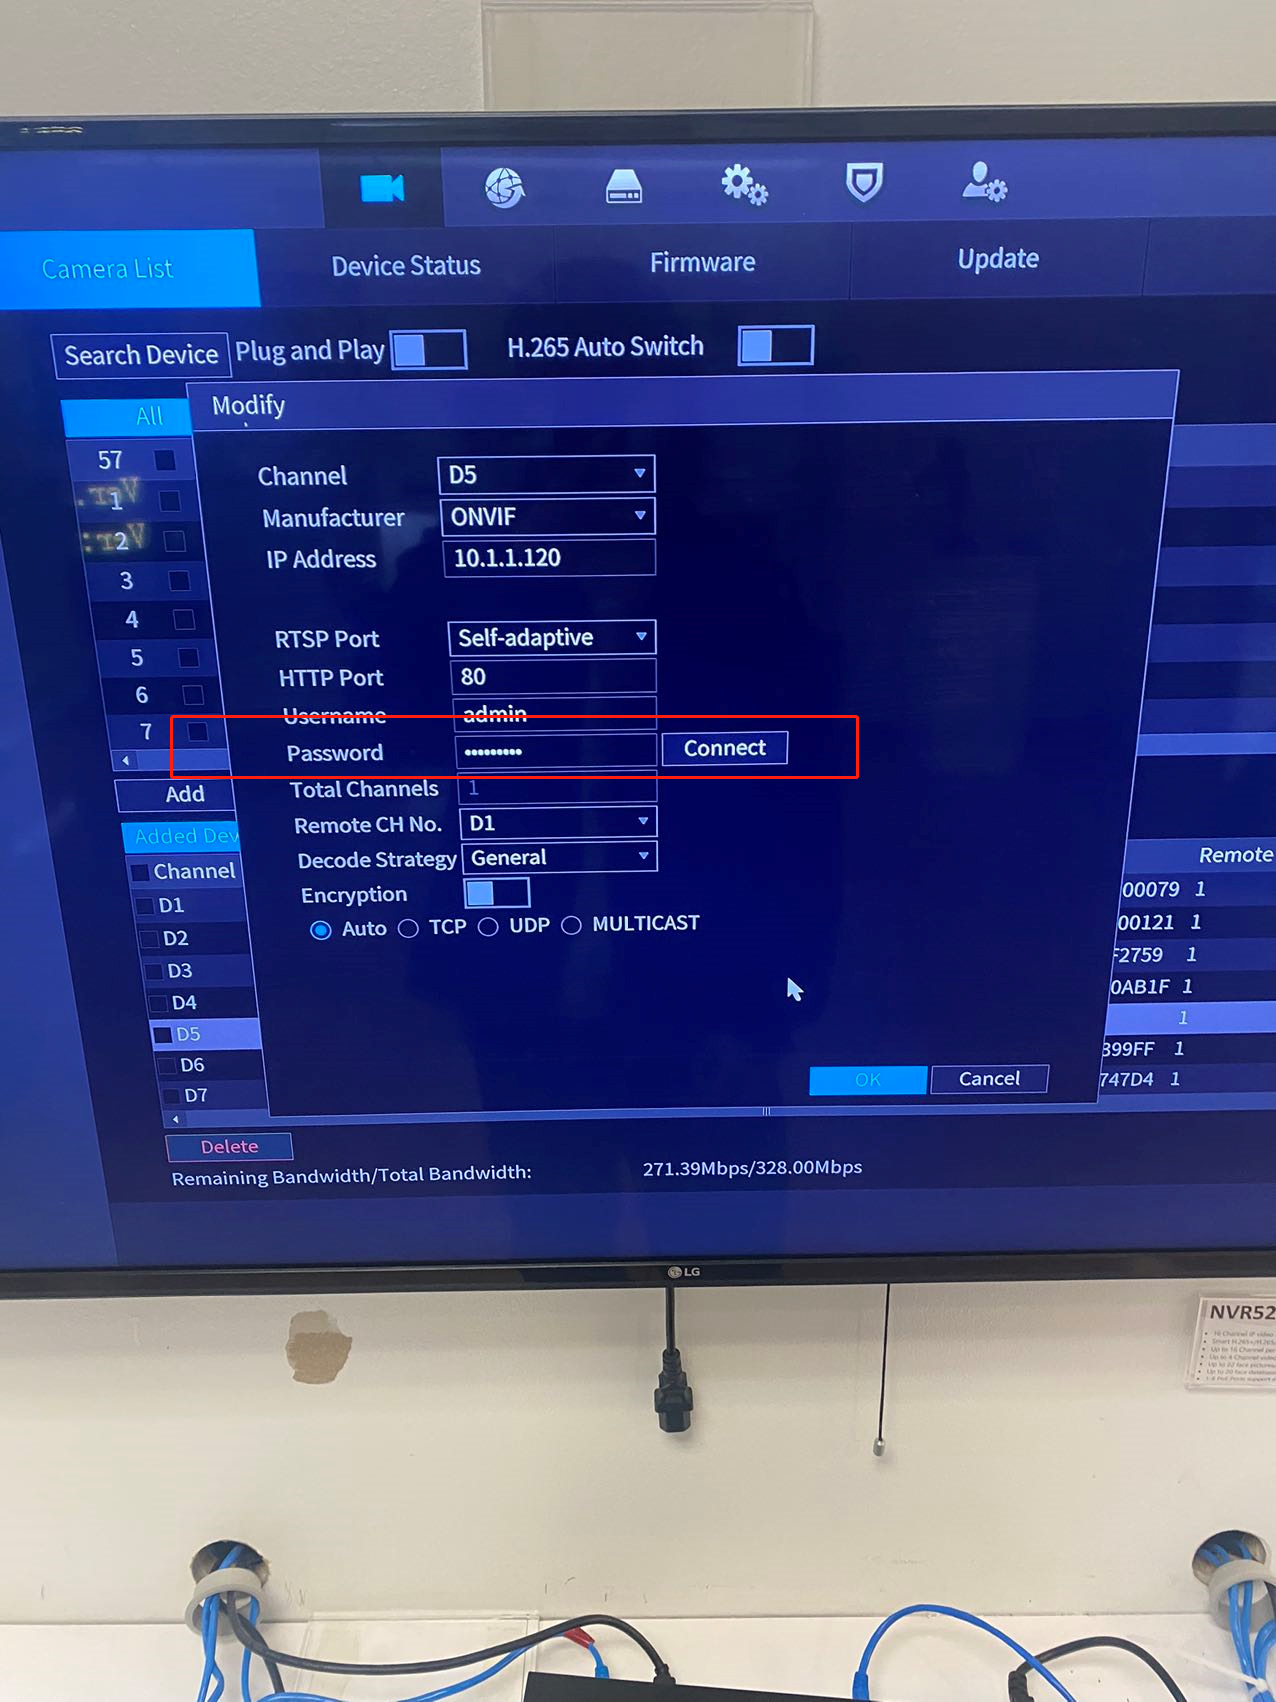
-
Camera online now.

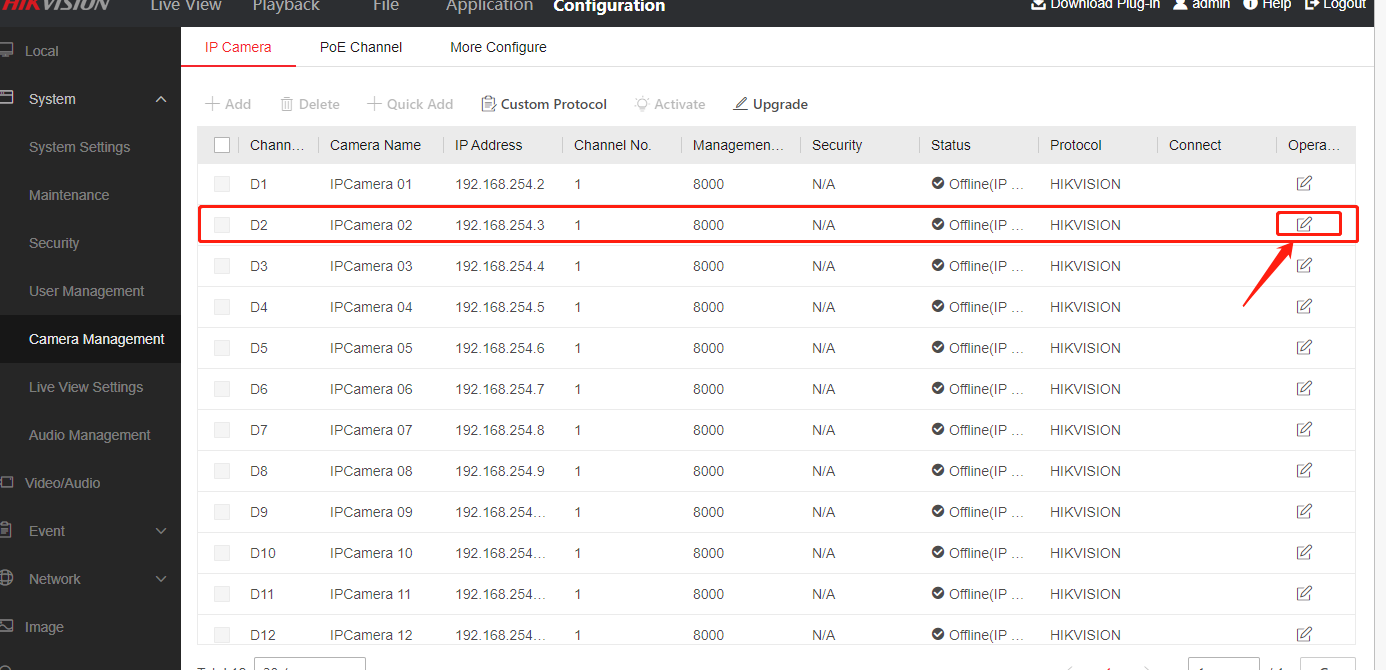
How to add Aibase color camera to Hikvision recorder?
- Updated on 14 Dec 2022
- 1 Minute to read
Camera model: Aibase color camera
Step by Step instruction
-
You need to modify the camera IP address first. You have to change IP address to 192.168.254.10-253. For example: 192.168.254.12.
-
Plug in the cameras to NVR directly
-
Go to Edit .
-
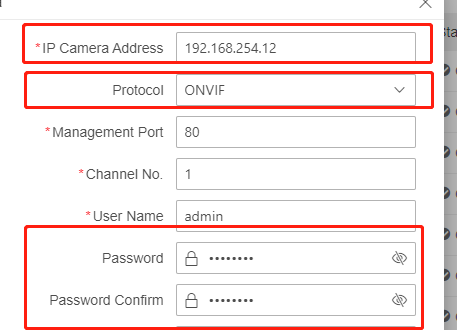
Select Manual in adding method.

-
Edit and input the camera password, IP address, Protocol
-
Camera online now.

Facial detection setup guide
- Updated on 14 Oct 2022
- 1 Minute to read
Step by Step instruction
You can go to the web interface of the recorder
Go to: Remote Setting ->AI -> FD -> Enable. Click OK to enable face detection.
-
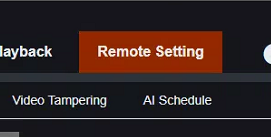
Click Remote Setting
-
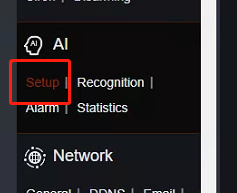
Click AI-Setup
-
Select FD and Enable the channel

-
Save the setting
-
Set FD schedule
LCD(line crossing) and PID(instruction detection) setup guide
- Updated on 14 Oct 2022
- 1 Minute to read
Step by Step instruction
- You can go to the web interface of the recorder
Go to: Remote Setting ->AI -> LCD .

- Set LCD schedule.
In the step 5, you just need to draw a line on the picture directly.
LPD(License Plate detection) setup guide
- Updated on 14 Oct 2022
- 1 Minute to read
Step by Step instruction
-
Click Remote Setting
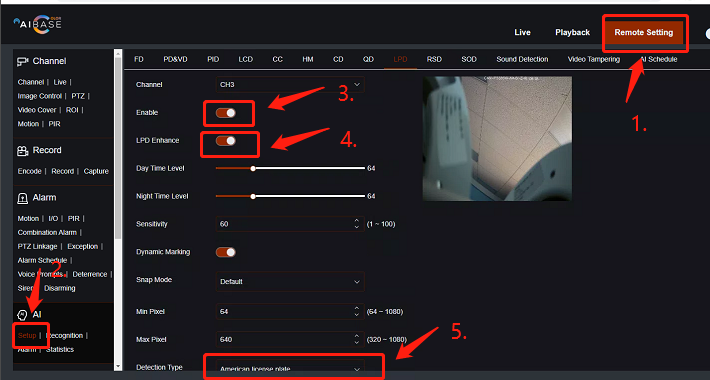
-
Click AI setup
-
Enbale LPD
-
Enable LPD enhance
-
Set Detection type to American licence plate
-
Set LPD Schedule.
People counting setup guide
- Updated on 14 Oct 2022
- 1 Minute to read
Step by Step instruction
- Click remote setting

- Click Setup
- Click LCD
- Enable LCD
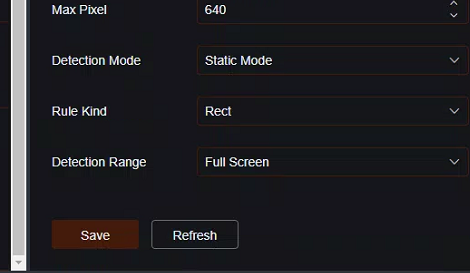
- Draw a rule at the camera picture directly
- Select Detection Type: vehicle or human
- Save it.
- Set LCD schedule.
PD&VD(people and vehicle detection) setup guide
- Updated on 14 Oct 2022
- 1 Minute to read
Step by Step instruction
- Click Remote Setting
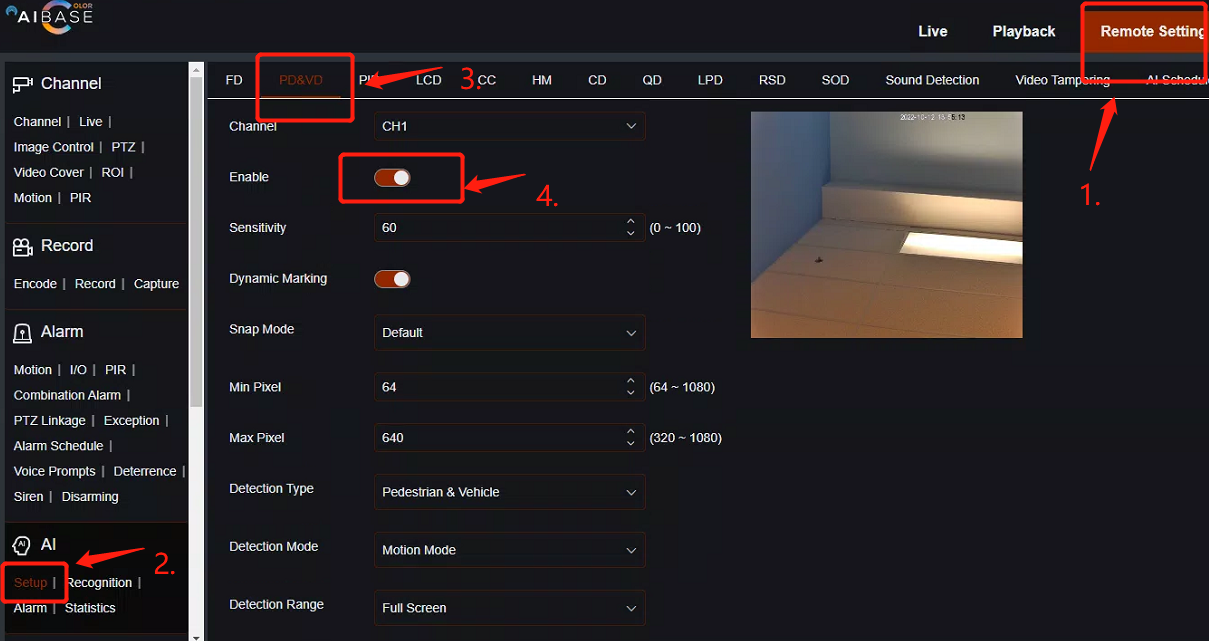
- Click Setup
- Select PD&VD
- Enable it
- Save it
- Set PD&VD schedule
AI smart schedule setup guide
- Updated on 13 Oct 2022
- 1 Minute to read
Step by Step instruction
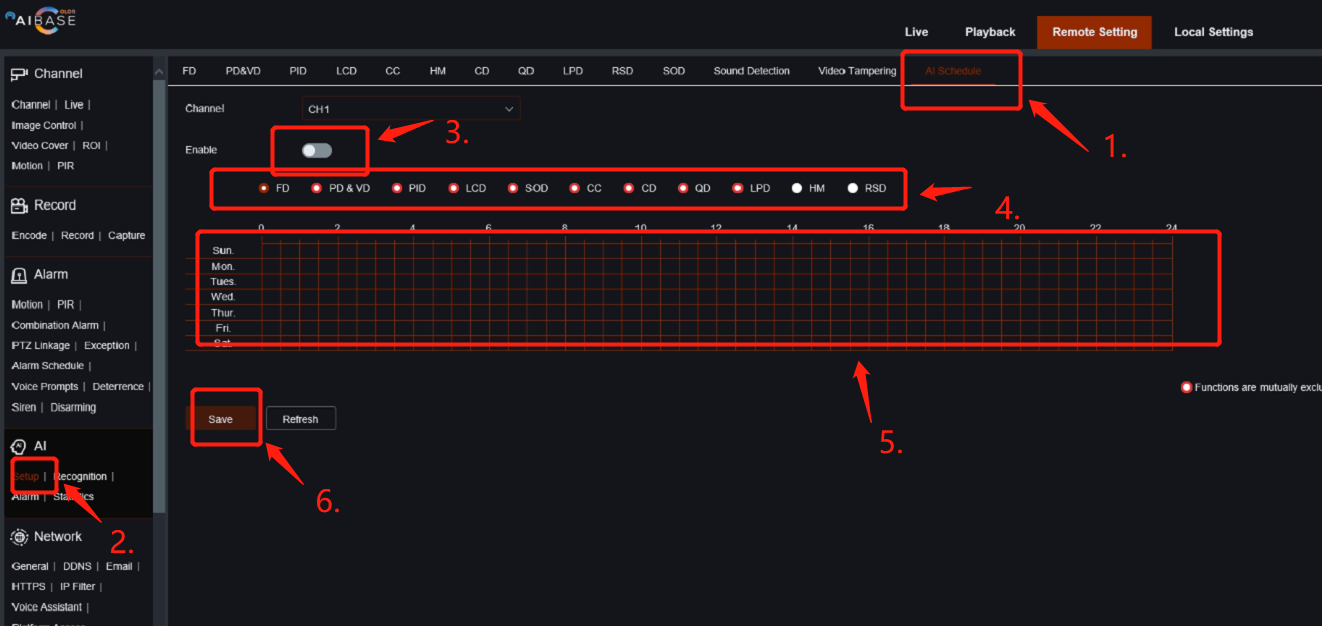
- Click setup(AI)
- Select AI smart schedule
- Enable schedule
- Select which function which you want to set schedule
FD/PD&VD/PID/LCD/SOD/CC/CD/QD/LPD/HM/RSD - Draw the green box

- Save it.
Voice Prompts setting guide
- Updated on 28 Jan 2023
- 1 Minute to read
Description
If you want to trigger your own voice record when something be detected, you could enable voice prompts as an active deterance function
Recorder model: NVR-3216-AI
Recorder firmware: 2023-01-17
Camera model: CAM-IP3155
Camera Firmware: 2022-11-03
Step by Step instruction
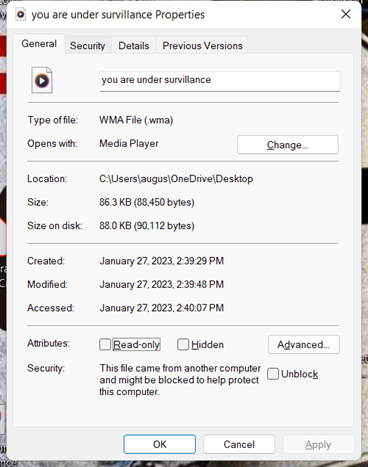
- Rocord your own voice prompts as file .wma
-
Go to NVR web interface, go remote setting voice prompts, click import.
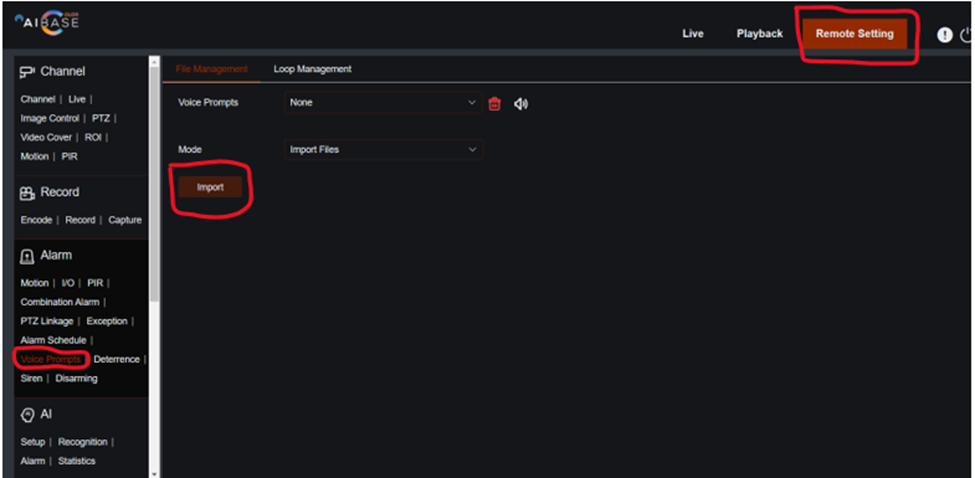
-
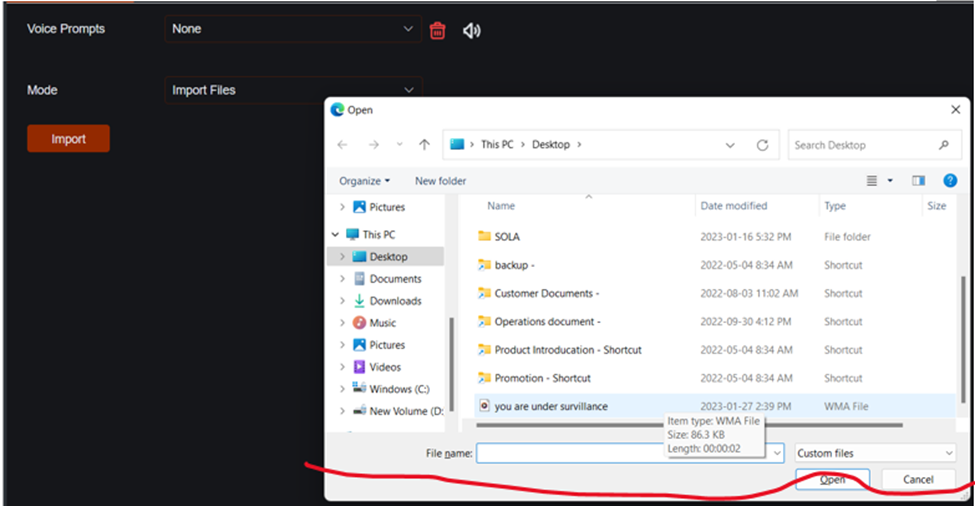
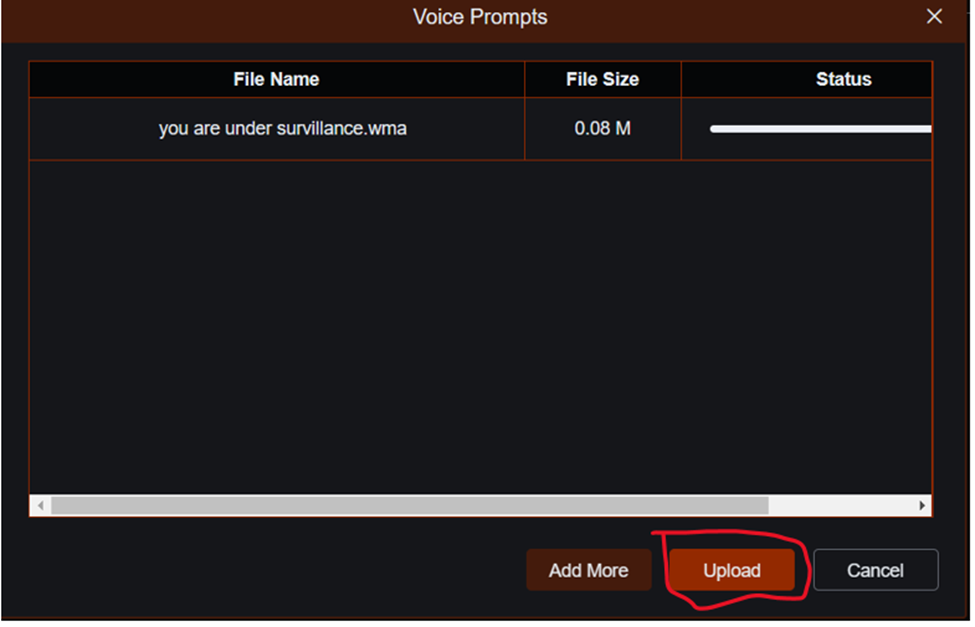
Import the voice file .wma and click upload
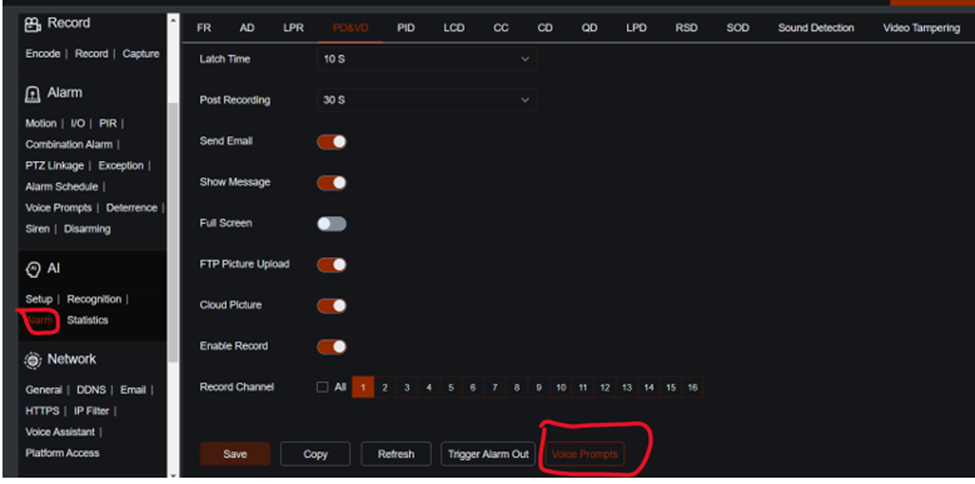
- Go to the AI Alarm and click voice prompts set the voice prompts

How to reboot and factory default your device
- Updated on 23 Oct 2022
- 1 Minute to read
Description
This article will show you how to reboot and factory default Aibase Color NVR and IP camera.
Step by Step instruction
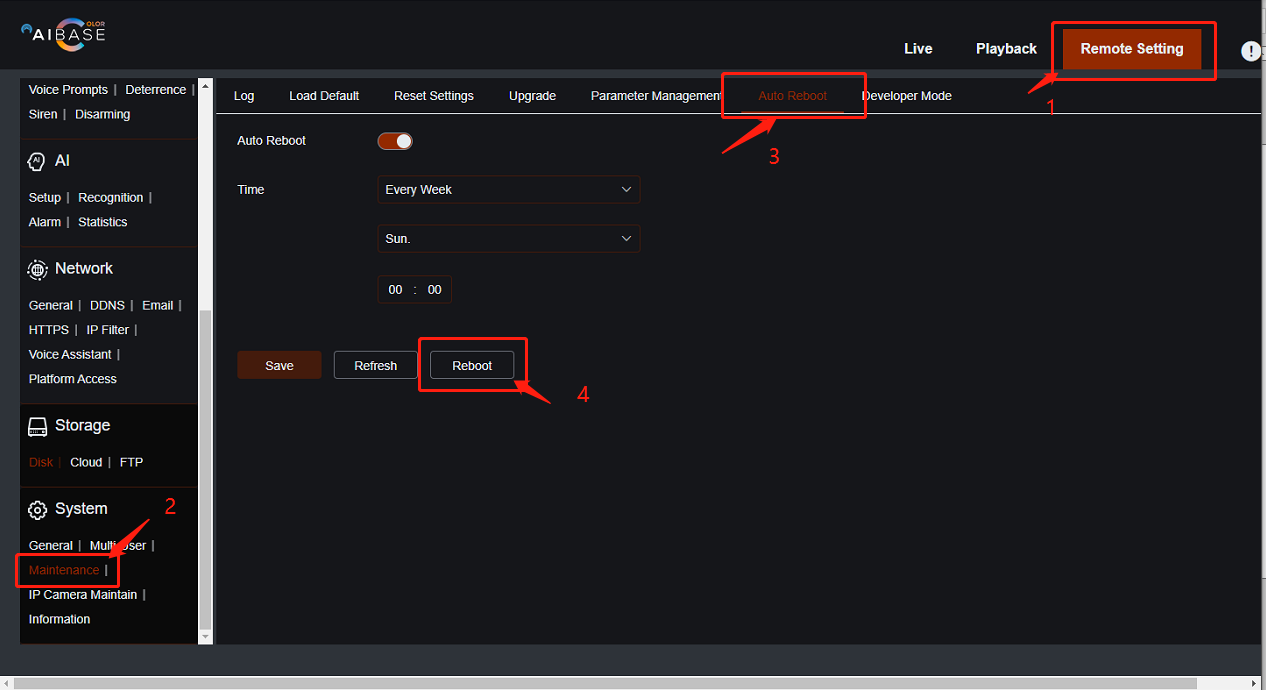
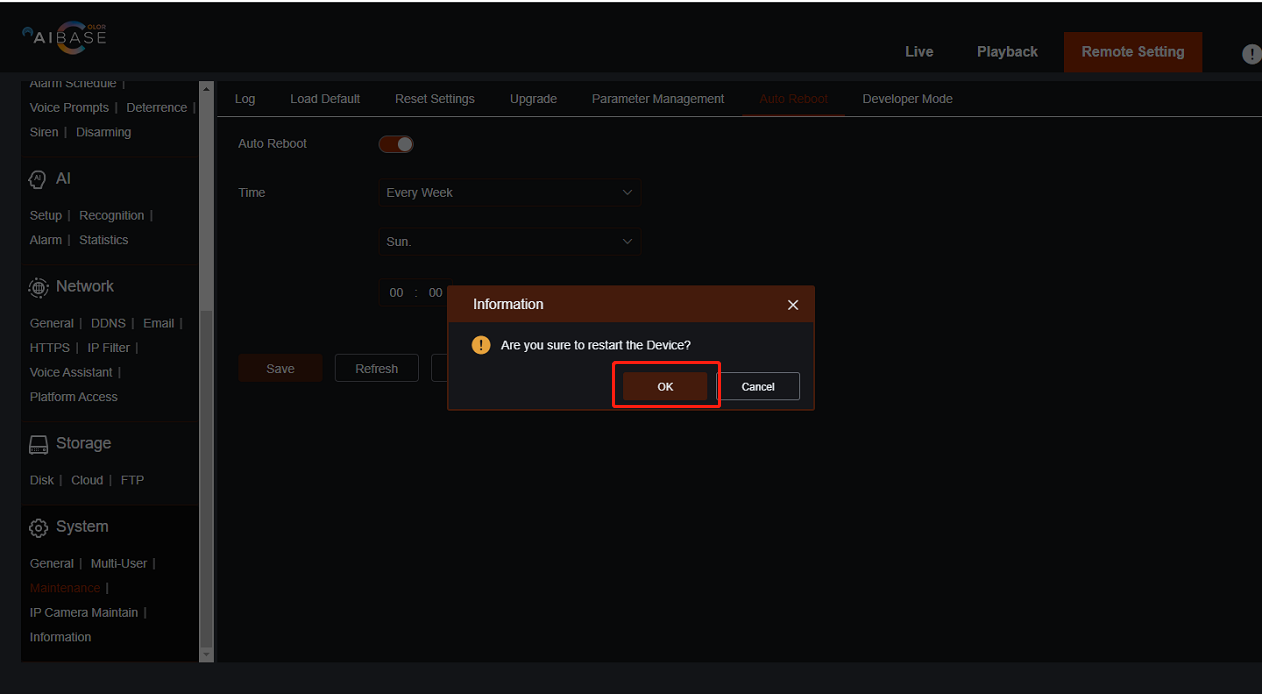
You can go to the web interface of the recorder to reboot the device (NVR and IPC):
Go to: Remote Setting -> System -> Maintenance -> Auto Reboot. Click OK to confirm reboot.
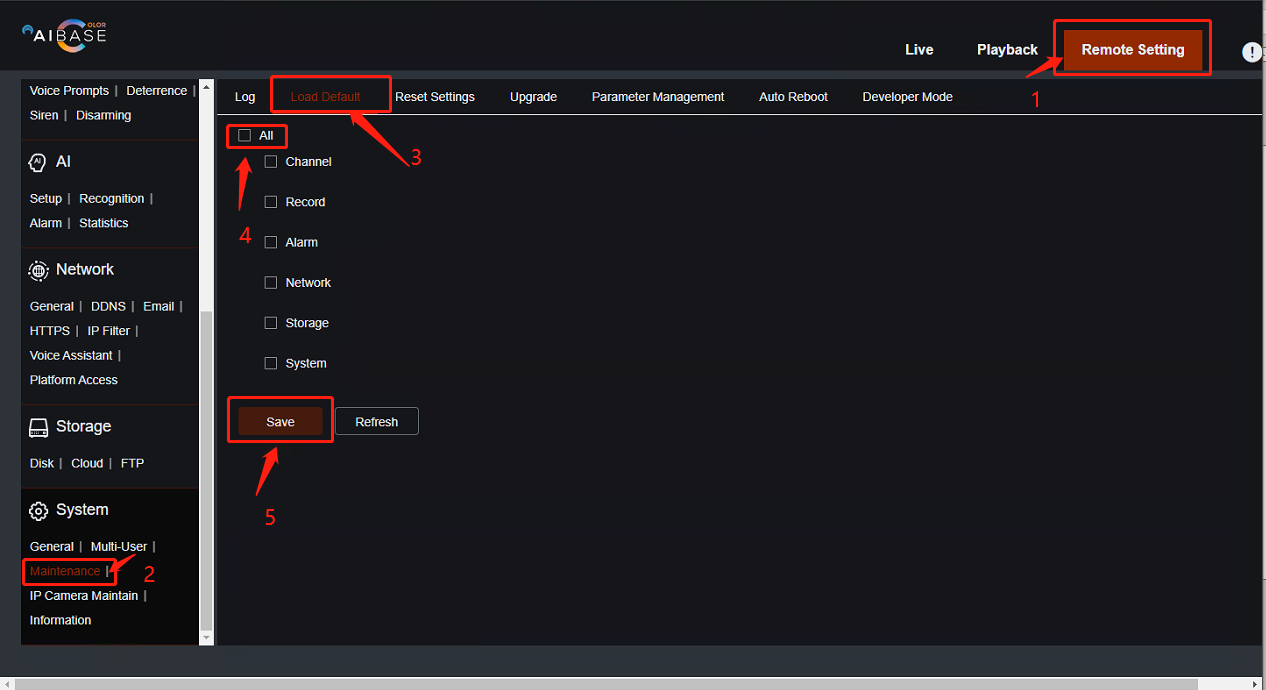
You can go to the web interface of the device to reset factory default:
- follow the steps:
Remote Setting -> System -> Maintenance -> Load Default. - Check "All" then Save
User account setup guide
- Updated on 11 Oct 2022
- 1 Minute to read
Description
This article will show you how to set up an user account in a NVR
Step by Step instruction
Go to: Remote Setting -> System -> Multi User
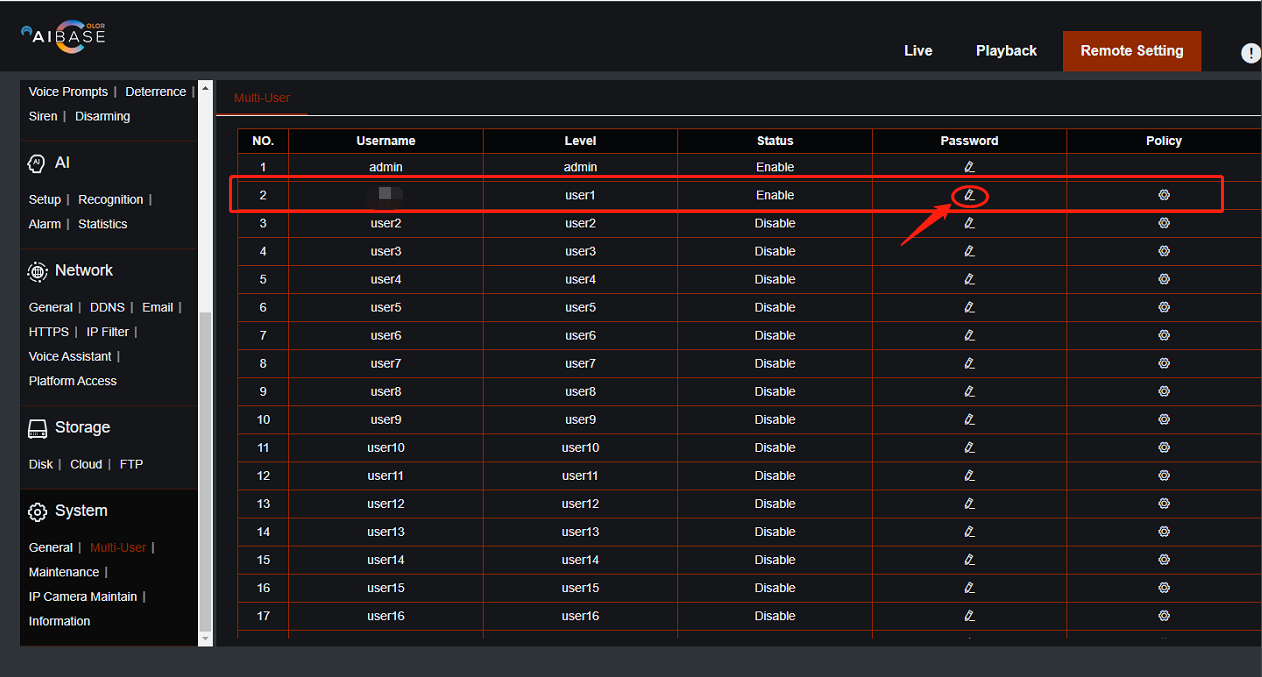
Click on Edit Password icon and assign user name and password for the user.
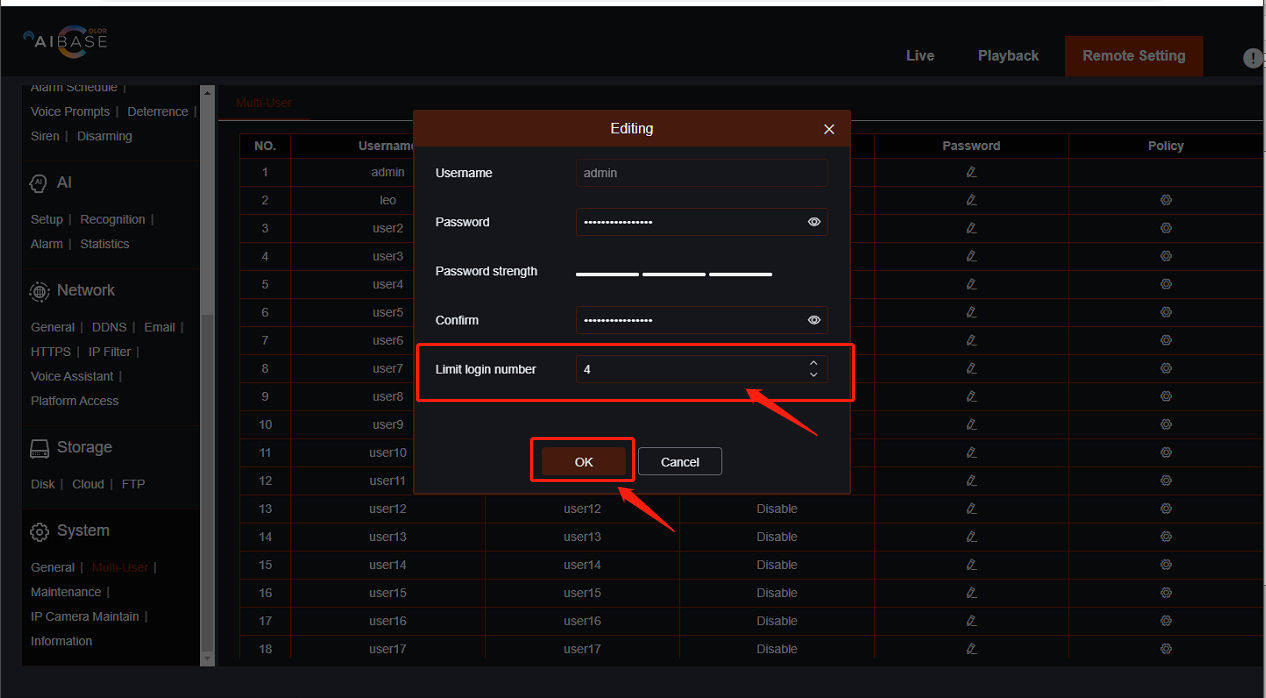
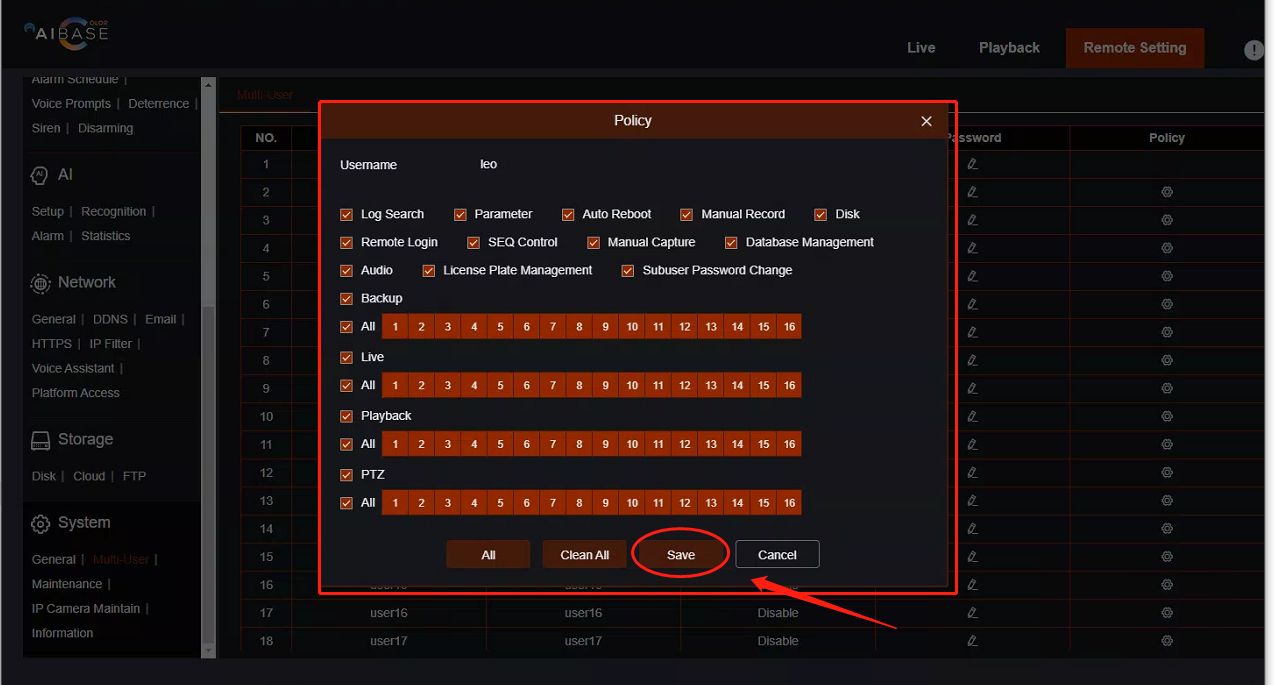
Hit on the Policy icon to set the permissions for the user and Save it.

Firmware upgrade instruction
- Updated on 23 Oct 2022
- 1 Minute to read
Description
This article is the instruction of Upgrade firmware for the AiBase Color NVR and IP Camera
Step by Step instruction
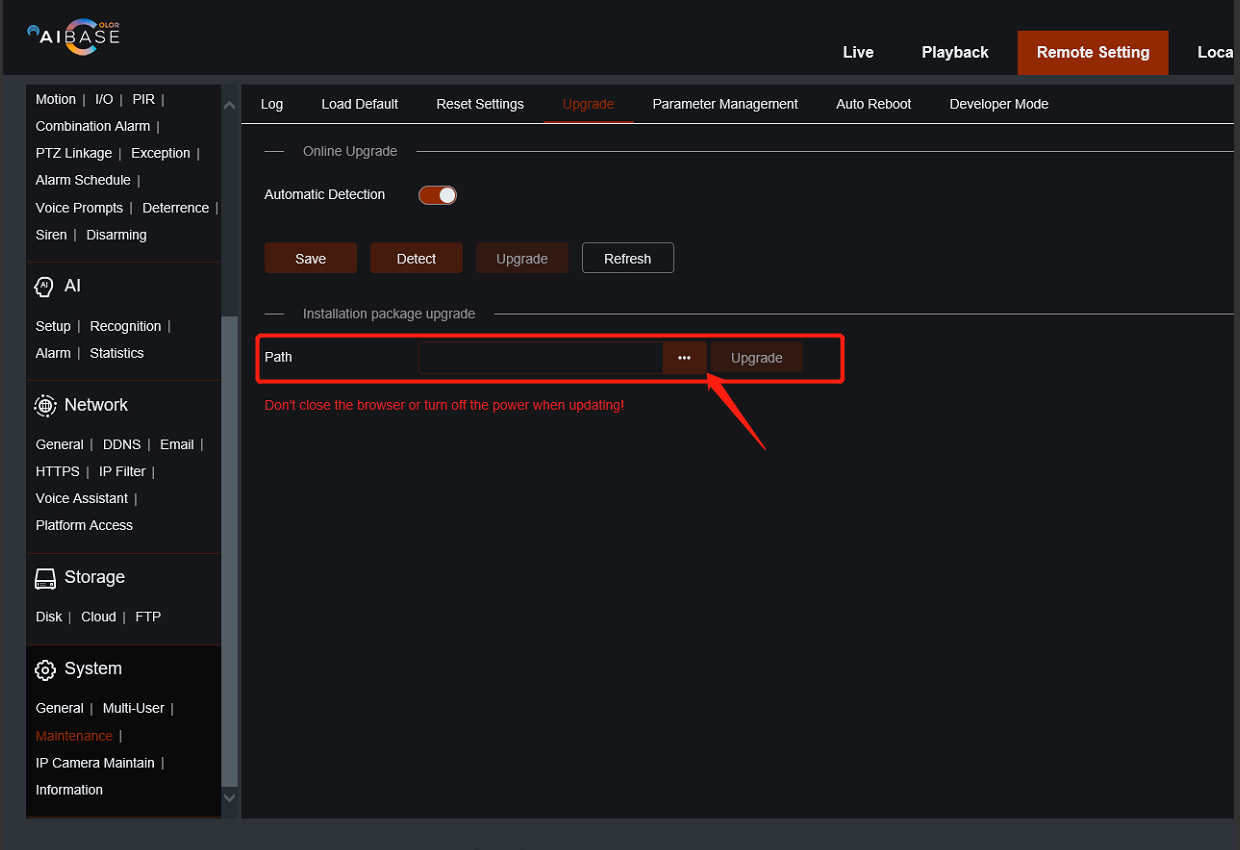
- Upgrade firmware for NVR:
When login to the NVR by using Web browser. If the firmware of your device is not up todate, The system will pop up a notification to remind you to upgrade.
You can go in to Remote Setting --> Maintenance --> Upgrade. Find out the upgrade file to upgrade the device.

- Upgrade firmware for IPC
It similar to the NVR upgrade. Login to IPC web UI. Go to Remote Setting --> Maintenance --> Upgrade. Find out the upgrade file to upgrade the IPC.
{height="" width=""}
Format harddrive instruction
- Updated on 23 Oct 2022
- 1 Minute to read
Description
This article is the instruction of how to format the hard drive from the recorder
Step by Step instruction
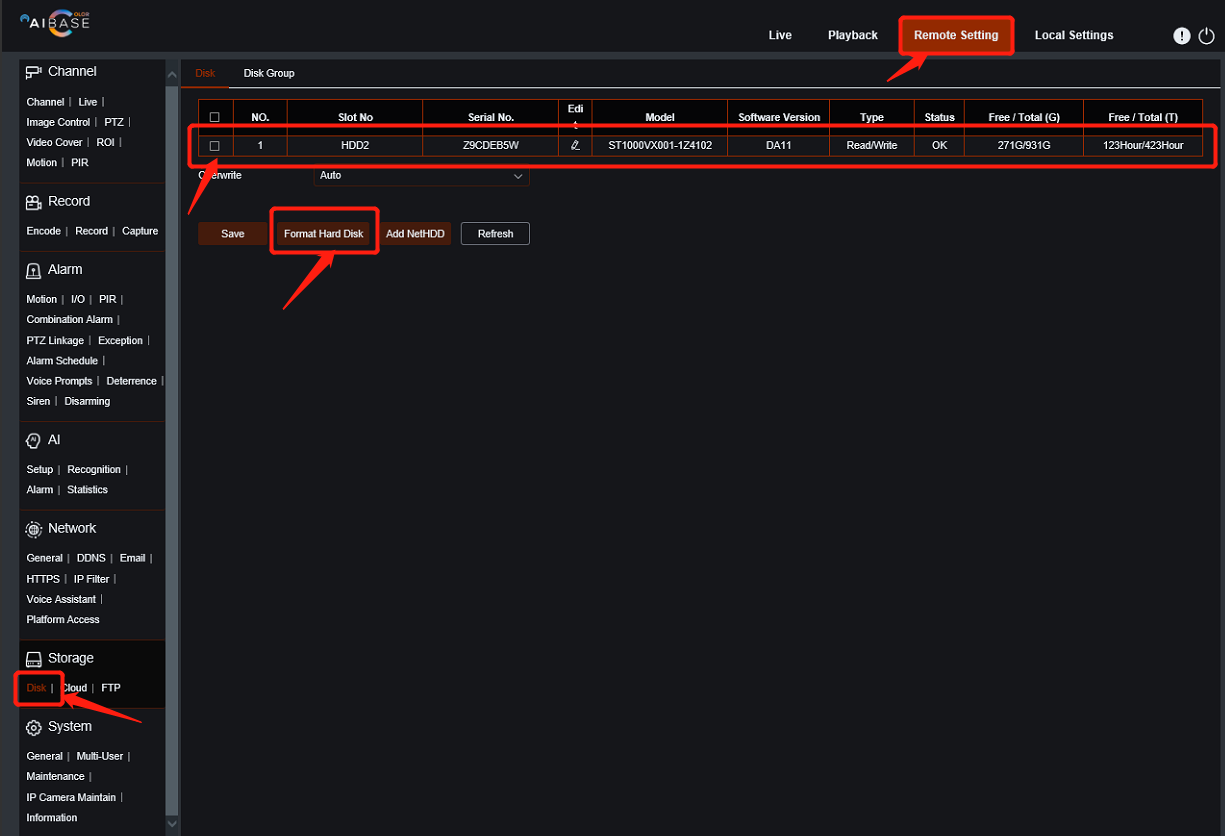
You can login to the NVR through web UI to format the hard drive.
Go to Remote Setting --> Storage --> Disk, Select the hard drive, which you want to format then hit the Format Hard Dick button.
How to default your IP camera via NVR
- Updated on 24 Oct 2022
- 1 Minute to read
Description
This article is the instruction of How to default your IP camera through NVR
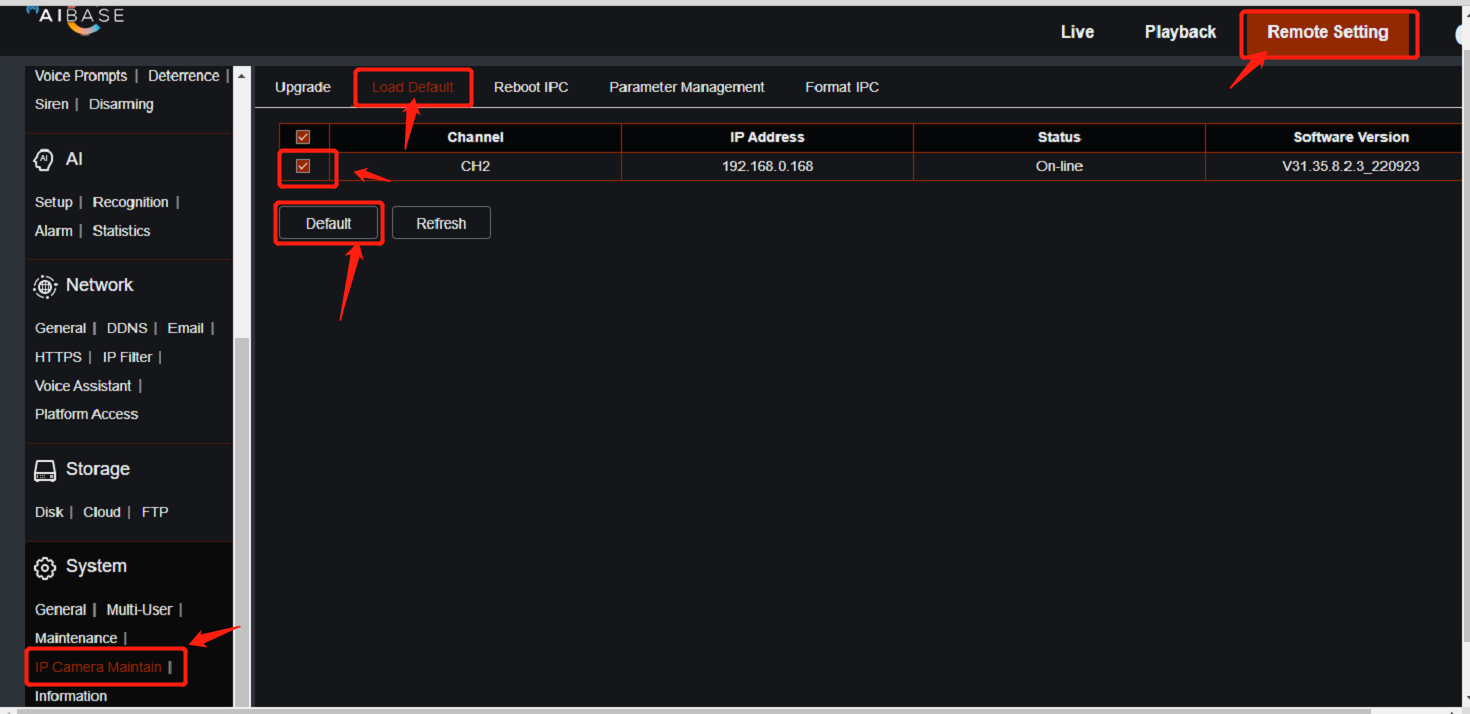
Step by Step instruction
To default a camera, which is added into the NVR, go to Remote Setting --> IP Camera Maintain --> Load Default to select the camera then click Default button.
How to reset password Aibase color Recorder?
- Updated on 29 Nov 2022
- 1 Minute to read
- Find the reset hole in the back of the recorder
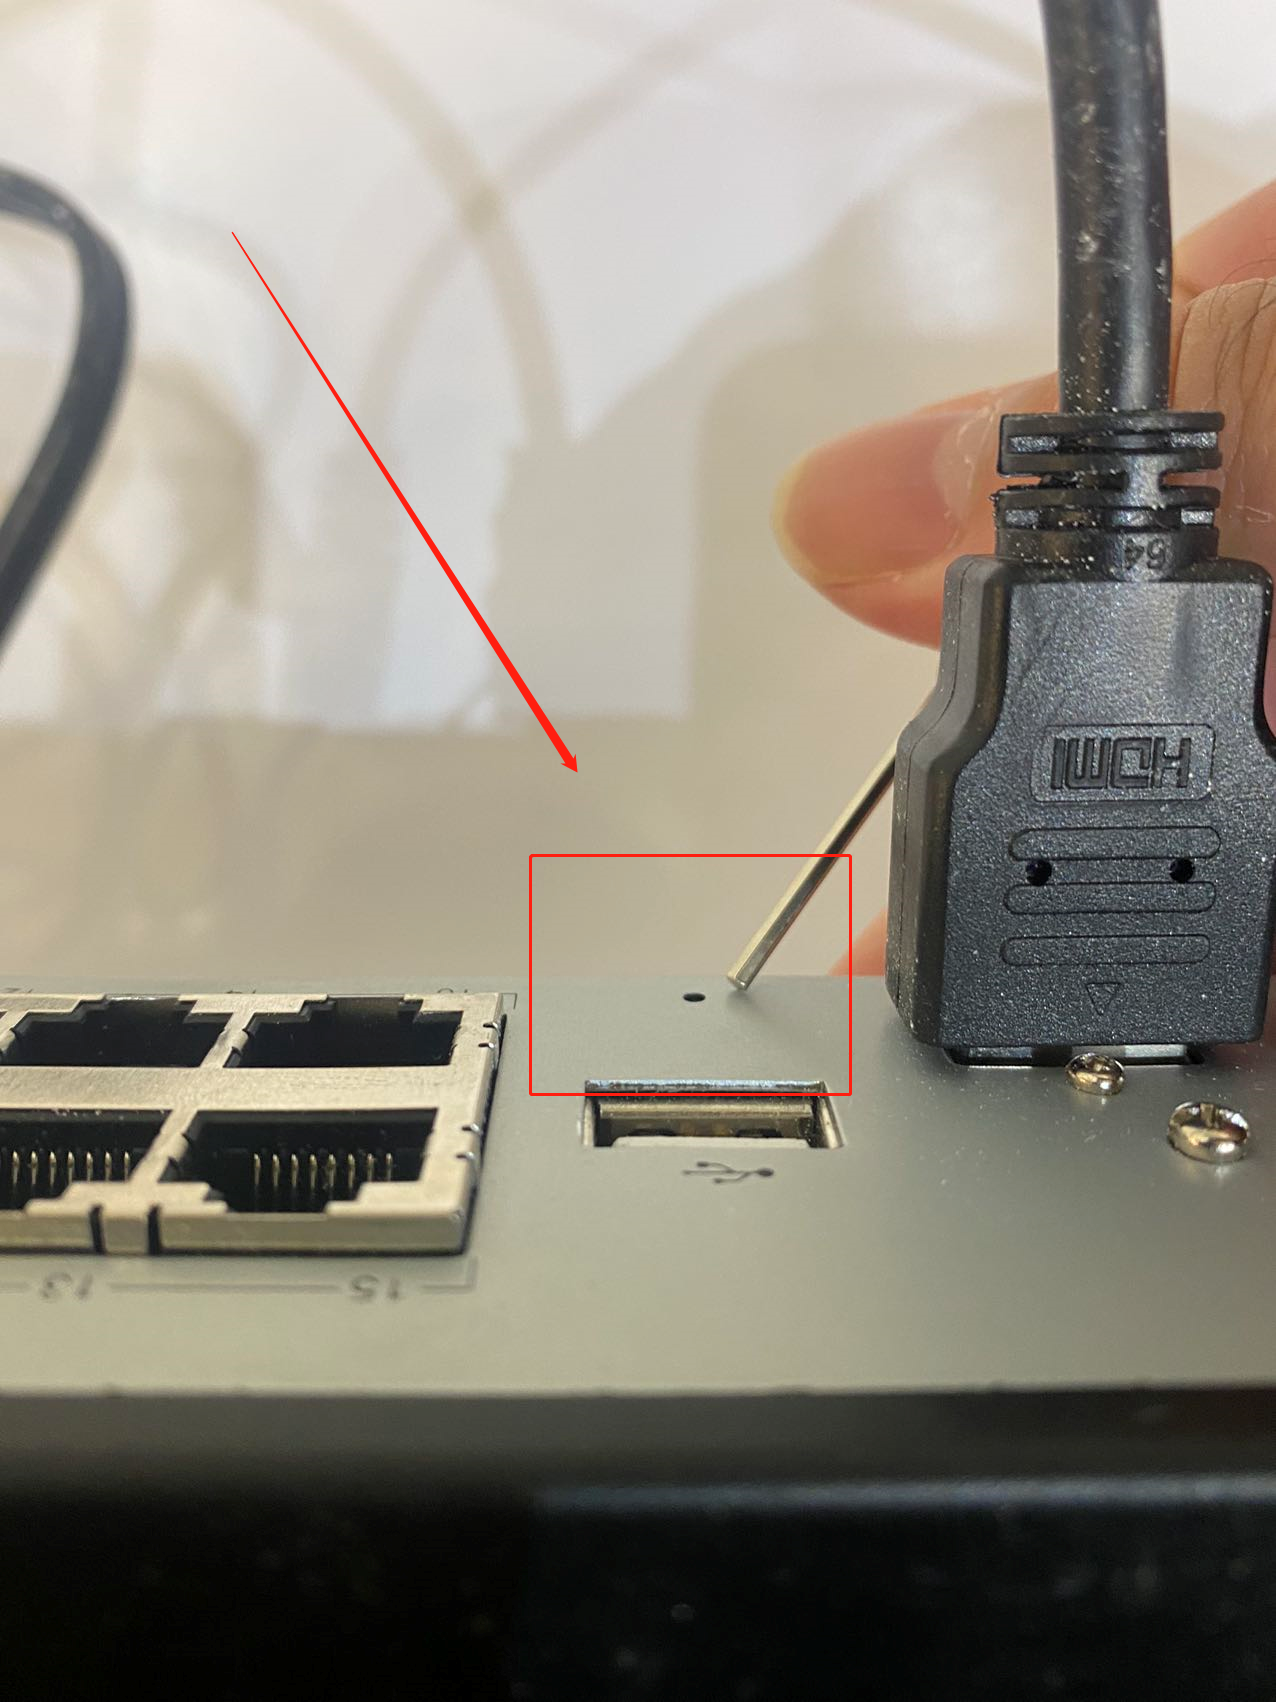
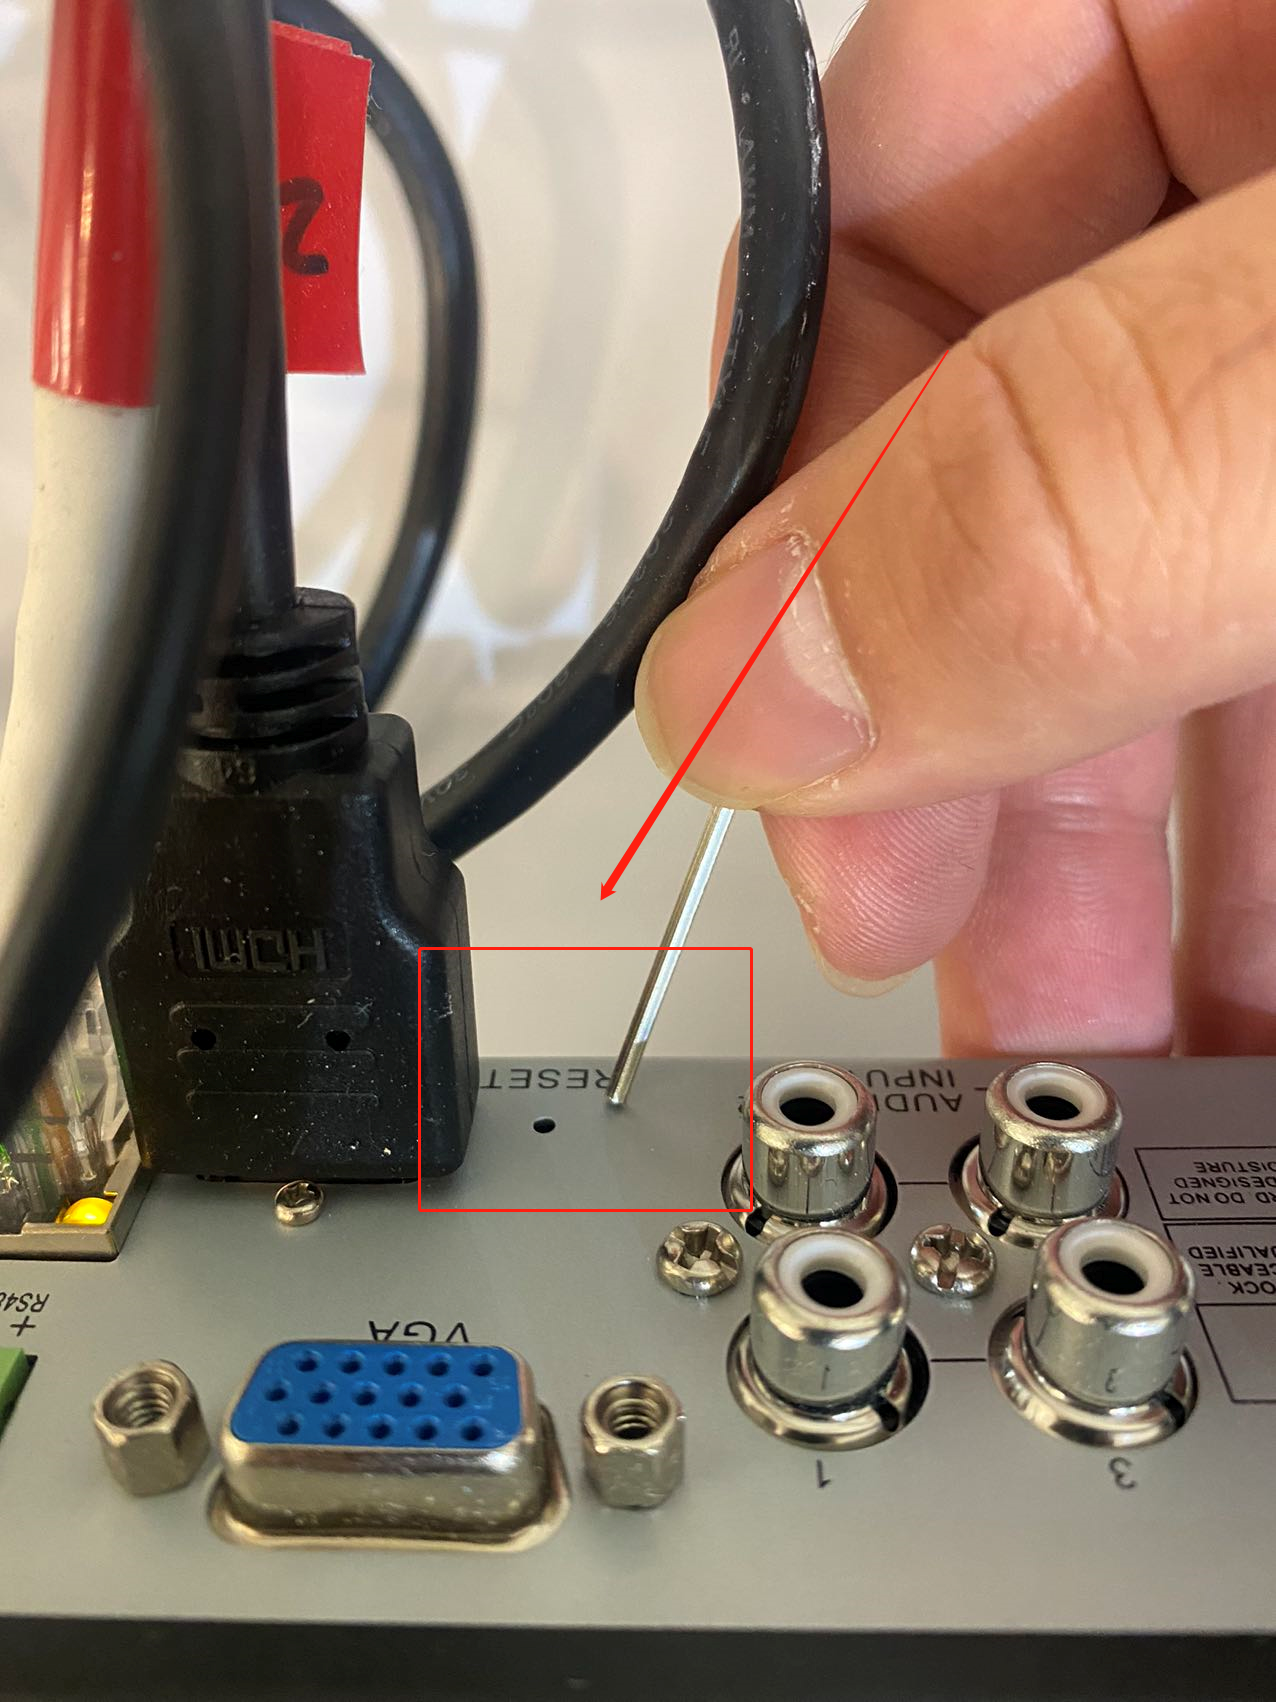
- When the power is on, insert the pin for 10 seconds and the system will restore the factory Settings.
How to upgrade Ai color cameras and NVR firmware?
- Updated on 23 Jan 2023
- 1 Minute to read
Make sure your recorder has connected to the Internet successfully.
We have two ways to upgrade firmware:
** Locally upgrade the firmware.**
1.Upgrade the recorder firmware first.
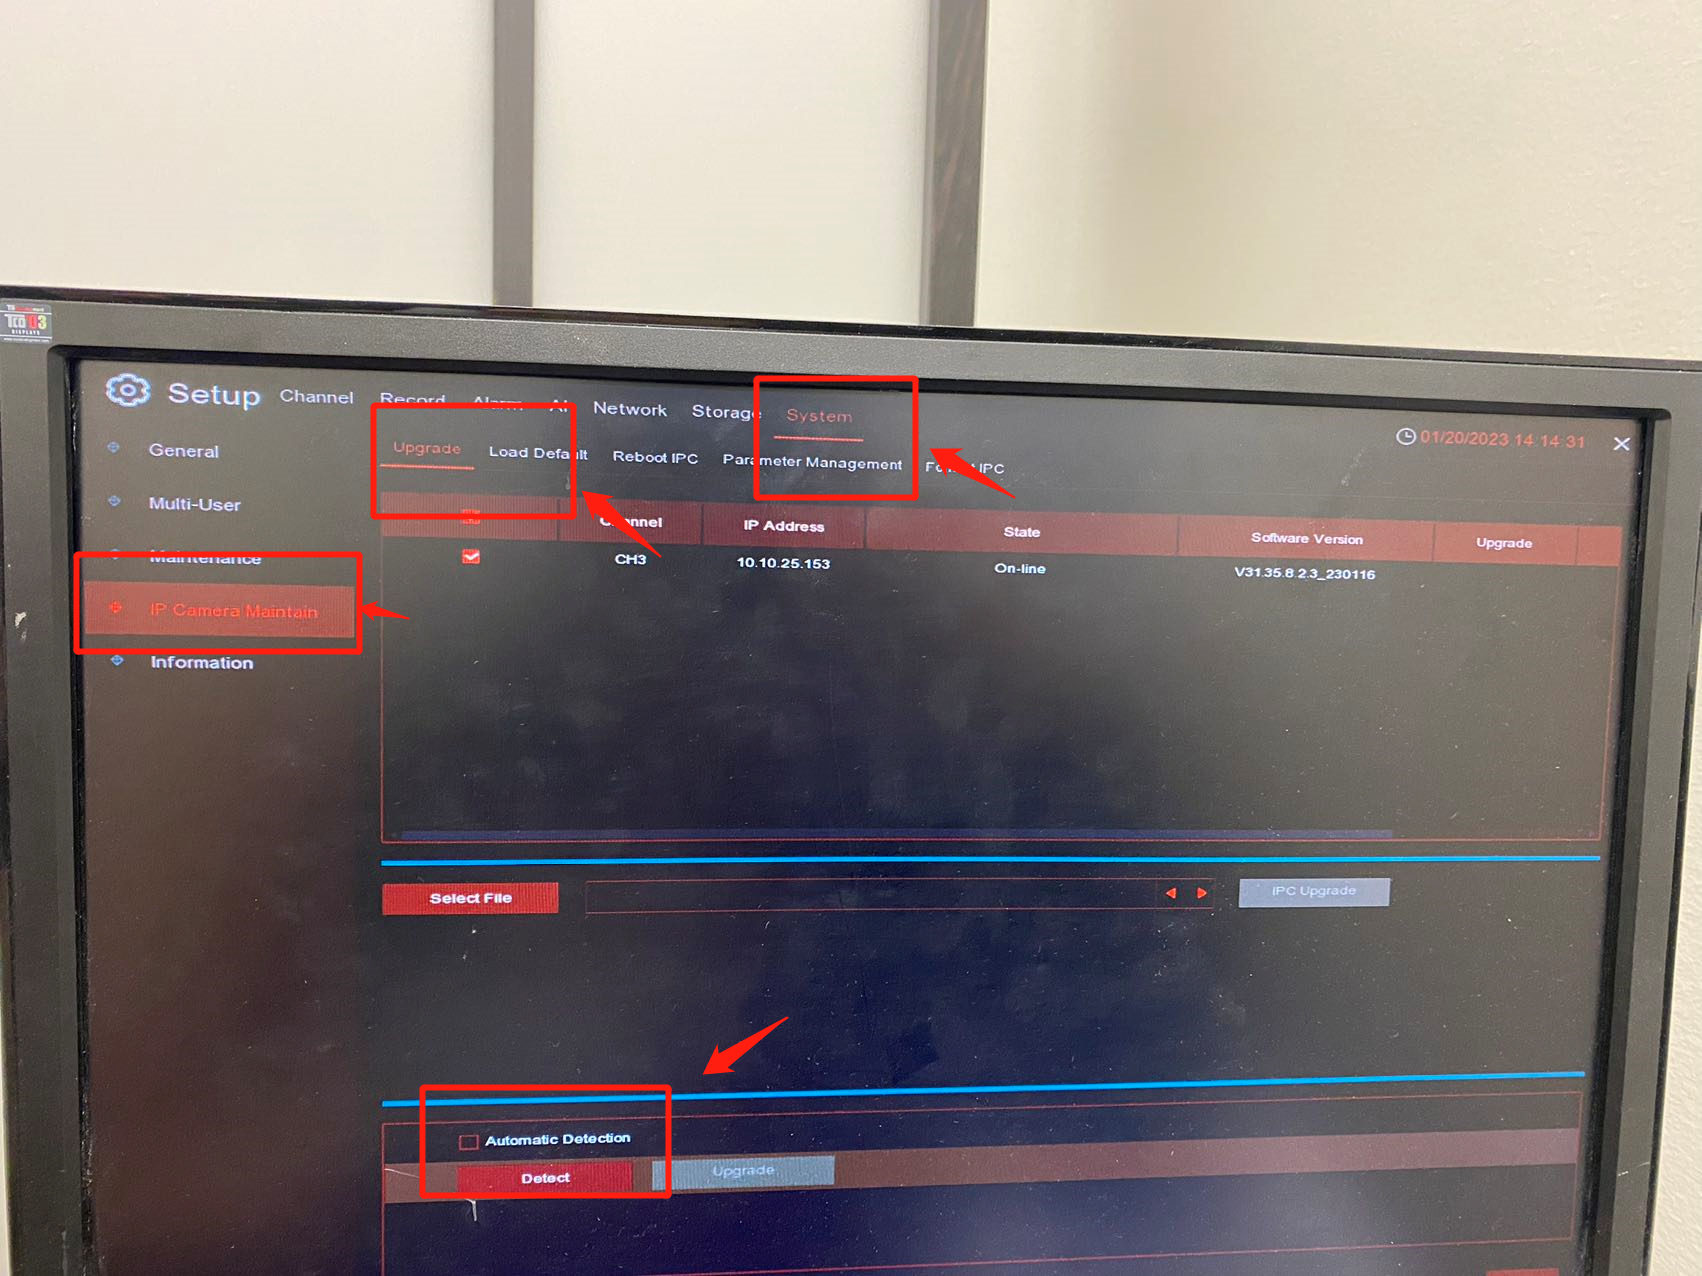
System--->Upgrade--->Maintain--->Click Detect--->input password

2.And then upgrade the camera firmware.
System-->IP Camera Maintain--->Upgade--->Detect
Remotely upgrade the firmware.
- Login in your AI color VMS
- Go to device management-->Setting

- upgrade recorder first, Click System--->Maintain--->Upgrade--->Detect
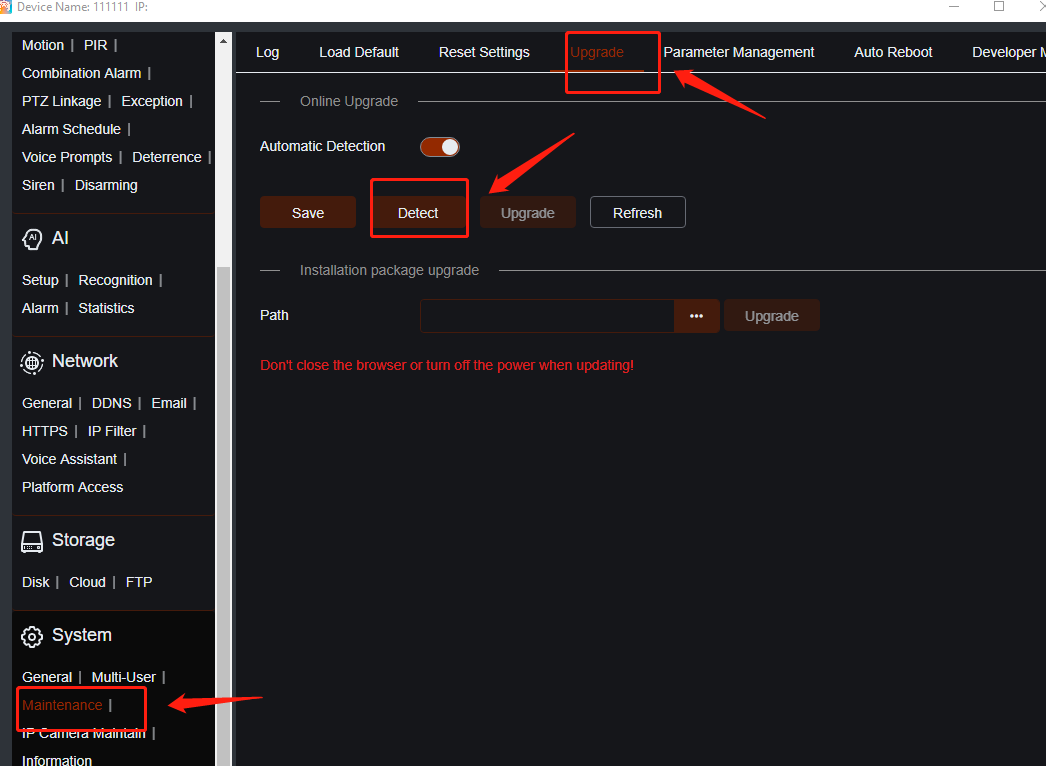
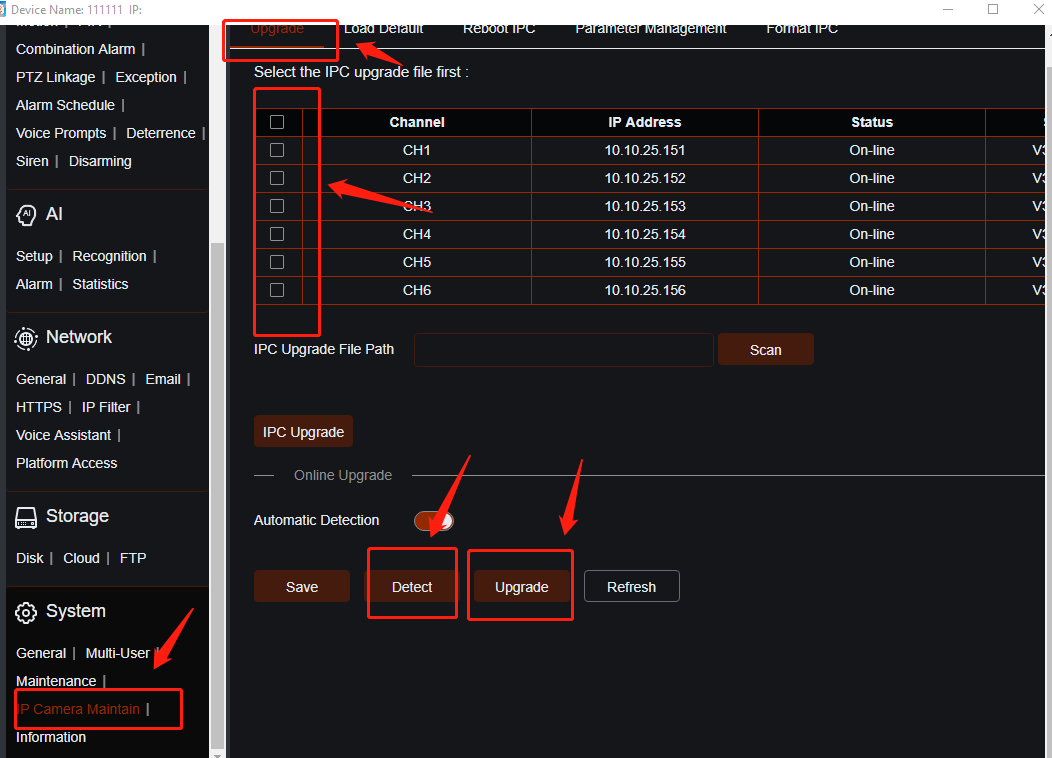
- and then upgrade cameras.
IP camera maintain---> Upgrade--->Select All cameras--->Detect first--->Click upgrade
How to add third party camera to Aibase color recorder?
- Updated on 27 Jan 2023
- 1 Minute to read
Recorder model: Aibase color recorder
Camera model: Support Onvif protocol.
Step by Step instruction
-
You need to modify the camera IP address first. You have to change IP address to 10.10.25.151-*** For example: 10.10.25.153.
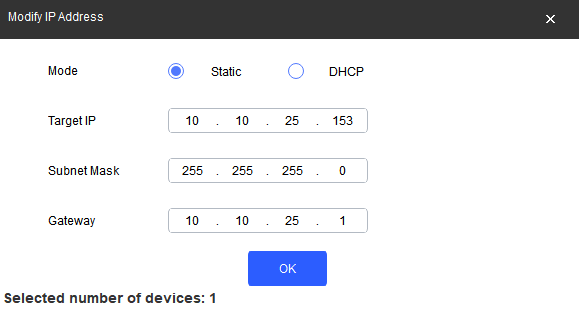
-
Plug in the cameras to NVR directly
-
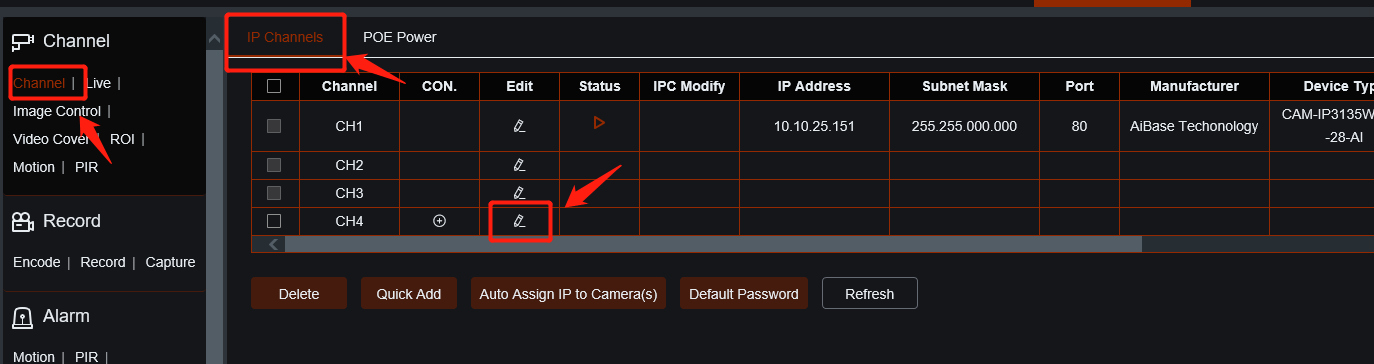
Go to channel-->IP channels---> Edit .
-
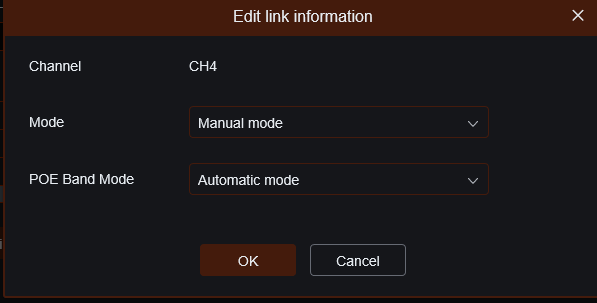
Select manual mode.
-
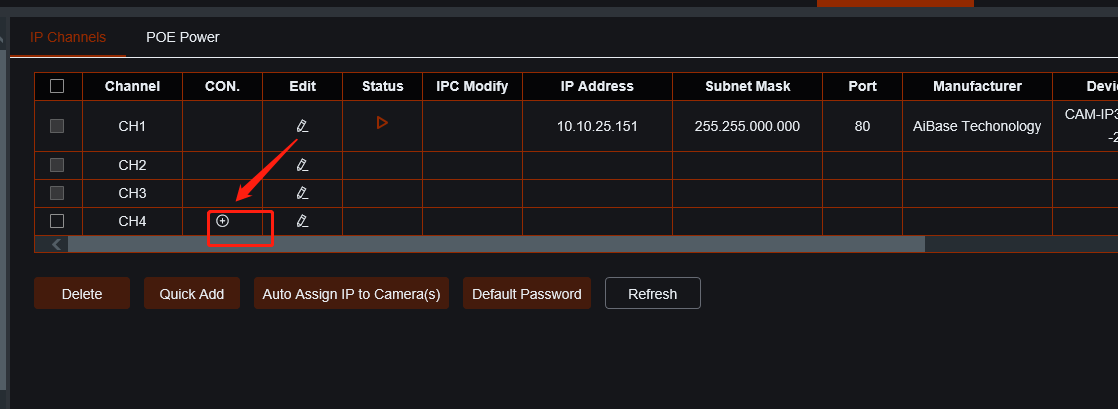
Click Add
-
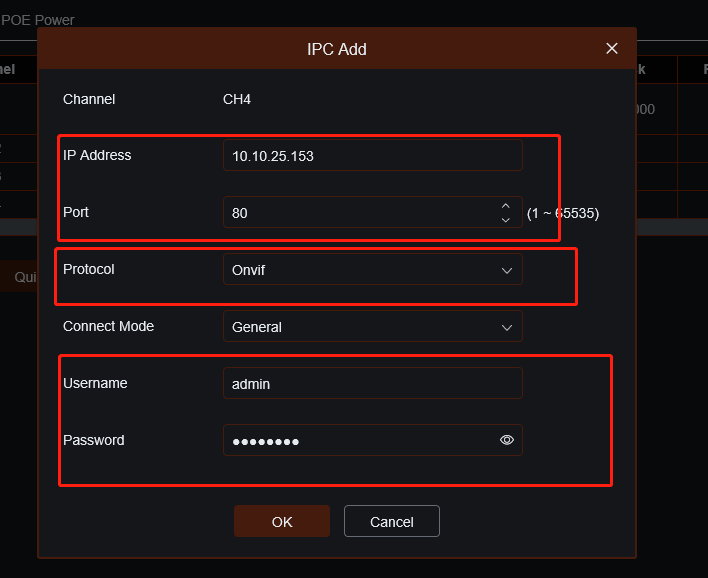
Input IP address, port, protocol,username and password
-
Camera online now.
How to add device in the AI color app
- Updated on 23 Oct 2022
- 1 Minute to read
Description
This article will show you how to add device in the AI color APP.
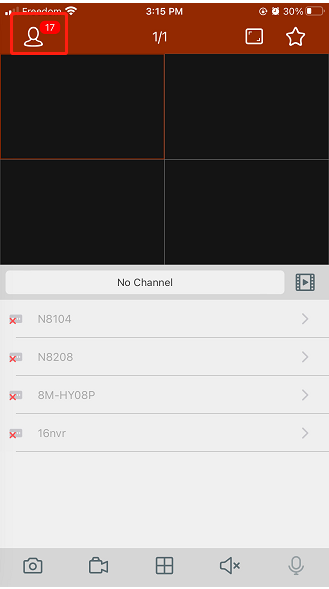
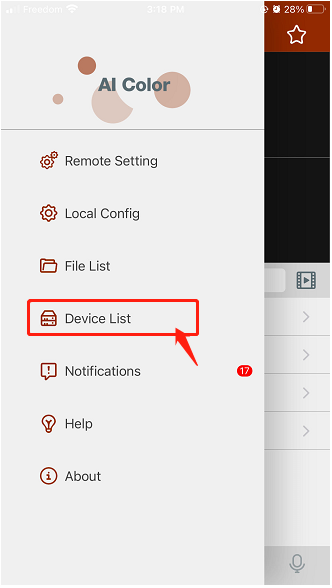
Step by Step instruction
-
Download the AI Color APP from Apple store or google play and install the APP in the smart phone.
-
Access to Device List then hit the Plus icon on the top right corner and select IPC/NVR/DVR
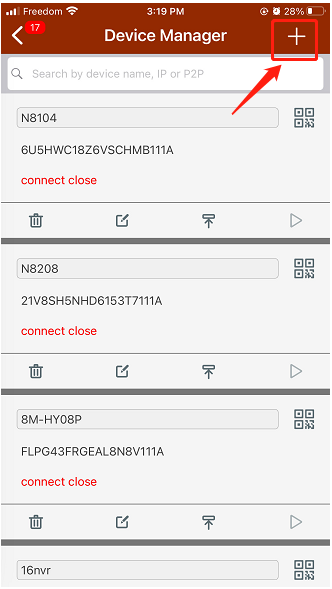
- Scan the QR code of the device. Enter the user name and password of the device then save setting. You ready to go for the management.

How to setup custom view in the AI color app
- Updated on 23 Oct 2022
- 1 Minute to read
Description
**This article will show you how to setup custom view in the AI color APP.
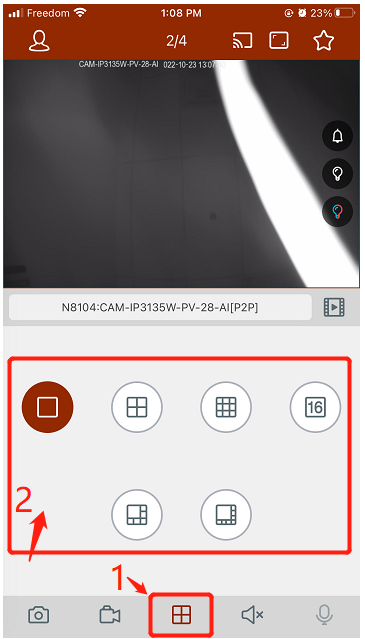
Step by Step instruction
To set up custom view on the AI Color APP, hit on the
 icon, then select the views, which you want.
How to do two-way talk in the AI color app
- Updated on 23 Oct 2022
- 1 Minute to read
Description
**This article will show you how to do two-way talk in the AI Color APP **
Prerequisite
Recorder model: All Models of NVR / DVR
Camera model: Camera should have the Two-way talk function
Step by Step instruction
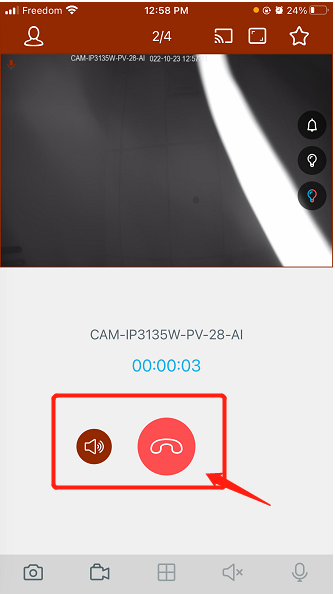
- Select the camera, which you want to make two-way talk. Click on the Mic icon, which shows on figure 1 and you can have two-way talk through the APP. To end the talk, hit on the hand up icon in figure 2.
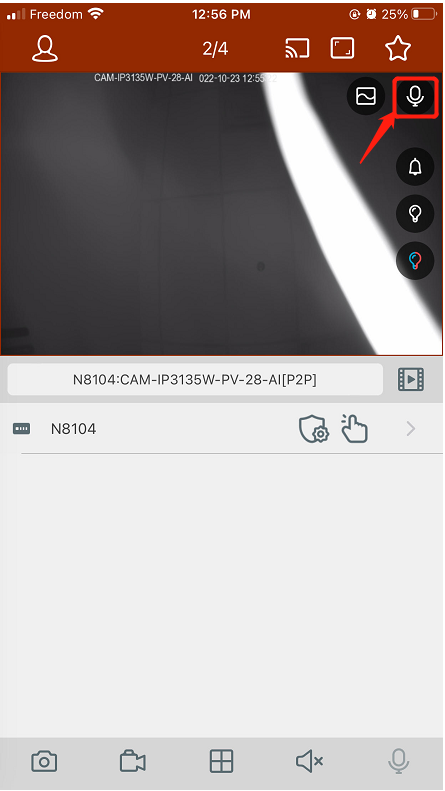
Figure 1
How to remote config NVR in the AI color app
- Updated on 23 Oct 2022
- 1 Minute to read
Description
This article will show you how to remote config NVR in the AI Color APP
Step by Step instruction
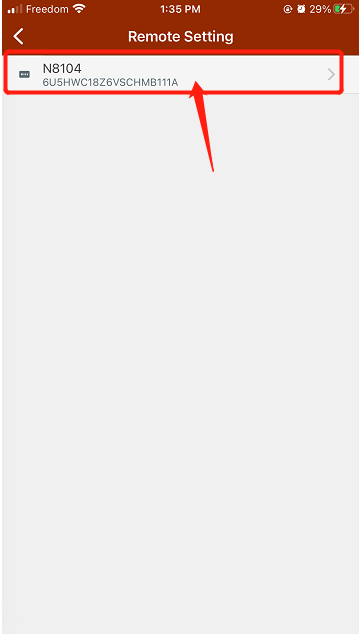
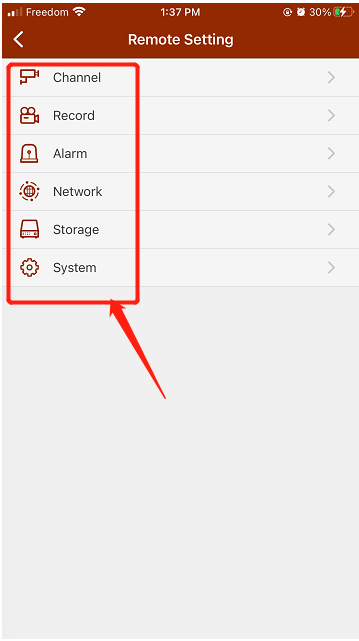
- Select Remote Seeting on the APP then select the NVR, which you want to configure.
- You can configure the function based on the NVR.

Manually capture in the AI color app
- Updated on 23 Oct 2022
- 1 Minute to read
Description
**This article will show you how to mae a capture manually in the AI Color APP.
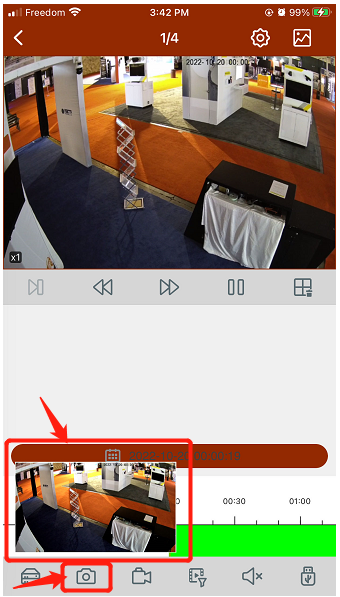
Step by Step instruction
- On the liveview or playback view. If you want to take a capture, just hit the camera icon in the bottom of the menu bar. A picture will be captured.

- Double click on the picture, you can send out snapshot through the 3 party of the soatware such as WhatsApp, Instagram, email etc.
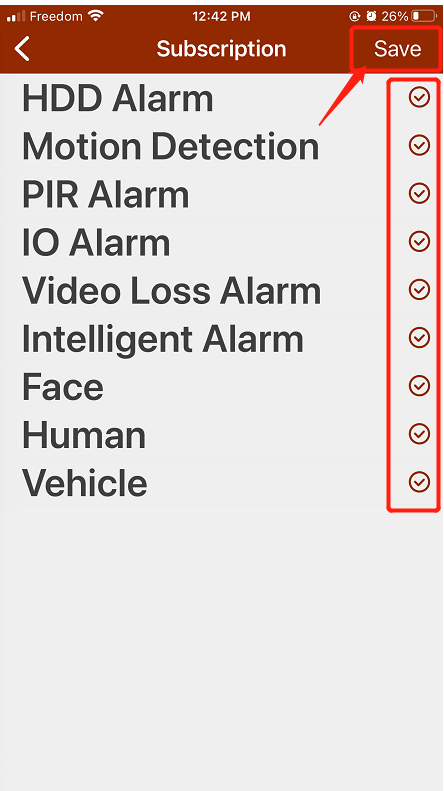
Enable notification in the AI color app
- Updated on 23 Oct 2022
- 1 Minute to read
Description
This article will show you how to enable notification in the AIcolor APP.
Step by Step instruction
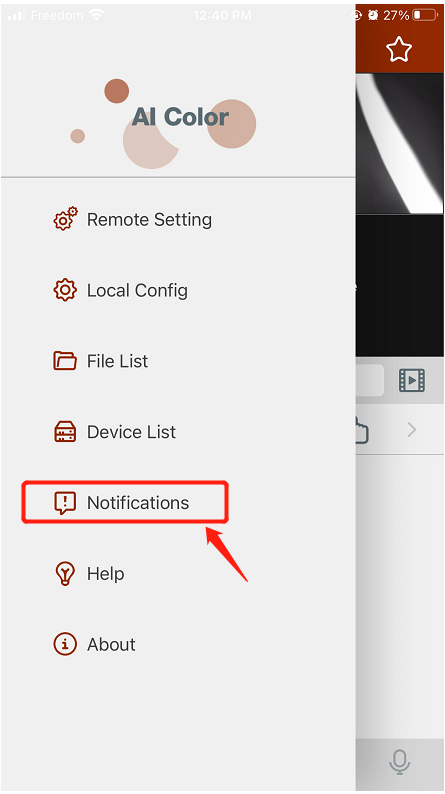
To Enable notification on the AI Color APP, Follow the figures to enable the push Notifications for the device, which you want to have the event notifications.
 {height="" width=""}
Figure 1
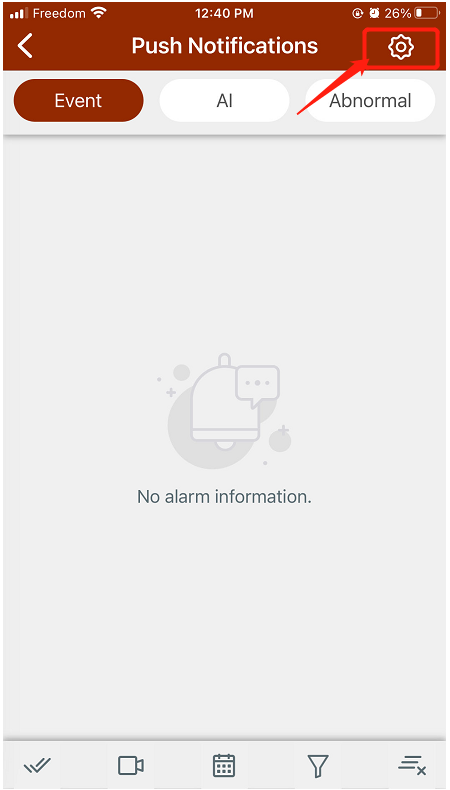
Figure 2
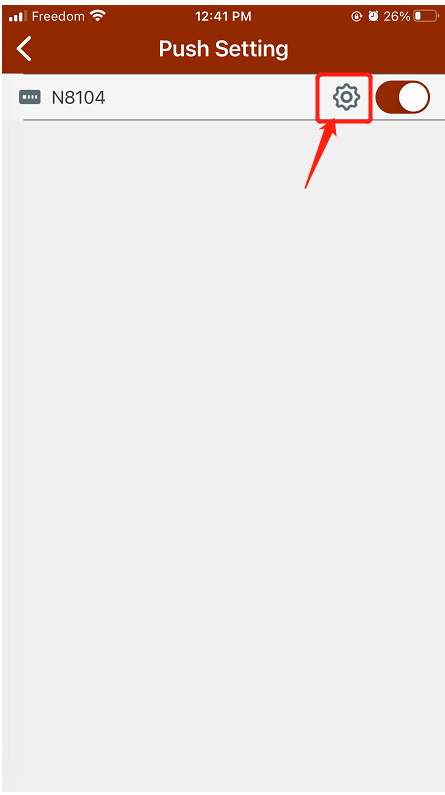
Figure 3
Ai Color Android APP notification unrestricted setting
- Updated on 24 Jan 2024
- 1 Minute to read
Description
Ai Color Android APP notification unrestricted setting.
Step by Step instruction
When notification are not working on your Ai Color Android app. If you receive the notification badge on the main screen but when go into the Ai Color app, select notifications there are no notifications listed. Please follow the setting bolow and let the APP always run in backgroud.

Figure 1
Please note that allowing the APP to always run in the backgroud may reduce battery life. You can change this later from Settings--> Apps & nitifications.

Figure 1
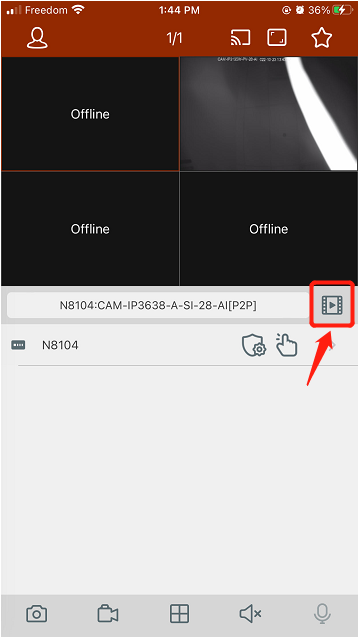
How to playback in the AI color app
- Updated on 23 Oct 2022
- 1 Minute to read
Description
This article will show you how to playback in the AI Color APP
Step by Step instruction
-
Hit on the Playback icon (Figure 1)
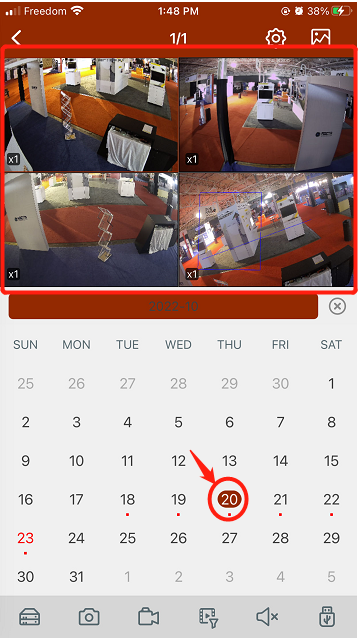
-
Select day and time that you want to playback.

- Once you selected the day & time, the playback will be show up.
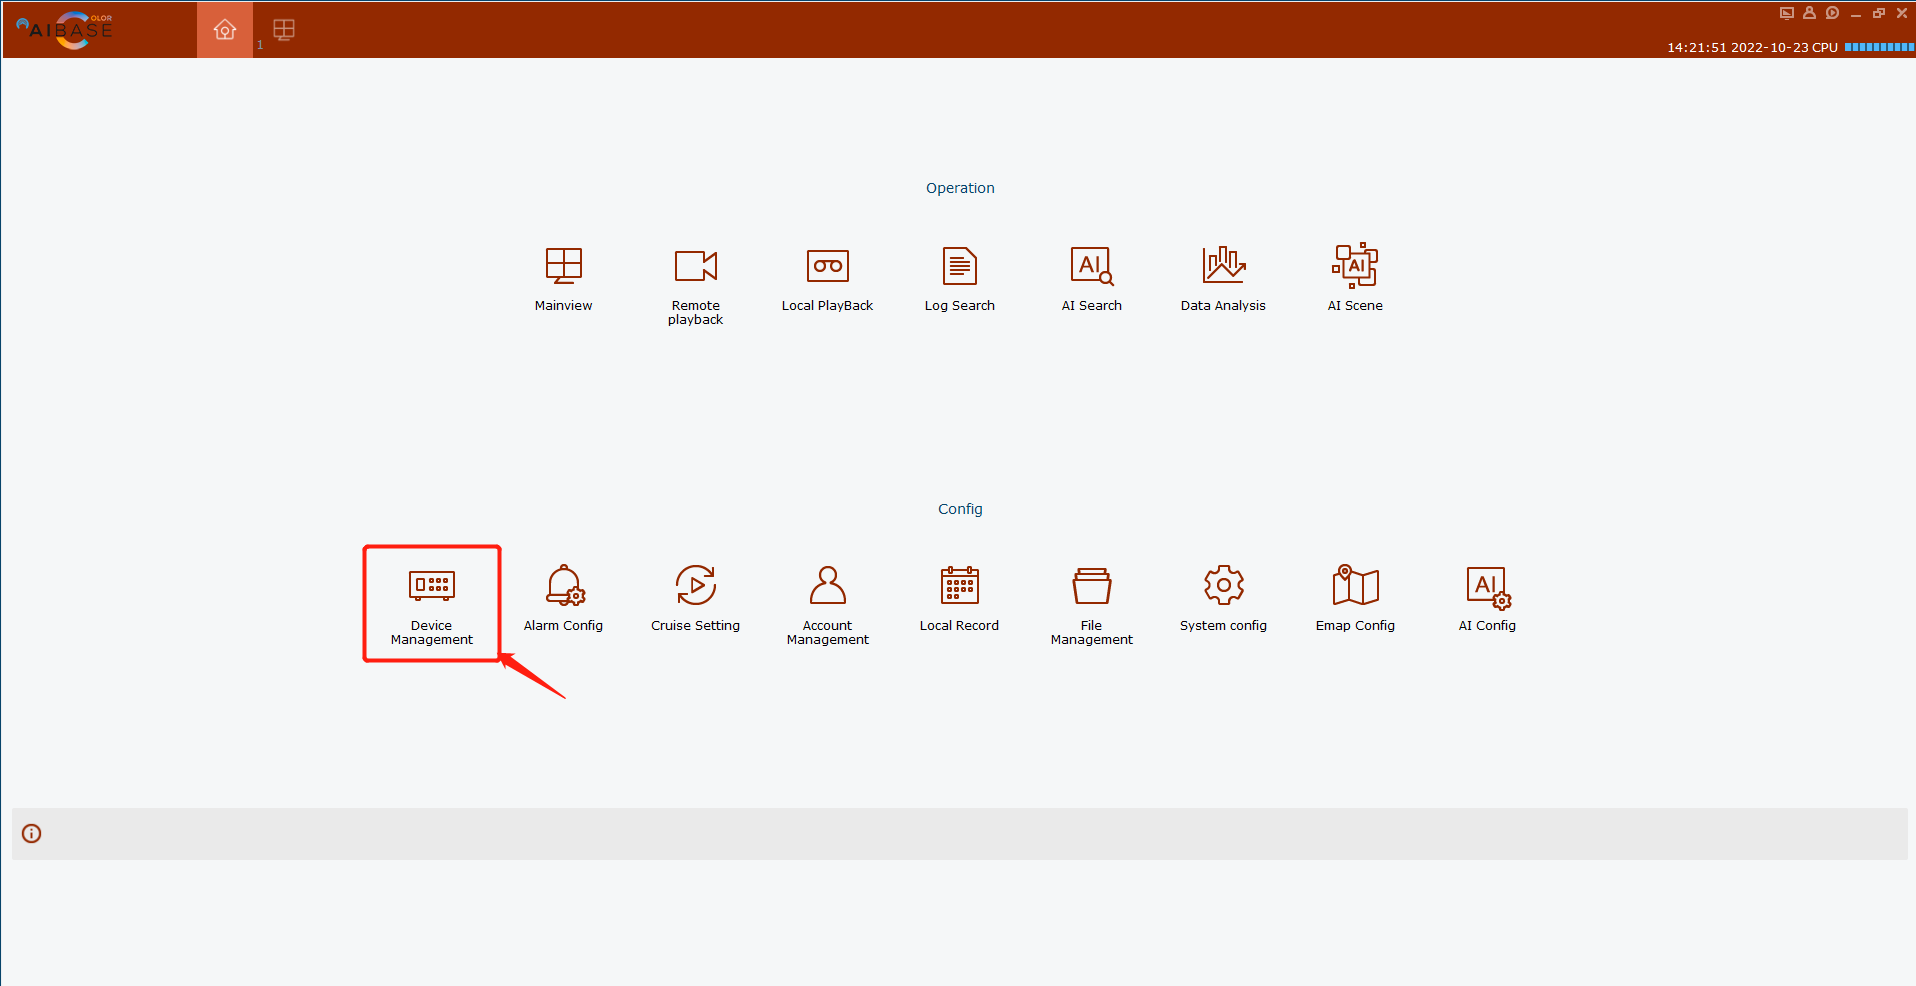
How to add device in AI Color VMS
- Updated on 23 Oct 2022
- 1 Minute to read
Description
This article will show you how to add device in AI Color VMS
Step by Step instruction
- Install AI Color VMS software in to your computer.
- login to the VMS and hit on Device Management.
- Hit on the Plus icon on the top right corner then a dialog box will pop up.
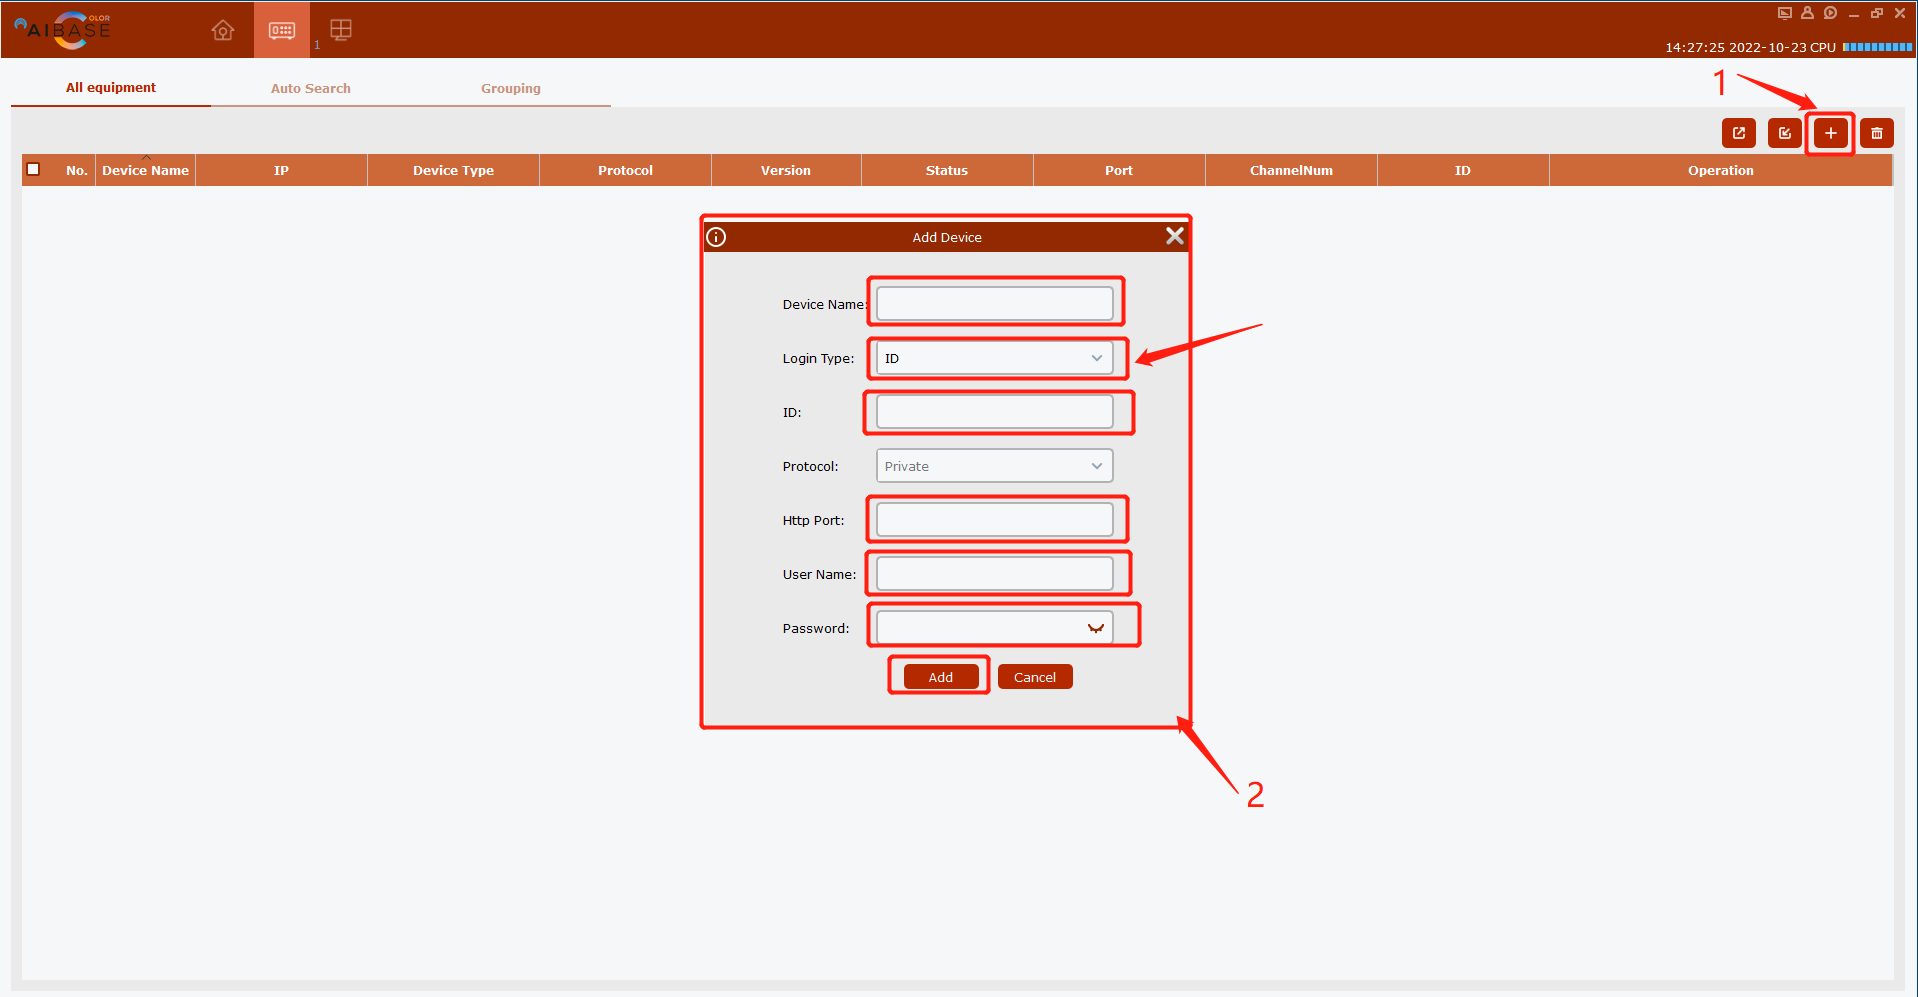
- Assigh a Device Name. You can choose the login Type to be IP if you computer is connected in the same networ segment of the device, or you can choose ID as the login Type.
- Enter the Device ID, http port, user name and password then click on Add button.
AI Color VMS liveview instruction
- Updated on 23 Oct 2022
- 1 Minute to read
Description
This article is the instruction of the Liveview in AI Color VMS
Step by Step instruction
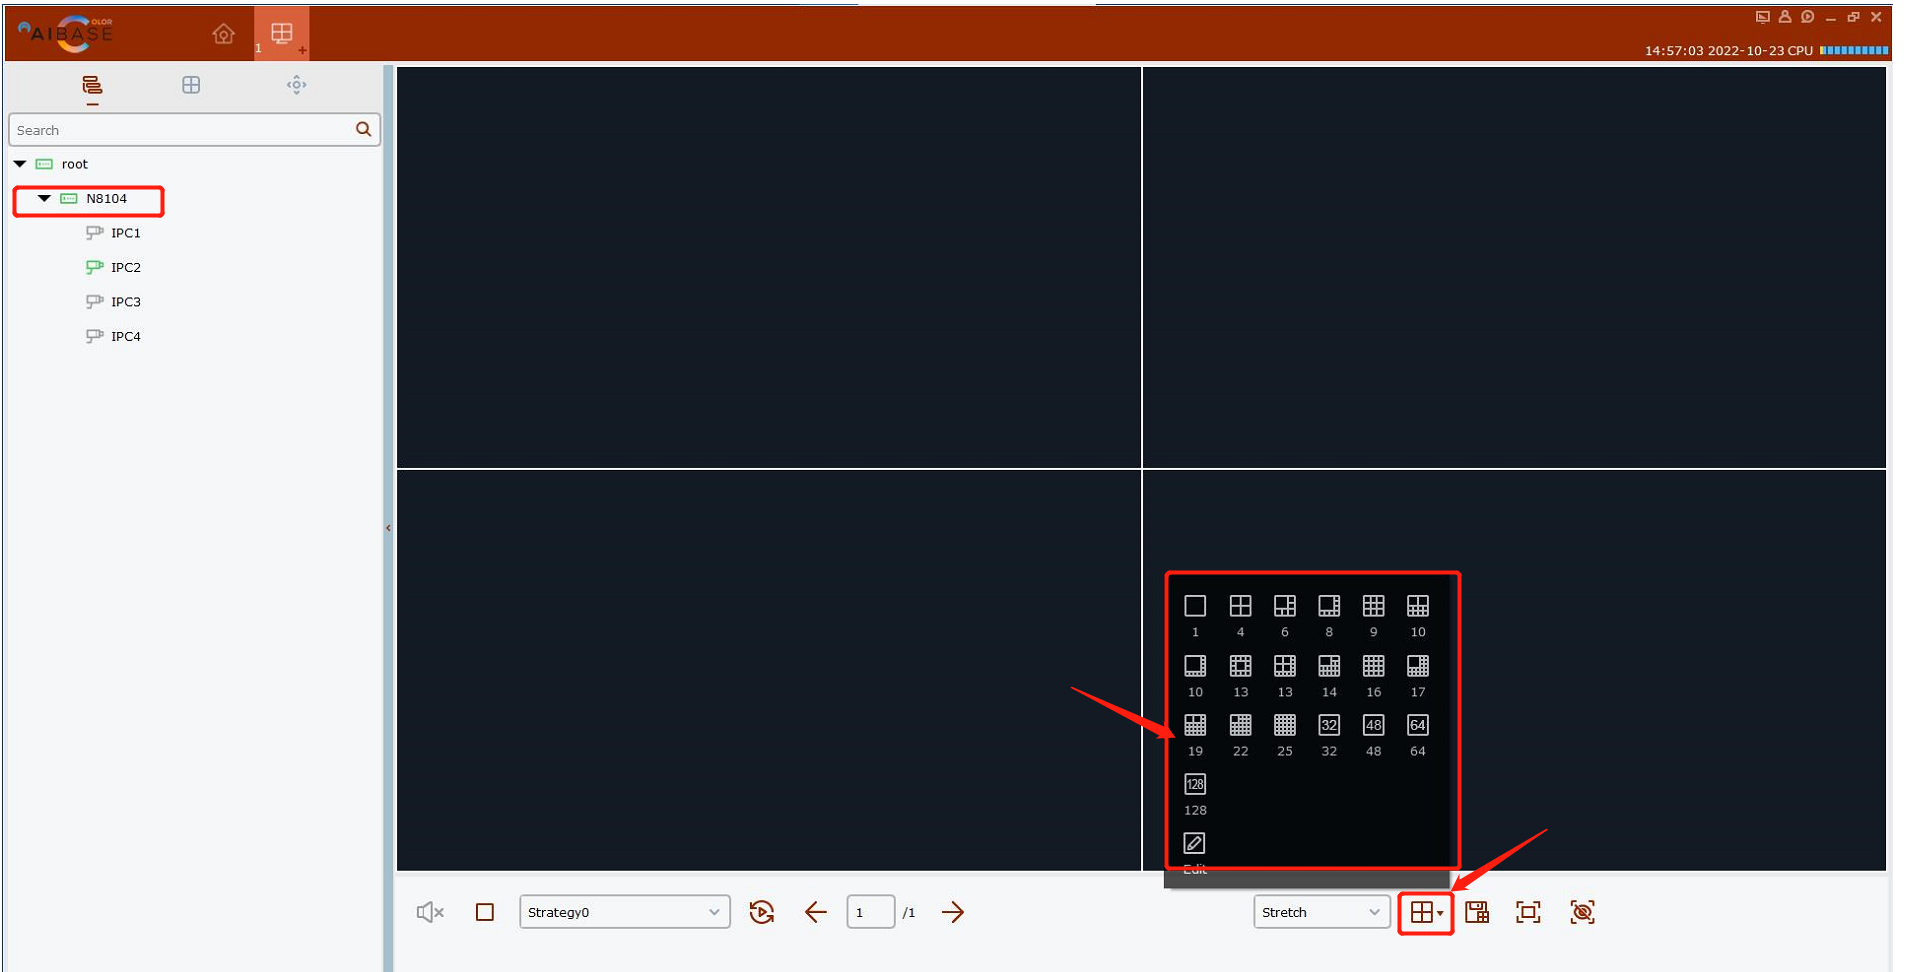
- Clivk on the Mainview of VMS home page
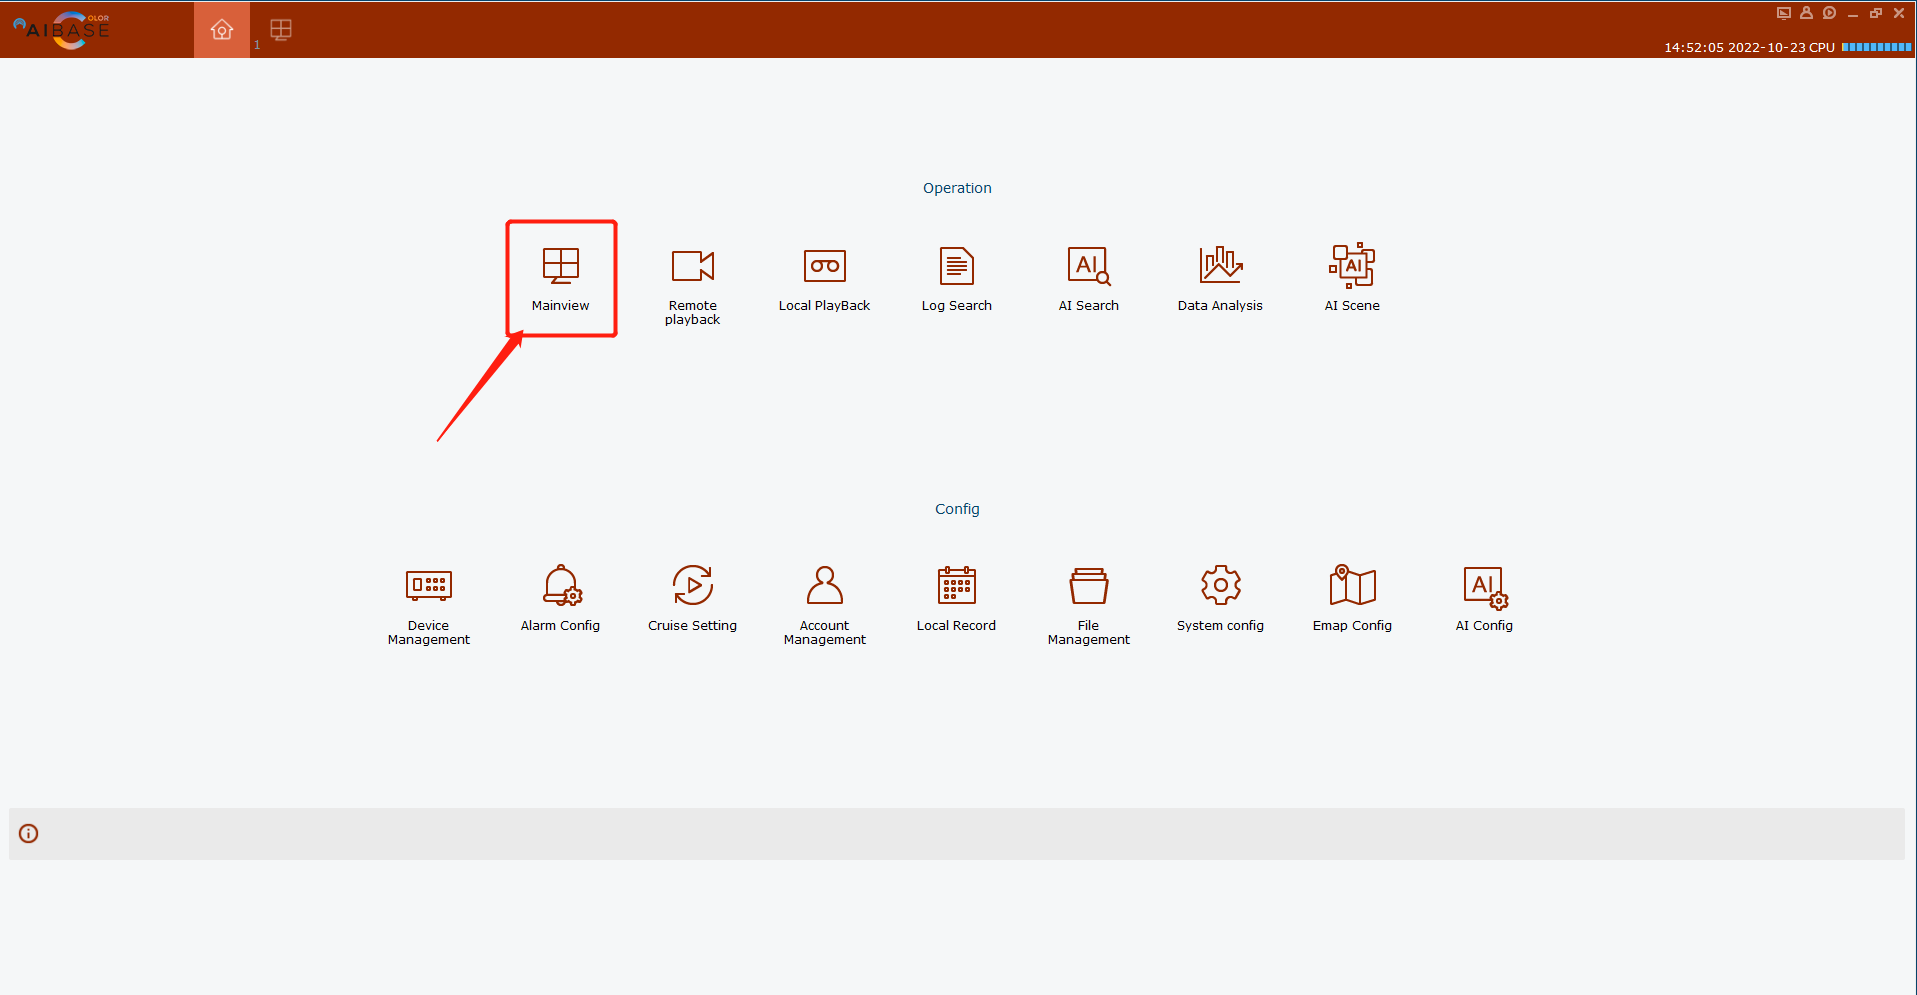
- On the mainview page, hit the icon and select the views you want to see.
AI Color VMS playback and backup videos guide
- Updated on 23 Oct 2022
- 1 Minute to read
Description
**This article is the instruction of playback and bacup videos through AI Color VMS software **
Step by Step instruction
- Hit Remote Playback on home page
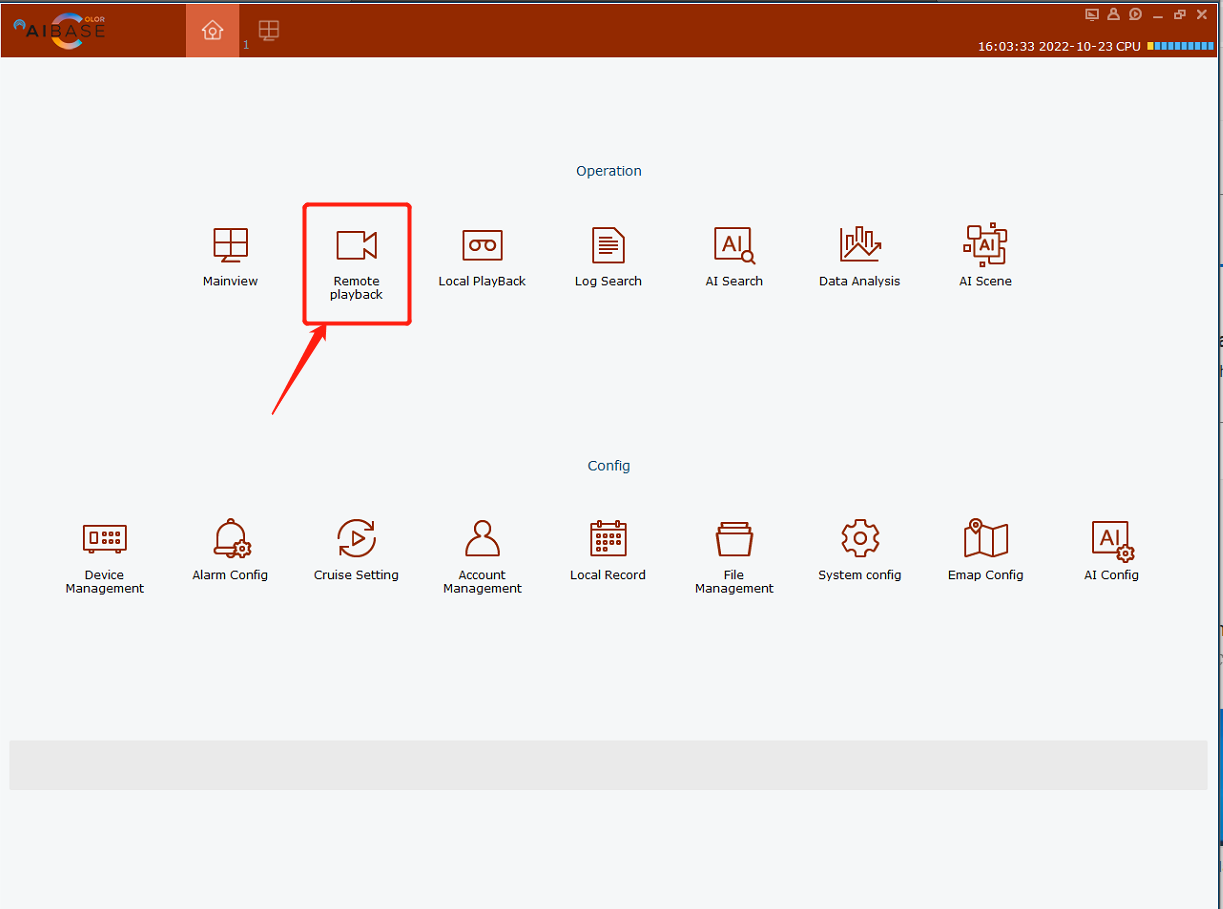
-
On the playback page, select the date and time, stream type, record type of the channel, which you want to playbac or bacup then hit search.
-
Hit the Scissors icon to adjust the time period that you want to bacup, then click download button to save the video to a path.
NVR remote control via AI Color VMS
- Updated on 24 Oct 2022
- 1 Minute to read
Description
This article shows how to remote control NVR via AI Color VMS software
Step by Step instruction
Through AI Color VMS software, you can do most of control as same as on the local.
You can operate the NVR / DVR such as monitoring the Liveview, playback, intelligent search etc.,
You can also doing the device configuration through the AI Color VMS.
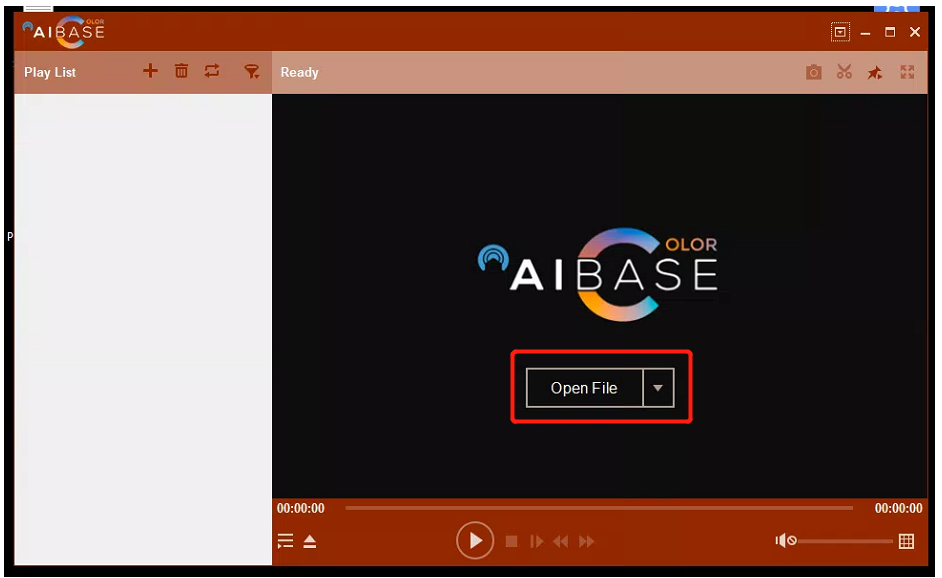
How to playback video clip via AI color player
- Updated on 23 Oct 2022
- 1 Minute to read
Description
This article will show you how to playback video clip via AI Color player
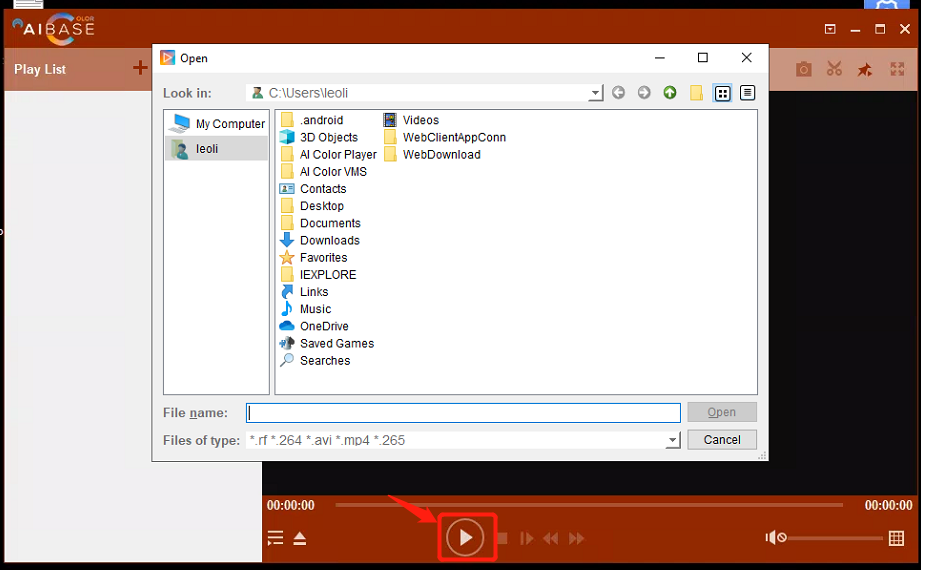
Step by Step instruction
- You can download and install AI Color Player.
- Turn on the AI Color Player. select the video clip file, which you are backed up then hit the play button.